
| Version 4 (modified by , 11 years ago) (diff) |
|---|
EG-EXP-7: Click Router Experiment Acceptance Test
This page captures status for the test case EG-EXP-2, which verifies a click router scenario between two racks. For overall status see the InstaGENI Acceptance Test Status page.
Last update: 2013/01/09
Test Status
This section captures the status for each step in the acceptance test plan.
| Step | State | Date completed | Ticket | Comments |
| Step 1 | ||||
| Step 2 | ||||
| Step 3 | ||||
| Step 4 | ||||
| Step 5 | ||||
| Step 6 | ||||
| Step 7 | ||||
| Step 8 | ||||
| Step 9 | ||||
| Step 10 | ||||
| Step 11 | ||||
| Step 12 | ||||
| Step 13 | ||||
| Step 14 | ||||
| Step 15 | ||||
| Step 16 |
| State Legend | Description |
| Color(green,Pass)? | Test completed and met all criteria |
| Color(#98FB98,Pass: most criteria)? | Test completed and met most criteria. Exceptions documented |
| Color(red,Fail)? | Test completed and failed to meet criteria. |
| Color(yellow,Complete)? | Test completed but will require re-execution due to expected changes |
| Color(orange,Blocked)? | Blocked by ticketed issue(s). |
| Color(#63B8FF,In Progress)? | Currently under test. |
Test Plan Steps
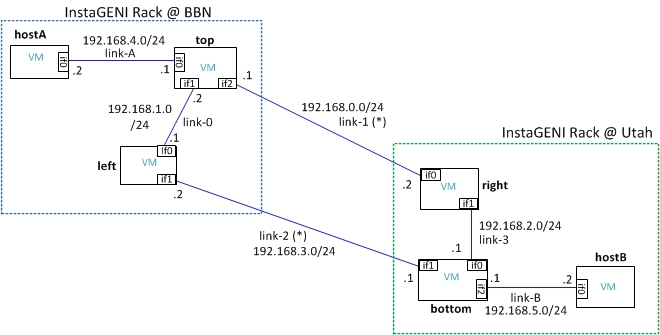
the following aggregate manager nicknames are used:
ig-utah=,https://utah.geniracks.net/protogeni/xmlrpc/am/2.0
ig-gpo=,https://instageni.gpolab.bbn.com/protogeni/xmlrpc/am/2.0
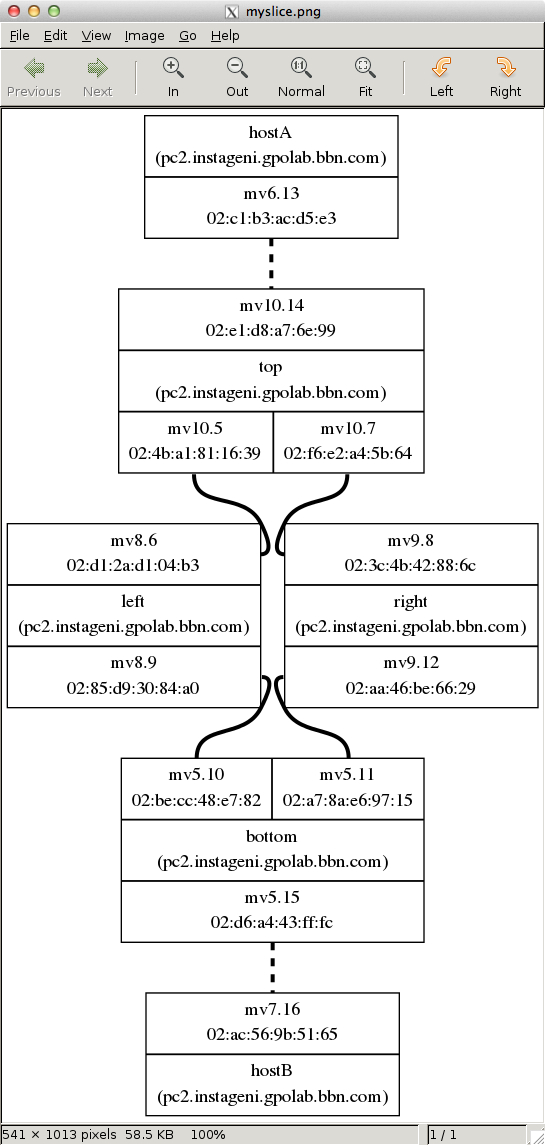
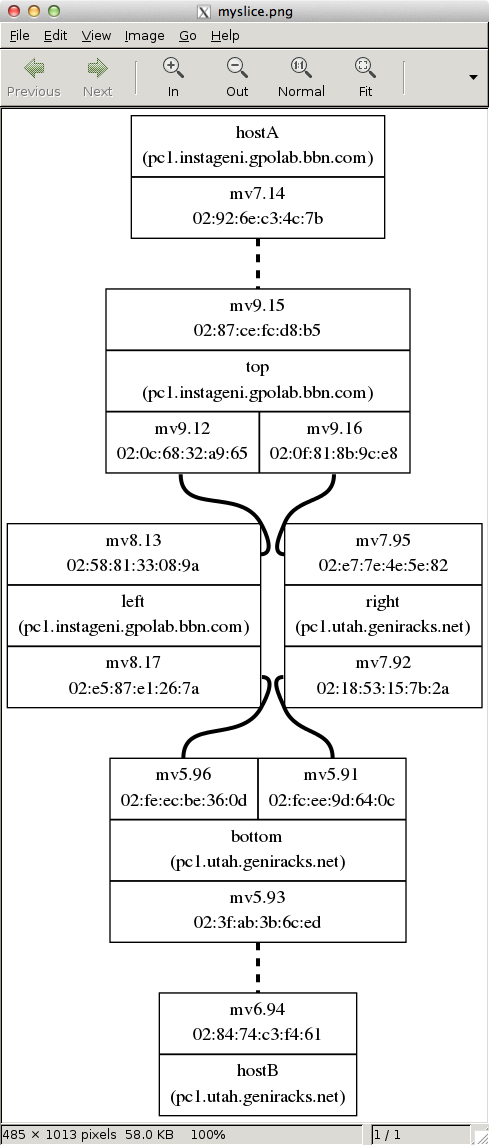
1. As Experimenter1, request ListResources from GPO and Utah InstaGENI
As user lnevers@bbn.com requested listresources from GPO and Utah InstaGENI aggregates:
$ omni.py listresources -a ig-gpo -o
$ omni.py listresources -a ig-utah -o
2. Review ListResources output from both AMs
Reviews output files "rspec-instageni-gpolab-bbn-com-protogeniv2.xml" and "spec-utah-geniracks-net-protogeniv2.xml" to determine available resources.
3. Define a request RSpec for three VMs at BBN InstaGENI
4. Define a request RSpec for three VMs at Utah InstaGENI
5. Create slice
6. Create a sliver
In the slice IG-EXP-7 create a slivers at each AM, using the RSpecs defined above.
7. Install Click router
Download the Click Router software on the 4 nodes that will be routers in the experiment. Build the user-level Click program in the 'userlevel' directory on each of the 4 router nodes.
8. Determine Click router settings
Determine the interface to MAC address mapping, and various settings required for the 4 router node and modify click configuration.
9. Run the user-level Click router
Run the user-level Click router by providing the configuration file name as an argument on each node.
10. Log in to Host1 and send traffic to host2
Log in to Host1 and send traffic to host2 and leave traffic running.
11. Review Click logs on each Click router
16. Delete slivers
Attachments (7)
- myslice.jpg (209.9 KB) - added by 11 years ago.
- IG-EXP-7-gpo.jpg (44.0 KB) - added by 11 years ago.
- IG-EXP-7.jpg (82.1 KB) - added by 11 years ago.
- myslice2.jpg (195.6 KB) - added by 11 years ago.
- combined-manifest.xml (13.2 KB) - added by 11 years ago.
- IG-EXP-7-manifest-rspec-instageni-gpolab-bbn-com-protogeniv2.xml (10.7 KB) - added by 11 years ago.
- IG-EXP-7-manifest-rspec-utah-geniracks-net-protogeniv2.xml (10.4 KB) - added by 11 years ago.
Download all attachments as: .zip