
| Version 5 (modified by , 10 years ago) (diff) |
|---|
IDMS Experiment in GENI
The persistent IDMS experiment allows other users to attach at shared VLAN sites, granting access to the available storage resources. Users may then upload and download their experiment data using a set of client tools. IDMS provides:
- A custom RSpec that configures a node to access the IDMS experiment
- Nodes use DHCP to lease an address within the IDMS data plane subnet
- Automatically installed client tools to upload/download data to available storage nodes
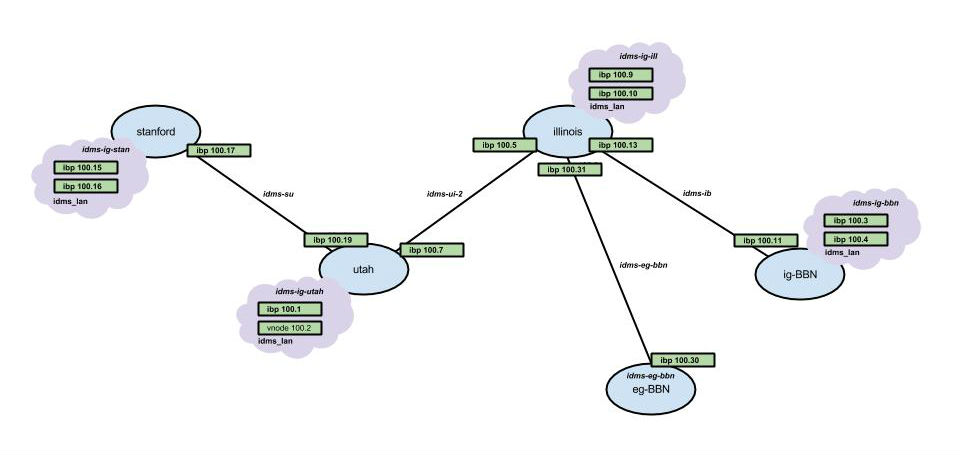
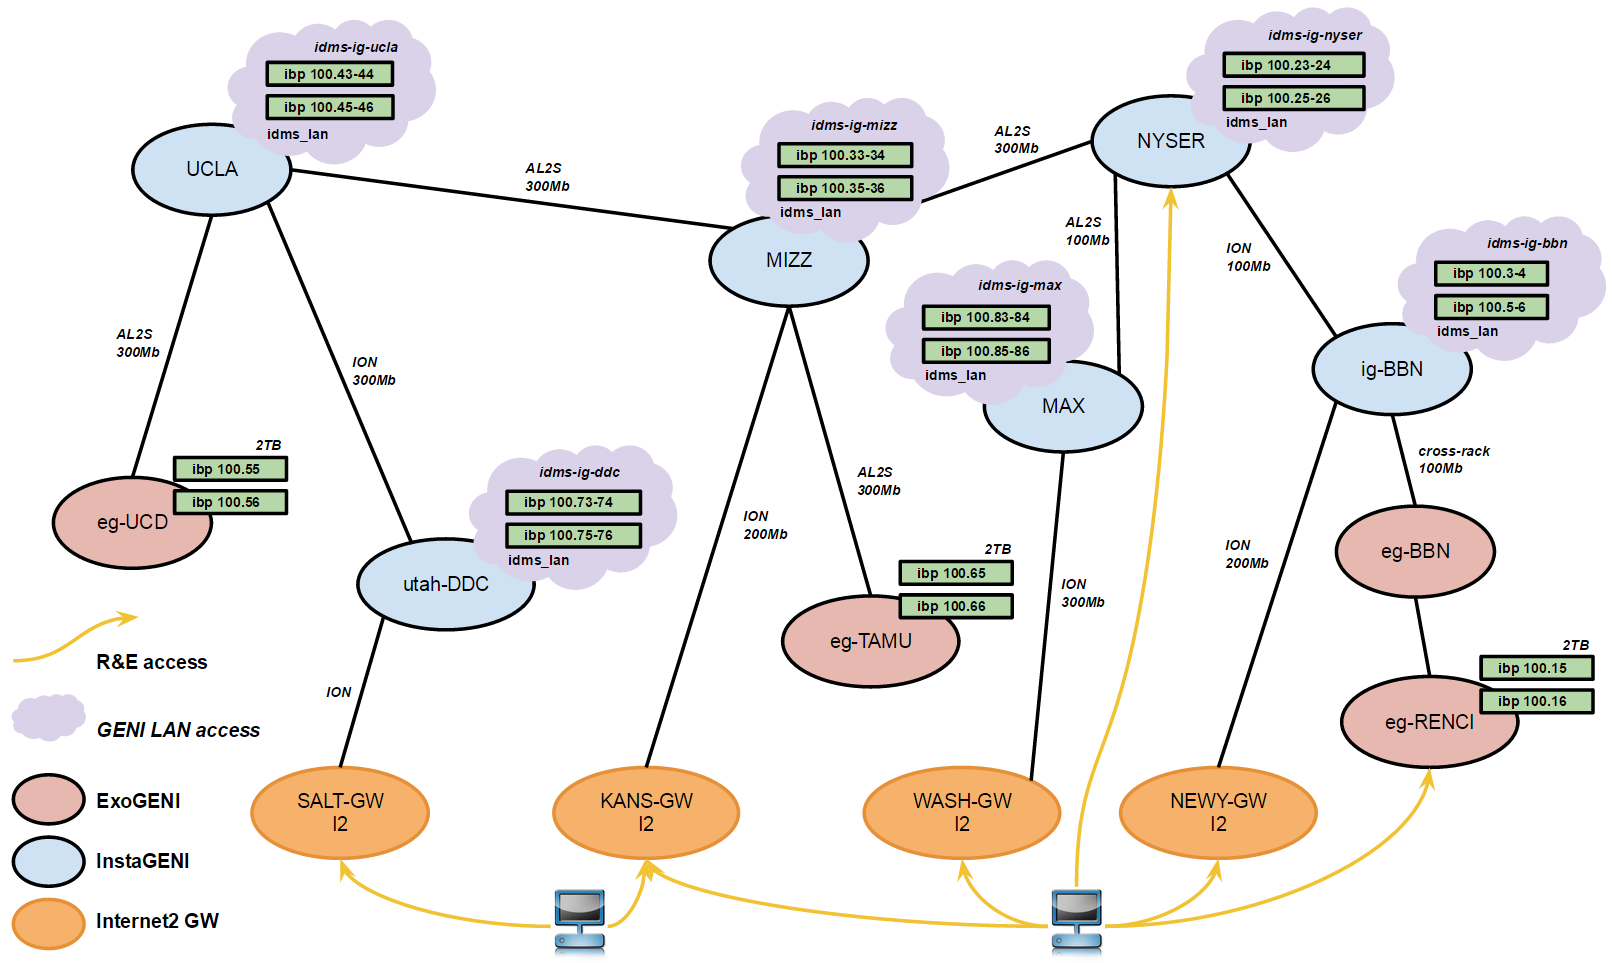
Base Experiment Topology
Shared VLANs at Stanford, Utah, Illinois, ig BBN and eg BBN
- Stitching between the shared VLAN sites to create a cross-country data plane
- Phoebus Gateways on ProtoGENI backbone nodes for external access to the experiment and to improve WAN transfer performance
- DHCP server at illinois-ig - 10.10.150.0

Prerequisite
In order to go through this tutorial you will need to use a tool for reserving resources. You can use either Flack or Omni. If you haven't used any of these tools before, please go through the introductory tutorials first.
- Flack tutorial. Flack is graphical web tool.
- Omni tutorial. Omni is a command line tool.
1. Create your experiment
 |
- Create a slice . Name your slice something like xxxomni (where xxx are your initials).
- Reserve resources . In this step we are going to reserve resources using the rspec file from this URL: http://www.gpolab.bbn.com/experiment-support/Layer2Ping/layer2ping.rspec. The topology that this rspec describes looks like the diagram on the left.
- Wait until your resources are ready
2. Run your experiment
Now that resources are ready we can start running our experiment.
- Login to all the reserved hosts. We will first start by logging in to both of our reserved nodes. If you don't know how to login to your nodes please follow these instructions.
- Send IP traffic The first simple experiment that we will run is to verify the IP connectivity between our hosts.
- Check the interfaces of your nodes. In the terminal type:
/sbin/ifconfig
You should see at least two interfaces:- The control interface. This is the interface from where you access the node, e.g. ssh into your host. The control interface is mainly used for control traffic, i.e. traffic for controlling the node and the experiment. The control interface usually has a publicly routable IP.
- The data interface. This is the interface that is used for sending experimental traffic. This is the interface that connects to the other hosts of your experiment through GENI. The links between these interfaces are the ones that allow you to run non-IP experiments.
- Note the name and the MAC address of the control and of the data interface for each node. The data interface is the one that has an IP that starts with 10.
- From the client ping the server. From the xterm that is logged in to the client type :
ping server -c 5
Note: You can use the name that is assigned to the host to directly ping the host, you can also ping using the IP of the data interface of the node. An example output should look like :[[inki@r2 ~]$ ping server -c 5 PING 10.10.2.1 (10.10.2.1) 56(84) bytes of data. 64 bytes from 10.10.2.1: icmp_seq=1 ttl=64 time=1.95 ms 64 bytes from 10.10.2.1: icmp_seq=2 ttl=64 time=2.27 ms 64 bytes from 10.10.2.1: icmp_seq=3 ttl=64 time=2.04 ms 64 bytes from 10.10.2.1: icmp_seq=4 ttl=64 time=1.95 ms 64 bytes from 10.10.2.1: icmp_seq=5 ttl=64 time=1.72 ms --- 10.10.2.1 ping statistics --- 5 packets transmitted, 5 received, 0% packet loss, time 4005ms rtt min/avg/max/mdev = 1.728/1.992/2.278/0.179 ms
- Check the interfaces of your nodes. In the terminal type:
- Send non-IP traffic. GENI provides the capability of running non-IP experiments, since you can connect your hosts at Layer 2. For the purpose of this tutorial we have installed in all the hosts a very simple Layer 2 ping program that sends packets using a custom ethernet type.
- Disable the IP in your nodes. First of all we are going to completely disable IP on our nodes. In each of the terminals type:
sudo /sbin/ifconfig <data i/f name> 0.0.0.0
Note: Be extra careful to bring down the IP on the data interface, bringing down the IP on the control interface means that you will lose connectivity to your host. - Try again to ping from the client to the server. In the xterm of the client type:
ping server -c 5
This time the ping should timeout. - Start the Layer 2 ping server: In the server xterm, type:
sudo /usr/local/bin/pingPlusListener 12345
- From the client try to ping the server at layer 2. You will need the mac address of the data interface of the server and the name of the data interface of the client. In the xterm of the client, type:
sudo /usr/local/bin/pingPlus <server data mac addr> <client data i/f name> 12345
The result should look like :[uncusr20@client ~]$ sudo /usr/local/bin/pingPlus 02:00:9B:48:3E:20 mv1.1 12345 RQ:'5582+2067' to 2:0:9b:48:3e:20. RQ:5582+2067 from 2:0:3e:15:6c:ab.
- Disable the IP in your nodes. First of all we are going to completely disable IP on our nodes. In each of the terminals type:
Congratulations you have run a Layer 2 experiment in GENI!
3. Cleanup
Although all your reservations, have expiration times, you should always release your resources once you have completed your experiment to make them available to other experimenters.
Attachments (3)
- idms_gec201.jpg (40.5 KB) - added by 10 years ago.
- ig_idms_user.xml (1.8 KB) - added by 9 years ago.
- idms_gec22.png (213.6 KB) - added by 9 years ago.
Download all attachments as: .zip