
| Version 13 (modified by , 9 years ago) (diff) |
|---|
Sample Assignment: Writing a Web Server
Purpose
The goal of this assignment is to build a functional web server. This assignment will guide you through you the basics of distributed programming, client/server structures, and issues in building high performance servers.
This assignment is based on a course assignment used at the Distributed Systems Course offered by the Computer Science Department of Williams College and taught by Professor Jeannie Albrecht.
Prerequisites
Before beginning this experiment, you should be prepared with the following.
- You have GENI credentials to obtain GENI resources. (If not, see SignMeUp).
- You are able to use to request GENI resources using Jacks or Flack. (If not, see the Hello GENI tutorial).
- You are comfortable using ssh and executing basic commands using a UNIX shell. Tips about how to login to GENI hosts.
- You are comfortable with coding in C or C++
Setup
- Create a new slice using the resource reservation tool of your choice (Jacks / Portal, Omni, Flack).
- Reserve the RSpec from this URL at any InstaGENI aggregate (for example, UtahDDC InstaGENI): http://www.gpolab.bbn.com/experiment-support/WebServer/websrv.rspec.
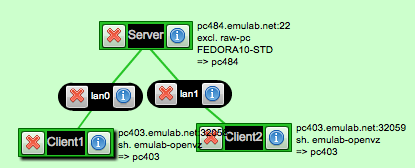
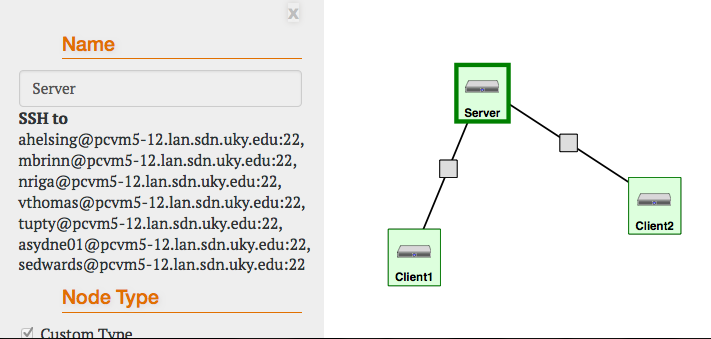
- Your sliver should look something like this:

In this setup, there is one host acting as a web server. To test that the webserver is up visit the web page of the Server host, use either of the following techniques:
- Open a web browser and go to the webpage http://<hostname>. In the above example this would be http://pcvm5-12.lan.sdn.uky.edu/, or use IP addresses directly.
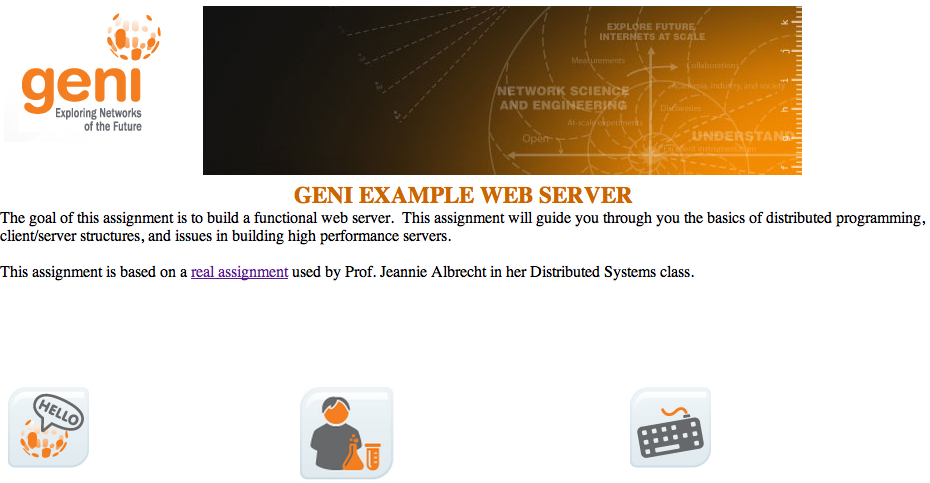
If the installation is successful you should see a page that is similar to this:

Note that the installation of the server may take a few minutes after the node becomes ready. If it doesn't work immediately, wait a few minutes and try again.
(If you would like to follow the progress of the installation you can log into the Server node and do tail -f /var/emulab/logs/runlog.g0G1QO where runlog.g0G1QO is replaced by the appropriate file from that directory on your node.)
Techniques
You will use the following techniques during this experiment.
Start and stop the web server
In the original setup of your sliver there a webserver already installed and running on the Server host. As you implement your own webserver you might need to stop
or start the installed webserver.
- To Stop the webserver run:
sudo service apache2 stop
To verify that you have stopped the webserver, try to visit the above web page, you should get an error. (You may need to refresh your browser, if it has cached the page from a previous visit.)
- To Start the webserver run:
sudo service apache2 start
Command Line Web Transfers
Instead of using a web browser, you can also use command line tools for web transfers. To do this, follow these steps:
- Log in to
Client1. - You can download the web page using this command
[inki@Client1 ~]$ wget http://server
--2012-07-06 04:59:09--  http://server/
Resolving server... 10.10.1.1
Connecting to server|10.10.1.1|:80... connected.
HTTP request sent, awaiting response... 200 OK
Length: 548 [text/html]
Saving to: “index.html”

100%[======================================>] 548         --.-K/s   in 0s

2012-07-06 04:59:09 (120 MB/s) - “index.html” saved [548/548]
Note: In the above command we usedhttp://serverinstead ofhttp://pcvm5-12.lan.sdn.uky.eduso that we can contact the web server over the private connection we have created, instead of the server's public interface. The private connections are the ones that are represented with lines between hosts in Jacks and Flack. When you do load testing on your web server, you should run tests from the two client machines in your test configuration, using thehttp://serveraddress, so that you are testing the performance of your server and not your Internet connection to the lab.
- The above command only downloads the
index.htmlfile from the webserver. As we are going to see later a web page may include other web pages or objects such as images, videos etc. In order to forcewgetto download all dependencies of a page use the following options:[inki@Client1 ~]$ wget -m -p http://server
This will produce a directory,server, with the following data structure. Run:[inki@Client1 ~]$ ls server/ home.html index.html links.html media top.html
Build your own Server
At a high level, a web server listens for connections on a socket (bound to a specific port on a host machine). Clients connect to this socket and use a simple text-based protocol to retrieve files from the server. For example, you might try the following command on Client1:
% telnet server 80
GET /index.html HTTP/1.0
(Type two carriage returns after the "GET" command). This will return to you (on the command line) the HTML representing the "front page" of the web server that is running on the Server host.)
One of the key things to keep in mind in building your web server is that the server is translating relative filenames (such as index.html) to absolute filenames in a local filesystem. For example, you might decide to keep all the files for your server in ~10abc/cs339/server/files/, which we call the document root. When your server gets a request for index.html (which is the default web page if no file is specified), it will prepend the document root to the specified file and determine if the file exists, and if the proper permissions are set on the file (typically the file has to be world readable). If the file does not exist, a file not found error is returned. If a file is present but the proper permissions are not set, a permission denied error is returned. Otherwise, an HTTP OK message is returned along with the contents of a file.
In our setup we are using the Apache web server. The default document root for Apache on a host running Ubuntu 12 is under /var/www.
- Login to the
Serverhost - Run
[inki@server ~]$ ls /var/www/
This should give you a similar structure to the directory structure you got when you downloaded the whole site with wget on the previous steps.
You should also note that since index.html is the default file, web servers typically translate "GET /" to "GET /index.html". That way index.html is assumed to be the filename if no explicit filename is present. This is also why the two URLs http://server (or http://pcvm5-12.lan.sdn.uky.edu) and http://server/index.html (or http://pcvm5-12.lan.sdn.uky.edu/index.html) return equivalent results.
When you type a URL into a web browser, the server retrieves the contents of the requested file. If the file is of type text/html and HTTP/1.0 is being used, the browser will parse the html for embedded links (such as images) and then make separate connections to the web server to retrieve the embedded files. If a web page contains 4 images, a total of five separate connections will be made to the web server to retrieve the html and the four image files.
Using HTTP/1.0, a separate connection is used for each requested file. This implies that the TCP connections being used never get out of the slow start phase. HTTP/1.1 attempts to address this limitation. When using HTTP/1.1, the server keeps connections to clients open, allowing for "persistent" connections and pipelining of client requests. That is, after the results of a single request are returned (e.g., index.html), the server should by default leave the connection open for some period of time, allowing the client to reuse that connection to make subsequent requests. One key issue here is determining how long to keep the connection open. This timeout needs to be configured in the server and ideally should be dynamic based on the number of other active connections the server is currently supporting. Thus if the server is idle, it can afford to leave the connection open for a relatively long period of time. If the server is busy servicing several clients at once, it may not be able to afford to have an idle connection sitting around (consuming kernel/thread resources) for very long. You should develop a simple heuristic to determine this timeout in your server.
For this assignment, you will need to support enough of the HTTP/1.0 and HTTP/1.1 protocols to allow an existing web browser (Firefox) to connect to your web server and retrieve the content offered now by the Apache server from your server. Note that you DO NOT have to support script parsing (php, javascript), and you do not have to support HTTP POST requests. You should support images, and you should return appropriate HTTP error messages as needed.
At a high level, your web server will be structured something like the following:
Forever loop: Listen for connections
- Accept new connection from incoming client
- Parse HTTP request
- Ensure well-formed request (return error otherwise)
- Determine if target file exists and if permissions are set properly (return error otherwise)
- Transmit contents of file to connect (by performing reads on the file and writes on the socket)
- Close the connection (if HTTP/1.0)
You will have three main choices in how you structure your web server in the context of the above simple structure:
- A multi-threaded approach will spawn a new thread for each incoming connection. That is, once the server accepts a connection, it will spawn a thread to parse the request, transmit the file, etc.
- A multi-process approach maintains a worker pool of active processes to hand requests off to from the main server. This approach is largely appropriate because of its portability (relative to assuming the presence of a given threads package across multiple hardware/software platform). It does face increased context-switch overhead relative to a multi-threaded approach.
- An event-driven architecture will keep a list of active connections and loop over them, performing a little bit of work on behalf of each connection. For example, there might be a loop that first checks to see if any new connections are pending to the server (performing appropriate bookkeeping if so), and then it will loop overall all existing client connections and send a "block" of file data to each (e.g., 4096 bytes, or 8192 bytes, matching the granularity of disk block size). This event-driven architecture has the primary advantage of avoiding any synchronization issues associated with a multi-threaded model (though synchronization effects should be limited in your simple web server) and avoids the performance overhead of context switching among a number of threads.
You may choose from C or C++ to build your web server but you must do it in Linux (although the code should run on any Unix system). In C/C++, you will want to become familiar with the interactions of the following system calls to build your system: socket(), select(), listen(), accept(), connect() . We outline a number of resources below with additional information on these system calls. A good book is also available on this topic.
What to hand in
- Write a paper that describes your chosen architecture and implementation details. Describe any problems that you encountered. In addition to describing the structure of your server, include a discussion that addresses the following questions:
- Web servers often use ".htaccess" files to restrict access to clients based on their IP address. Although it wasn't required, how would you go about supporting .htaccess in your server?
- Performance differences between HTTP/1.0 and HTTP/1.1. Can you think of a scenario in which HTTP/1.0 may perform better than HTTP/1.1? Can you think of a scenario when HTTP/1.1 outperforms HTTP/1.0? Think about bandwidth, latency, and file size. Consider some of the pros and cons of using a connection per session versus using a connection per object. The difference between the two comes down to the following:
- Only a single connection is established for all retrieved objects, meaning that slow start is only incurred once (assuming that the pipeline is kept full) and that the overhead of establishing and tearing down a TCP connection is also only incurred once.
- However, all objects must be retrieved in serial in HTTP/1.1 meaning that some of the benefits of parallelism are lost.
- Submit the code of your webserver. Make the server document directory (the directory which the webserver uses to serve files) a command line option. The command line option must be specified as -document_root. Make the port that the server listens on a command line option. The option must be specified as -port . Thus, I should be able to run your server as
$ ./server -document_root "/tmp/assignment1_files" -port 8888
(Note that you should use ports between 8000 and 9999 for testing purposes.)
Attachments (4)
- WebsrvExampleSliver.png (27.5 KB) - added by 12 years ago.
- WebsrvIndex.png (153.9 KB) - added by 12 years ago.
- WebsrvExampleSliverJacks.png (64.0 KB) - added by 9 years ago.
- websrv.rspec (3.4 KB) - added by 7 years ago.
Download all attachments as: .zip