
| Version 20 (modified by , 8 years ago) (diff) |
|---|
SDN Tutorial Using GENIDesktop and Adopt-A-GENI
The Adopt-A-GENI project makes it easy to incorporate SDN network resources into a GENI experiment.
This tutorial will guide you through the automatic process of setting up a Software-Defined Networking experiment using the GENIDesktop. You will perform flow management and monitoring tasks using the GENIDesktop's modules and the topology view of the experiment.
Goals
In this experiment you will learn how to do the following tasks:
- Enable Adopt-A-GENI (AAG) features in the GENI Desktop
- Setup an SDN experiment using OVS and Floodlight/RYU controller with NO manual configuration
- Setup and configure shortest path flows for communication between hosts through a graphical module
- Interact with the topology view of the network to install custom flows
- Live monitor flow counters present at installed flow rules
- Distribute a single flow entry to multiple OVS nodes
Prerequisites
- A GENI account, if you don't already have one sign up!
- Familiarity with reserving GENI resources using JACKS. See Jacks A First Experiment Using GENI and Jacks Tool
- Familiarity with the UNIX command line and networking tools (e.g. ssh, ping, iperf)
Tools
- Latest version of Firefox or Google Chrome browser
- Pop-up blockers and Javascript blockers disabled
Where to get help:
- If you need help with GENIDesktop, please email us at geni-users@googlegroups.com
Tutorial Instructions
Exercises/Tasks
- Create the Experiment:
- Login to the GENIDesktop As usual. If you need help see the GENIDesktop Manual Login page.
- Create a slice as usual. If you need help see the GENIDesktop Manual Create A Slice page.
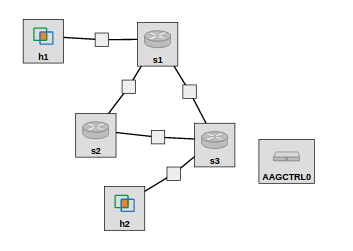
- Allocate Resources for the topology below using JACKS in the GENIDesktop. If you need help see the GENIDesktop Manual JACKS page (but we are not using the topology listed on that page).
In this tutorial we will be using Open vSwitch (OVS) nodes to represent OpenFlow Software Switches  and XEN VMs nodes to represent hosts
  . The general topology is:

Rename your nodes to match the given topology. Click node name, then type in the new name in the Name box in the left side dialog box.
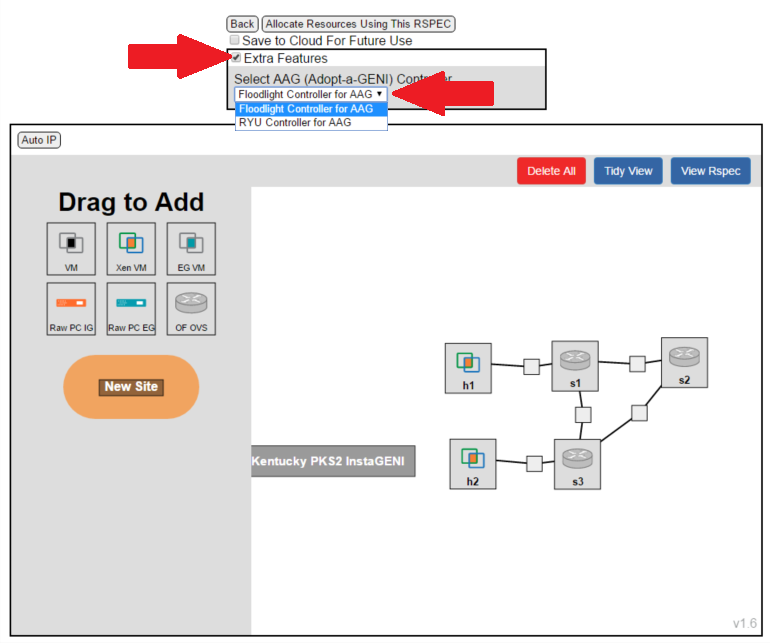
Before allocating the resources, click the Extra Features checkbox. You may choose between a "Floodlight Controller for AAG" or an "RYU Controller for AAG". For this tutorial we will be using the default option of "Floodlight Controller for AAG".

Click Allocate Resources Using This RSPEC
- Running Experiments: Load and execute code
- Viewing Traffic: SSH into nodes, generate and view traffic
- GENIDesktop CLI: Perform GENIDesktop operations using a Command Line Interface.
Create Experiment
- Login to GENIDesktop
1.1 === Create Slice === 1.2 === Allocate Resources using JACKS and the GENIDesktop ===
1.3 ==== Wait for slice to be allocated and instrumentized ===
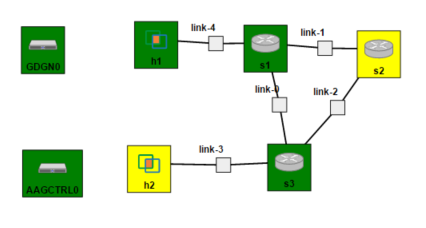
The controller node will automatically be added by the GENIDesktop when the slice is allocated.
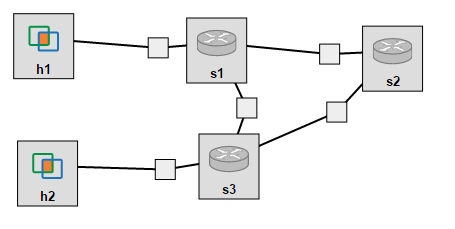
In this tutorial we will be using Open vSwitch (OVS) to represent OpenFlow Software Switches and XEN VMs to represent hosts. The controller node is automatically added by the GENIDesktop. The general topology is:

Attachments (9)
- topo.png (9.9 KB) - added by 8 years ago.
- xen_node.png (1.1 KB) - added by 8 years ago.
- ovs_node.png (1.9 KB) - added by 8 years ago.
- allocate_topo.png (9.7 KB) - added by 8 years ago.
- initial_topology_arrows.png (78.8 KB) - added by 8 years ago.
- progress.png (224.9 KB) - added by 8 years ago.
- final_topo.png (18.0 KB) - added by 8 years ago.
- booting.png (18.0 KB) - added by 8 years ago.
- welcome.png (97.3 KB) - added by 8 years ago.
Download all attachments as: .zip