
| Version 35 (modified by , 10 years ago) (diff) |
|---|
Understanding the AM API

1. Design the Experiment
|
2. Establish the Environment
2.1 Pre-work: Create a GENI account
|

Figure 2-1 Logging into the GENI Experimenter Portal. |
Congratulations, you have successfully created a GENI account.
2.2 Pre-work: Project lead adds you to a project
In order to use the portal to reserve resources, you must join a project.
|
2.3 Pre-work: Ensure SSH keys are setup
Access to compute resources in GENI is provided through ssh key pairs and thus the portal needs a public key to upload to compute resources. For the purposes of the tutorial we will have the portal create an SSH key pair for you. (However, if you prefer to use your personal public key you can choose to upload it.)
Verify that you have at least one public key associated with your account. To do that, after you login to the portal check under your Profile, under the SSH keys tab. If you do not have SSH keys associated yet, please follow these instructions.
2.4 Configure Omni
- Login to the GENI Portal
- Click on the `Profile tab` link on the top of your screen. Then click on the `Configure omni` tab under `PROFILE`.
- Click on the `Download your omni data` button under step 2.
- If this is the first time you try to access your GENI certificate you will have to generate one. Click on the `generate a certificate` link.
- Unless you really understand how SSL certificates work, choose the simple option. Click on the `Generate Combined Certificate and Key File` button and then click on `Close`. You will be taken back to the download page with the warning. Reload the page to enable the download button.
- If you are a member of more than one project, select which project you would like to be the default one for running experiments in GENI. You can always change the project that is used by the `-r` command line option of Omni. Then click on `Download your omni data`.
- The bundle will be saved at
~/Downloads/omni-bundle.zip - Open a terminal window and type:
omni-configure
The cert and key files you need will be installed in the appropriate folders.


3. Obtain Resources
Now that you are a member of a project, you can create a slice and reserve resources.
3.1 Create a slice
|

Figure 3-1 Create a new slice. |
Now that you are a member of a project, you can create a slice and reserve resources.
3.2. Import a simple experiment
For this exercise, we will edit a predefined RSpec file. Start by loading this predefined topology into Flack.
|

Figure 3-1 Import an RSpec into Flack. |
|||||
|
3.3. Modify the experiment to automatically install and execute network test software
For this experiment, we'd like some additional software (<tt>Apache</tt>, <tt>iperf</tt>, and a couple of custom scripts) loaded onto the VMs to perform traffic measurements.
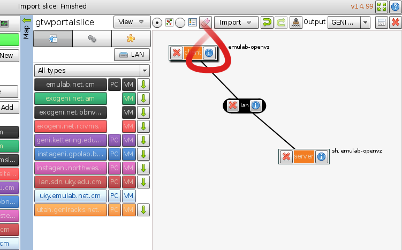
1. In Flack, you can manipulate the details of the request for a node or link with the "i" button on the relevant component on the canvas (see figure). Do this now on the client node. |
 |
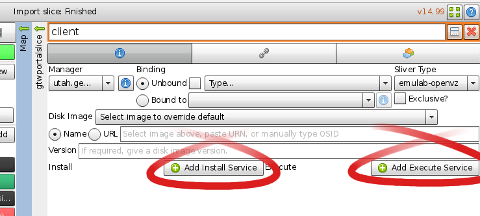
2. When you open the node information, you should see options like those in the figure. The controls available to you will vary depending on the types of the aggregate manager and the component, but many features are widely available throughout GENI.
3. The way we will request installation of the proper software and execution of our experiment is to add install and execute services. First, select "+ Add Install Service" as shown. Flack will now prompt you for an "Archive URL" and a location for installation. For this experiment, please enter the appropriate URL:
![]() InstaGENI
InstaGENI
http://www.gpolab.bbn.com/experiment-support/UnderstandAMAPI/ig/underAMAPI_ig.tar.gz
![]() ExoGENI
ExoGENI
http://www.gpolab.bbn.com/experiment-support/UnderstandAMAPI/eg/underAMAPI_eg.tar.gzand ask for this to be installed in:
/local
4. Similarly, please use the "+ Add Execute Service" button to request that the appropriate command:
![]() InstaGENI
InstaGENI
sudo /local/install-script.sh
![]() ExoGENI
ExoGENI
/local/install-client.sh(client node only)
/local/install-server.sh(server node only) be executed using
sh
| Be very careful when entering this information -- these commands will not be executed yet, so it will be some time before you will see any relevant error messages if there is a mistake here. |
5. Once both the "install" and "execute" services are specified, please choose "Apply". Then repeat the procedure to add the same "install" and "execute" services on the server node.
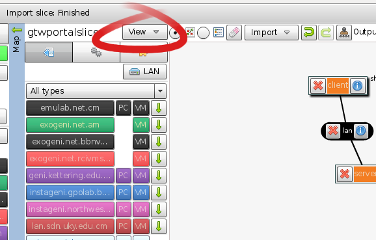
| 6. Also on the server node, click on the "link" tab and select "Routable Control IP" as shown in the figure. |
 |
Figure 3-5 On the Link tab, select the "Routable Control IP" button.
If you have time, it would be instructive to download the "underAMAPI_*.tar.gz" file yourself, and inspect the contents. You will see the install-script.sh file referred to in the execute service, and this is a good example of how you can ask for GENI components to perform tasks for you without any manual intervention. This is a very useful facility for large experiments!
3.4. Export the modified request RSpec
Now we will pull back some of the covers and inspect exactly what Flack has been doing for us when preparing the RSpecs for the experiments we design. Each node and link has a corresponding element in the RSpec, and the details of the component configuration (such as the install and execute services we requested above) are specified with attributes, or sometimes child elements, within those portions of the document.
|
 |
3.5. Instantiate the new experiment using Omni
For this step, we'll change the approach a bit and switch to a new client tool: the command line Omni client. From a terminal, please enter the command:
$ omni -a AM_NICKNAME createsliver SLICENAME RSPEC_FILE
where AM_NICKNAME is the nickname for your assigned aggregate manager and SLICENAME is the name of the slice you created at the portal (both of these are given on your worksheet). RSPEC_FILE should be replaced with the filename of the RSpec you saved in step 4.
If all is well, Omni should give you a number of informational messages, such as:
INFO:omni:Loading config file /home/geni/.gcf/omni_config
It should quickly proceed to the point where it makes the request to the remote manager:
INFO:omni:Creating sliver(s) from rspec file /home/geni/Downloads/experiments.rspec for slice ...
This step can sometimes be time-consuming, so please be patient. If it succeeds, within a few minutes Omni should report:
INFO:omni: Completed createsliver:
and your sliver is complete!