
| Version 5 (modified by , 8 years ago) (diff) |
|---|
IPv4 Routing Assignment
Overview:In this experiment you will learn how to set up static routing with the route command. We will orchestrate this experiment in Ansible and use the ping command to verify connectivity. We will use the following network topology for this experiment:
|
|
Prerequisites:For this tutorial you need :
|
Tools:All the tools will already be installed on your nodes. For your reference we are going to use: |
|
Where to get help:
|
 |
1. Verify your Environment Setup:
This exercise assumes you have already setup your account at the GENI Portal. In particular ensure that:- You can login to the GENI Portal
- You are a member of a GENI Project (there is at least one project listed under the ''Projects'' tab)
- You have setup your ssh keys (there is at least one key listed under the ''Profile->SSH Keys'' tab)
2. Setup the Topology:
- Login to the GENI Portal
- Reserve resources from an ExoGENI rack using the RSpec called ECE374_UMass_EG from the Portal
3. Ansible Login
- If you have Omni installed on your machine use the command "$readyToLogin MYSLICE --useSliceAggregates --ansible-inventory -o" to create an inventory for the Ansible playbook and proceed to Step 4.
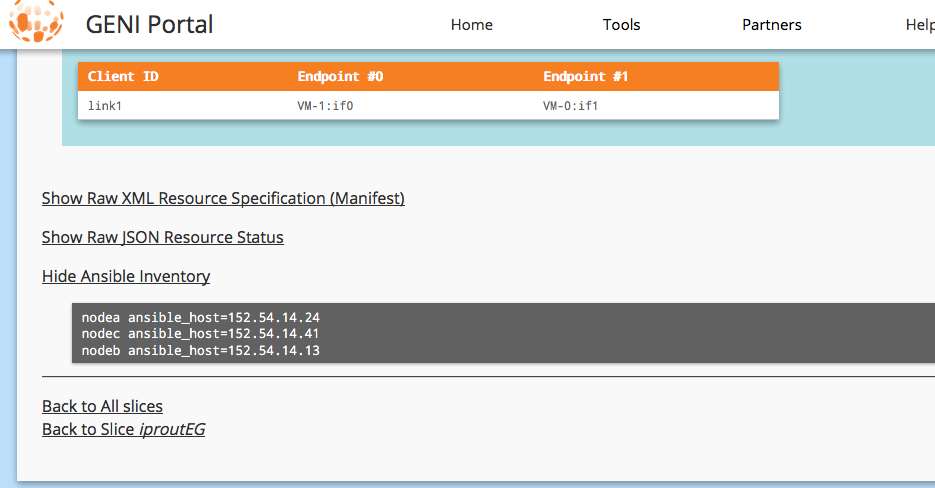
- If you do not have Omni installed, click on the "Details" button on the Slice page in the GENI Portal
- Scroll to the bottom of the screen and click on the link "Show Ansible Inventory"
- Using your favorite text editor, save the output to a file called inventory as explained in the AnsibleHelloGENI tutorial
4. Test connectivity using ping
This sections checks the local connectivity of each node to its neighboring node.
- name: test NodeA
   hosts: NodeA
   sudo: True
   tasks:
    - name: ping seta1
       shell:  "ping -c 5 192.168.1.11"
       register: pingA1_test
       failed_when: "'Timeout' in pingA1_test.stdout_lines"
    - debug: var=pingA1_test.stdout_lines
    - name: ping seta2
       shell:  "ping -c 5 192.168.3.12"
       register: pingA2_test
       failed_when: "'Timeout' in pingA2_test.stdout_lines"
    - debug: var=pingA2_test.stdout_lines

- name: test NodeB
  hosts: NodeB
  sudo: True
  tasks:
   - name: ping setb1
      shell:  "ping -c 5 192.168.1.10"
      register: pingB1_test
      failed_when: "'Timeout' in pingB1_test.stdout_lines"
   - debug: var=pingB1_test.stdout_lines
   - name: ping setb2
      shell:  "ping -c 5 192.168.2.12"
      register: pingB2_test
      failed_when: "'Timeout' in pingB2_test.stdout_lines"
   - debug: var=pingB2_test.stdout_lines

- name: test NodeC
  hosts: NodeC
  sudo: True
  tasks:
   - name: ping setc1
      shell:  "ping -c 5 192.168.3.10"
      register: pingC1_test
      failed_when: "'Timeout' in pingC1_test.stdout_lines"
   - debug: var=pingC1_test.stdout_lines
   - name: ping setc2
      shell:  "ping -c 5 192.168.2.11"
      register: pingC2_test
      failed_when: "'Timeout' in pingC2_test.stdout_lines"
   - debug: var=pingC2_test.stdout_lines
5. Setup the routing
The goal of this exercise is to setup the routing as indicated in Figure 1; i.e. packets from A sent to IP address 192.168.2.12 on node C should be routed via node B. In order to create this routing behavior you will need to modify the routing tables in your nodes using the linux route command
#Enter static routing commands here
- name: route NodeA
  hosts: NodeA
  sudo: True
  tasks:
   - name: rout seta1
      shell:  ""
      register: routA1_test
   - debug: var=routA1_test.stderr_lines

- name: route NodeB
  hosts: NodeB
  sudo: True
  tasks:
   - name: rout setb1
      shell:  ""
      register: routB1_test
   - debug: var=routB1_test.stderr_lines

- name: route NodeC
  hosts: NodeC
  sudo: True
  tasks:
   - name: rout setc1
      shell:  ""
      register: routC1_test
   - debug: var=routC1_test.stderr_lines
Questions:
- Setup the routing from A to 192.68.2.12 so that it goes through B. Was it enough to just modify the routing tables? What else did you need to change in order for the traffic to flow?
6. Test routing using ping
This part of the script is used to test the new route setup.
#Test New route setup
- name: testroute NodeA
  hosts: NodeA
  sudo: True
  tasks:
   - name: ping seta1
     shell:  "ping -c 5 192.168.2.12"
     register: pingA1_test
     failed_when: "'Timeout' in pingA1_test.stdout_lines"
   - debug: var=pingA1_test.stdout_lines
Once you have filled in the route commands, execute the ansible playbook using the following command:
ansible-playbook <myfile.yml> -i inventory
 |
4. Cleanup
After you are done with the exercise and you have captured everything requested for the writeup, you should release your resources so that other experimenters can use them. In order to cleanup your slice :- In Jacks, press the Delete button in the top of your canvas
- Select Delete at used managers and confirm your selection.
What to hand in:
- Drag the graphs into your Markdown and include answers to the questions above in the same document.
- When you are ready to submit your assignment, i.e, verified that the required routing is in place, Click on the Share Page button at the top left corner of the Plan column. This sends a link to your grader to evaluate your output.
![]()
Tips
- If you have trouble with your assignment, look carefully in the logs on the Execute panel. It gives you an output similar to one you will see in bash shell and you will be able to figure out why your script doesn't work as expected.
- If you get a "Command not found " error when executing standard commands like
ifconfigaddsbinto your path:export PATH=$PATH:/sbin
- Remember that you can use “ifconfig” to determine which Ethernet interface (e.g., eth0) is bound to what IP address at each of the nodes.
- In order to enable IP forwarding of packets on a node you have to execute the following command:
sudo sh -c 'echo 1 > /proc/sys/net/ipv4/ip_forward'
- A new slice will always be in its initial state with NO routing set up!
- A useful tool to debug the packet flow is tcpdump. In order to install it run:
sudo apt-get install tcpdump
Attachments (1)
- ansible_inventory.png (67.4 KB) - added by 8 years ago.
Download all attachments as: .zip