
| Version 22 (modified by , 15 years ago) (diff) |
|---|
The TIED Clearinghouse
The TIED clearinghouse presents four primary services to experimenters:
- Experimenter Registration
- Slice Management
- Aggregate Management
- Experimental tools
This page outlines those services and how an experimenter can make use of them. Most of these services are provided to one extent or another by DETER's fedd software and the DETER testbed. We describe fedd's relationship to the idea of a clearinghouse, and our concerns with that concept elsewhere.
We summarize these services here before describing in detail how to access them.
Experimenter Registration
TIED currently makes access control decisions based on both the identity of a user and on the attributes that TIED knows about the user. The user's identity is encoded in a fedid, the TIED version of a GENI ID. A fedid can be created by any user using standard SSL commands, but the advantage of using the TIED experimenter registry is that it binds additional information to that identity. Specifically, this creates a three-level name for the experimenter. This allows the TIED federation daemon to negotiate different levels of access with the aggregates with which the TIED clearinghouse federates.
A registered TIED user has access to the various aggregates TIED works with and can create slices across them.
Slice Management
For TIED, slice management is the creation and manipulation of experiments that span multiple facilities. The facilities are aggregates, each of whaich controls access to a set of resources. Currently TIED supports creation of slices across testbeds with an Emulab interface and that run instances of fedd that act as aggregate managers. In addition to the experimenter/slice interface, TIED provides interfaces that allow experiment management tools to be used in the slice.
The TIED slice manager creates slices from an abstract "nodes and networks" description using multiple facilities, guided by the user.
Component/Aggregate Management
The TIED clearinghouse manages the access control of multiple sites as aggregates. It provides a unified access control model across aggregates and provides a unified interface for alloacting resources from them. Currently Emulab-based testbeds are used as aggregates, but development is underway to access other systems through the same interfaces.
Most experimenters will not need to access this facility directly, as the high level requests for slice creation manage all this behind the scenes, but it is worth noting that it is happening.
Experiment Tools
Most tools that use the Emulab testbed interfaces can be seamlessly used on TIED slices. In particular the DETER SEER tool can be used to transparently manipulate experiments inside TIED slices. SEER is an extensible, agent-based experiment management system that enables node configuration, traffic generation, and data gathering. There are many generic services available to users and a documented extension model.
Using the TIED Clearinghouse
This brief tutorial will show how to
- Register with TIED
- Create, manipulate and terminate a slice using both a web interface and a command-line interface
- Connect to the slice and manipulate it using SEER
Throughout the tutorial are links to more detailed documentation. Questions or comments are welcome.
Registering with TIED
Registering with TIED is a two phase process. An experimenter first joins a DETER project that is set aside for TIED/GENI users, and then fedd is configured with the additional attributes that allow slice operation. The experimenter sees only the step of joining the DETER group.
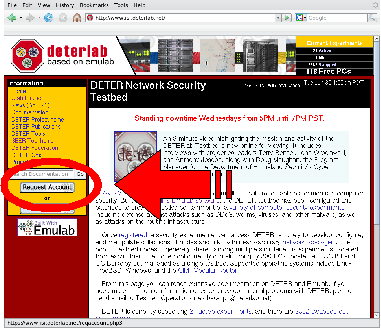
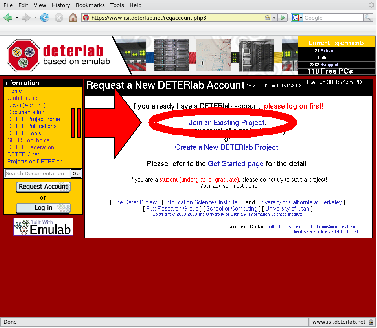
Joining the TIED project on DETER is just like joining a project on any Emulab-based testbed. If you are a DETER user, just log in and choose "Join an Existing Project" from the Experimentation menu. If not the detailed instructions follow.
Connect to http://www.isi.deterlab.net and click on the "Request Account" button. From the next screen the "Join an Existing Project" link. Fill out the form as instructed and be sure to enter "TIED" in the "Project Name" field. Shortly the TIED staff will approve you as a TIED member and also add appropriate configuration to the slice management portion of fedd to allow you to create slices. You will receive two e-mail messages, one stating you've been approved in the TIED group and one indicating that you've been granted the authority to create slices. Once you have received both messages, you are ready to create slices.


(Incidentally, you also have a fully functional DETER account.)
Slice Management
TIED's slice management features can be accessed through a simple web interface that makes common actions straightforward, and a command line interface that is more expressive for users with sophisticated needs. We expect that the web interface is sufficient for many early adopters. Both interfaces are undergoing development
Using the Web Interface
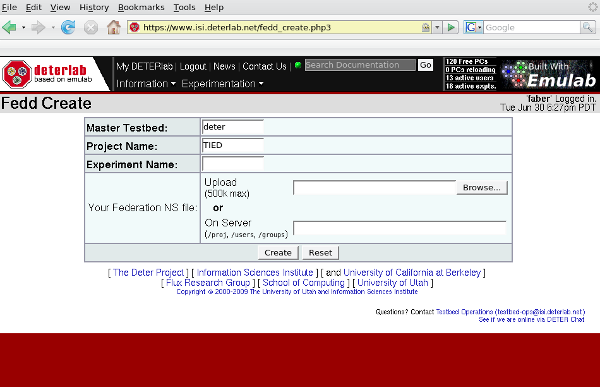
TIED keeps a record of slices created through the web interface and allows users to recreate them or terminate running ones through a web interface. The current list is available from https://www.isi.deterlab.net/fedd_list.php3 (you must be logged in using your DETER/TIED account to view this page). An example is below.

The image shows the logical topology of the slice. It does not include extra nodes in the slice used to induce network delay or loss, or extra nodes used to connect nodes between aggregates. The master testbed column indicates which testbed is exporting its user environment into the experiment; for TIED slices, this will usually be the DETER testbed. The project column will be TIED for TIED experimenters; it indicates that the DETER TIED project is being exported into the slice. The name of the slice is a mnemonic name attached to the slice; the slice also has a fedid that is not visible from this interface. There is also a button to retrieve the slice description used to create this slice, either to inspect it or to copy it for extension. Finally there is an indication of the slice's status (active, inactive, swapping, or unknown). Based on the current status there are buttons to create or terminate it. Termination removes the nodes from active use,but the description remains in this database, so a user may recreate it at the touch of a button.
Creation
One can create a slice either by activating one of the existing slice descriptions, which will create the slice based on its last configuration, or by going directly to the slice creation page and providing a slice description and a name. Slice descriptions are written in a modified ns2 language, extended to describe the embedding of nodes in the various aggregates. The language is briefly described in the fedd documentation. The configuration file used to describe each of the examples on the slice listing page is available from that page as a starting point.
Giving a slice a new name will create a new slice, specifying an existing name will overwrite an inactive slice.

Fedd's documentation on experiment creation provides detail on how experiments are created from the description. In reading that document from a GENI perspective, it helps to think of experiments as slices and testbeds as aggregates (the aggregate interface is provided by fedd).
The current web interface does not provide a progress report on the creation process, which is a known shortcoming. TO monitor the creation, use the the slice listing page. The status will go from swapping to active as the resources are allocated and configured from aggregates. Error messages are also sparse on the web interface, but the command line interface provides more information in the event of failure.
Creation is a matter of allocating and configuring resources from many aggregates. If the aggregates are loaded, this can be a lengthy process, on the order of minutes. This is not so much a TIED limitation - TIED parallellizes the process aggressively - but simply a side effect of making potentially complex allocations from various testbeds. Allow minutes of time at least.
Persistent creation problems should be brought to the attention of the fedd maintainer.
Termination
The simplest way to return a slice's resources is to use the terminate button from the slice listing page, which is active when a slice is active. Only the experimenter who created the slice can delete it from the web interface, though the command line interface is more versatile. Alternatively, one can terminate a slice from the termination page, where one must type the slice name by hand.
Termination releases the resources from each aggregate back to that aggregate to be reassigned. The configuration and name are retained in the web interface so that the slice can be easily recreated.
Slice Status
Both the creation and termination pages give the experimenter an indication that their slice operation has begun, but do not provide ongoing updates on the status of that operation. Creation can be a lengthy process, especially if there are allocation or configuration errors in aggregates. Currently the only way to track progress of a slice creation is through the slice listing page. This is an area of ongoing improvement.
Using the Command-line Interface
Creating, terminating and accessing information about the slice can be done through the published fedd interfaces accessible through the command line using the fedd_client.py program.
Replicating the detailed documentation of fedd_client.py at the link above unnecessary, but it is worth noting that one creates a slice using create, terminates a slice using terminate and that there is a range of information available about a slice using the other informational requests. Of particular interest are the image and ns_image commands that produce graphical representations of the topologies of either an existing slice or a slice description file, and the status command that provides a brief summary of the slice's status.
All of these commands can be run from the shell on users.isi.deterlab.net and will use the experimenter's default GID/fedid by default. By registering as a TIED user on DETER, experimenters have ssh access to that machine. Using the command line interface allows more fine-grained control of slice management functions. Specifically, by capturing an experiment capability using the --experiment_cert parameter to create and the --experiment_file parameters to information and terminate commands, the creator of the slice can allow others to manipulate the slice.
When using the command line, be sure to use the --url=https://users.isi.deterlab.net:23235 parameter.
Not all actions taken through the command line interface are reflected in the web interface.
DETER resources in the slice
Regardless of how it is created, access to the slice is through the DETER TIED account and the resources allocated on the DETER testbed. Those resources will be housed in an DETER experiment with the same name as the slice created. Information on the nodes allocated is available from the MyDETERLab selection from the experimentation interface when logged on to the DETER web site. An experimenter can access the allocated nodes on DETER and through them into the rest of the slice. The Emulab event system and SEER provide simpler ways of reaching into the slice.
Experiment Tools
The SEER experiment control tool is a useful way to manipulate a TIED experiment to both carry out the experiment and to examine real time data from the experiment. Other Emulab-style measurement gathering and event systems function as well, but SEER is a convenient, extensible system.
We focus on SEER, DETER's agent-based experiment management system. Without modification SEER presents a diverse set of agents that can configure nodes, send traffic (both benign and malevolent), and collect data. In addition, real-time data can be collected graphically. The following short tour gives an idea how to use SEER and shows some of its potential. More complete documentation of SEER (including video demonstrations) is available. There are a lot of screenshots here to make things easy, but SEER is fairly intuitive to use.
Once an slice is created that includes the SEER code - the SEER HOWTO explains the commands one must include in the experiment configuration language one must make to include the SEER base system - the SEER front end can be used. One can start the front end using the webstart link on the SEER page. Alternatively one can download the source from there and compile and run SEER locally, though we don't recommend it.
As a quick tour of SEER's capabilities, we show a 3-node slice, split across two aggregates, controlled by SEER. This is the TIED/one experiment listed on the slice listing page. The control node is a node dedicated to letting SEER see the whole slice, even though parts of it are remotely allocated. In TIED, control nodes are best allocated inside the DETER testbed.
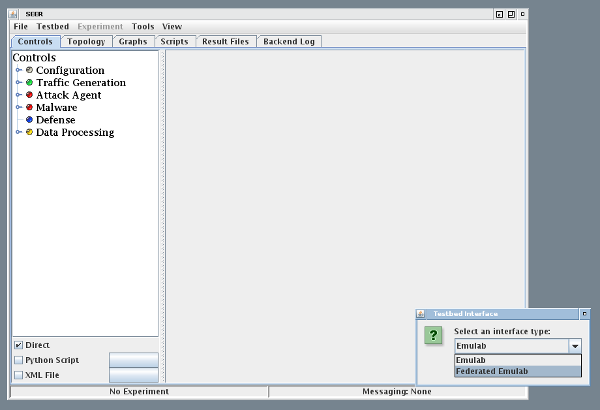
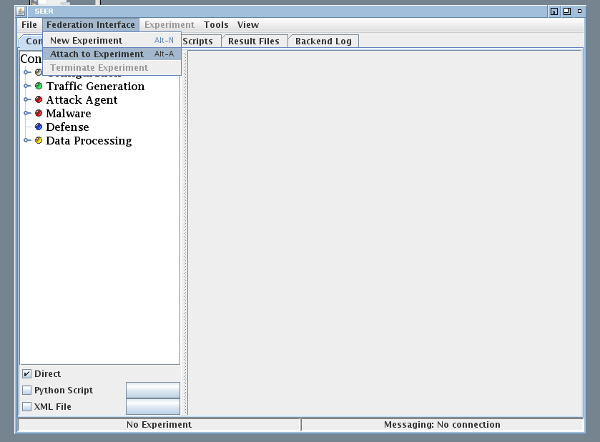
After activating the webstart link, and replying to any of your browser's questions about starting the interface, the SEER window and a dialog requesting the kind of interface to use will appear. Choose "Federated Emulab" from the list.

Next choose "Attach to Experiment" from the "Federation Interface" menu, which will bring up a dialog asking which experiment to attach. The project will be "TIED" and the experiment (slice) name is the one you chose. The image shows the "TIED/one" example slice.


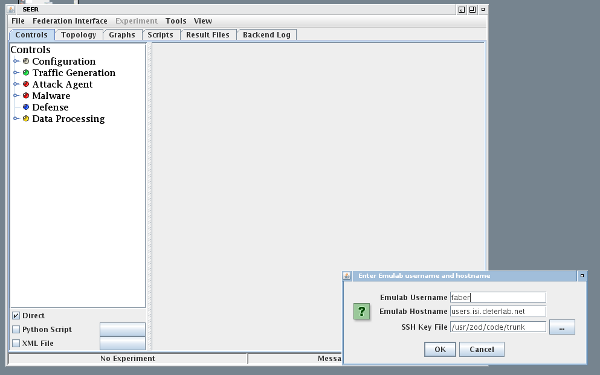
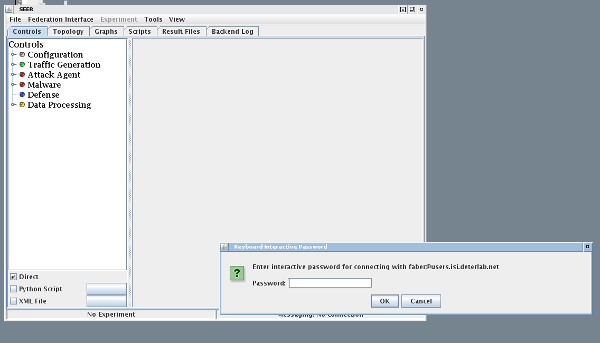
The next dialog gets the information needed to talk to the controller inside DETER. The important fields are the hostname (users.isi.deterlab/net) and your DETER username. The SSH key file is optional. If you don't give it, another dialog asking for your DETER password will appear.


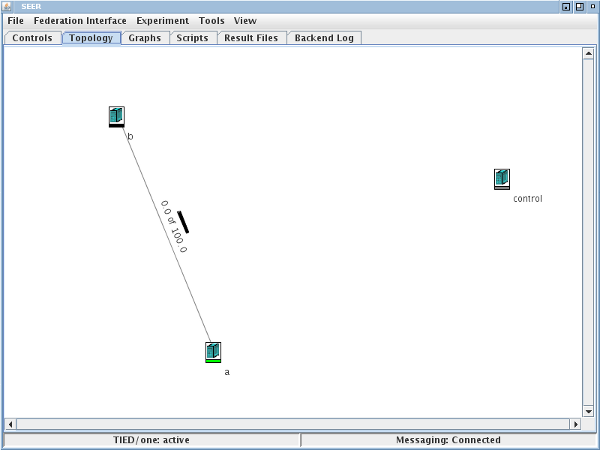
At this point SEER contacts the running fedd for logical information about the slice and populates the topology window. You can view that window by selecting the "Topology" tab. As before the image shows the two node TIED/one slice.

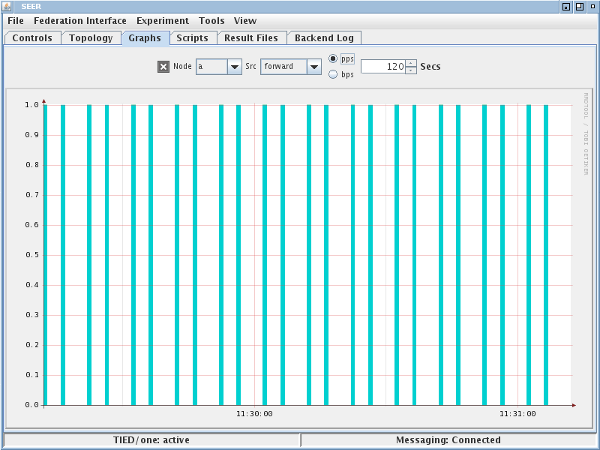
One can get a real time summary of traffic between nodes by placing the mouse pointer on the node on the topology, right clicking to access the node menu, and requesting a graph. The graph appears under the "graphs" tab. In this case the graph shows infrequent routing traffic (which is largely extraneous for such a simple slice). To see more, we initiate a ping below.


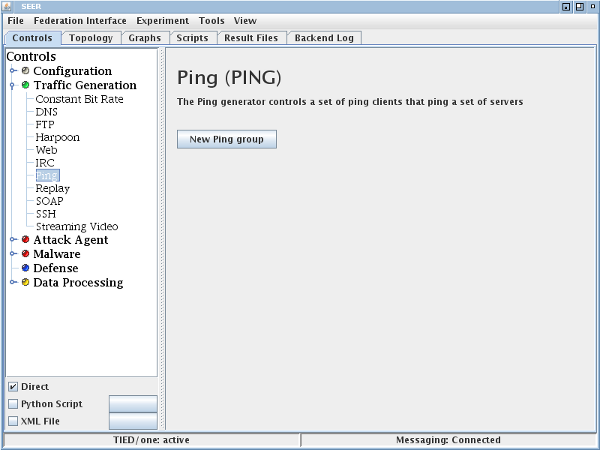
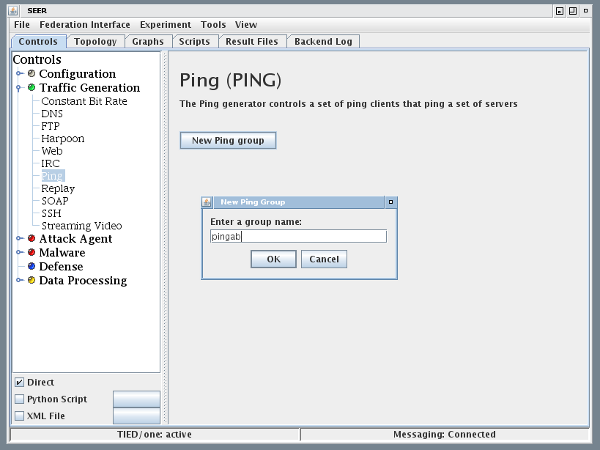
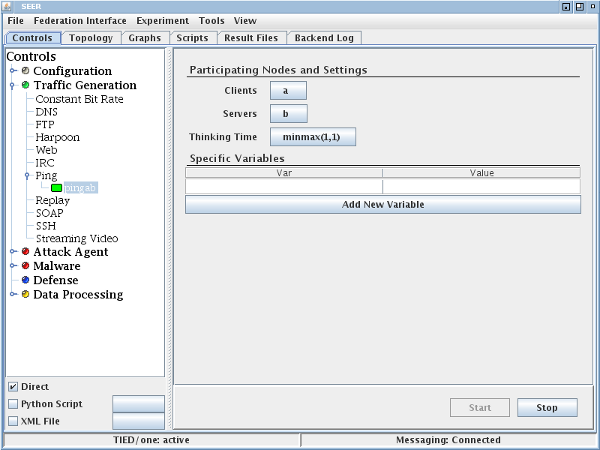
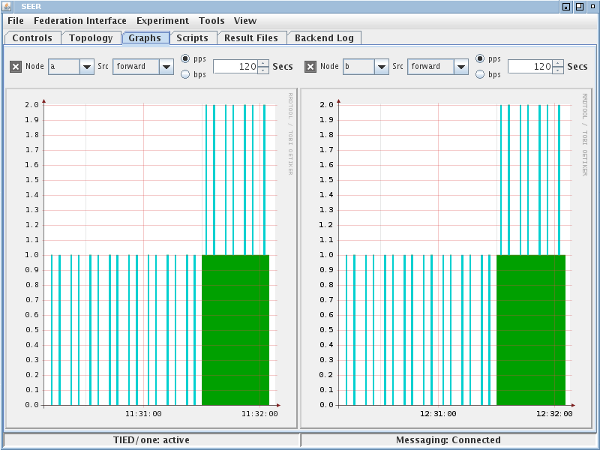
The controls dialog can be used to initiate actions on slice nodes. The screenshots show initiating a ping from node a to node b in the current experiment. The experimenter selects the ping traffic tool, creates an instance called "pingab", cnfigures the instance and starts the action.


Once the ping has started, it shows up in the traffic graphs from the nodes. This screenshot includes graphs for both a and b in the slice. The previous routing traffic remains, but the additional green traffic is the ping that occurs once per second.

Getting more from SEER
SEER has a broad array of traffic generators and attack traffic available without modification. In addition experimenters can add agents to SEER to perform arbitrary actions in the experiment. The data retrieval and data reporting systems are similarly customizable.
Attachments (17)
- screen1.png (49.4 KB) - added by 15 years ago.
- screen2.png (40.6 KB) - added by 15 years ago.
- screen4.png (68.1 KB) - added by 15 years ago.
- seer1.png (36.4 KB) - added by 15 years ago.
- seer2.png (39.1 KB) - added by 15 years ago.
- seer3.png (36.0 KB) - added by 15 years ago.
- seer4.png (36.5 KB) - added by 15 years ago.
- seer5.png (29.2 KB) - added by 15 years ago.
- seer6.png (26.1 KB) - added by 15 years ago.
- seer7.png (54.3 KB) - added by 15 years ago.
- seer8.png (61.2 KB) - added by 15 years ago.
- seer9.png (62.2 KB) - added by 15 years ago.
- seer10.png (62.0 KB) - added by 15 years ago.
- seer11.png (29.6 KB) - added by 15 years ago.
- seer12.png (35.6 KB) - added by 15 years ago.
- seer13.png (62.8 KB) - added by 15 years ago.
- screen3.png (93.1 KB) - added by 15 years ago.
Download all attachments as: .zip