
| Version 3 (modified by , 13 years ago) (diff) |
|---|
OnTime Control User Manual
Prasad Calyam, Kunpeng Zhu, Yingxiao Xu
Mar 07, 2011
Software License: 'GENI Project License (GPL)'
1. Overview
This document describes the installation, configuration and usage of OnTimeMeasure on PlanetLab. OnTimeMeasure is a measurement service for the GENI facility users. The measurement service can be used to perform centralized and distributed orchestration and provisioning of measurements within experiment slices for purposes such as:
- Network paths monitoring
- Network weather forecasting
- Network performance anomaly detection
- Network-bottleneck fault-location diagnosis
The 'OnTimeMeasure researcher web-portal' enables a ProtoGENI/Emulab and PlanetLab user to register, create and monitor experiment slices on geographically distributed resources.
Before proceeding further, we highly recommend reading the Experimenter Tutorial.
For details regarding OnTimeMeasure, please visit OnTimeMeasure Wiki.
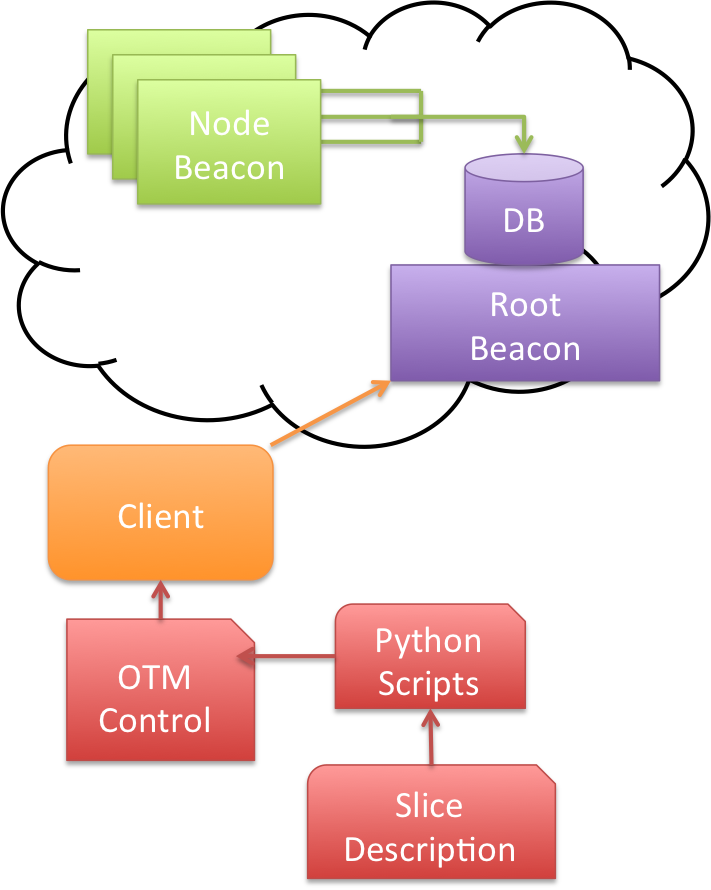
OnTime Control is a command-line interface client for OnTimeMeasure users to login, manage slice information and control Node/Root Beacons within their slices in an automated manner
Note: Typically, users need to install OnTime Control software on their desktops along with other experiment workflow tools such as Gush; OnTime Control provides a way to control the measurement service in an automated manner versus using the OnTimeMeasure web-portal to control the measurement service in an interactive manner.
Before proceeding further, we highly recommend reading the Experimenter Tutorial.
OnTimeMeasure User Workflow Steps:
- Install OnTimeMeasure software / OnTime Contol (Contents of this wiki)
- Configure / Resource Setup
- Submit Measurement Request
- Manage Measurement Service
- Query data/graphs/archive/dashboard
Features implemented in OnTime Control include:
- Manage requests for centralized measurement
- Start/Stop measurement service
- Check measurement service status
- Query measurement results
- Query measurement archive
- Run a distributed measurement request
2. Requirements
- ProtoGENI/PlanetLab slice with OnTimeMeasure software installed and running.
- Python 2.5.X or 2.6.X (NOTE: Current version is not compatible with Python 2.7 or 3.0)
Note: ActivePython is recommended for Windows OS users.
3. Installation and Configuration
Download the tarball from http://ontime.oar.net/download/OnTimeMeasure_latest.php, and extract the files in the OnTimeControl folder.
Copy the config_example.yaml as config.yaml and edit it with any text editor.
Follow instructions within the file to configure the OnTime Control software. It is strongly suggested to use the "direct" connection mode. The "portal" mode is a legacy capability.
Note: The above instruction corresponds to the Resource Setup step in the web portal.
4. Usage for centralized measurement
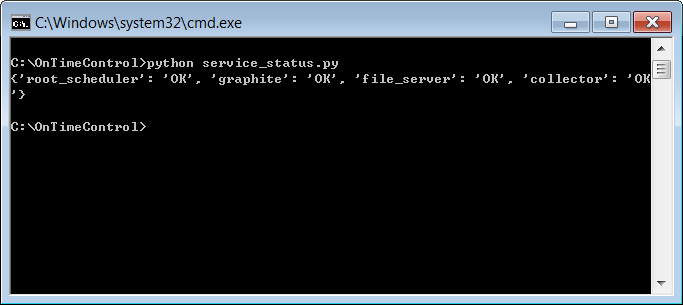
4.1 Check measurement service status
Run command "service_status.py" to verify whether the OnTime Control has been installed successfully, and to verify if all the components of the measurement service are functioning correctly.
Example:
python service_status.py

NOTE: The status of collector would be 'Initializing...' before you conduct the operation in 4.2 and 4.3
4.2 Manage measurement tasks
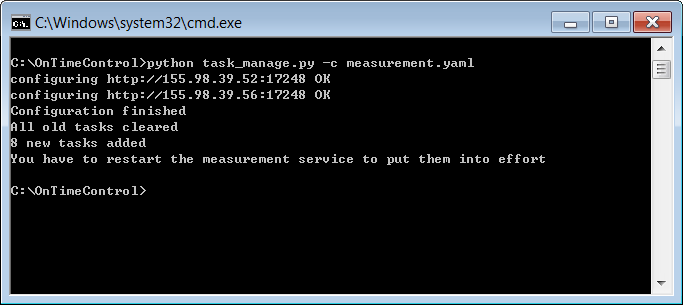
"task_manage.py" manages the measurement tasks (i.e., requests), which are configured in a YAML file. An example "measurement.yaml" is included in the package with contents:
# Measurement task settings
# Hint: A space is required after ':'

##################################################
# Supported patters:
# - Periodic
# - RandomPoisson
# - RandomExponential
# - RandomGaussian
# - StratifiedRandom
# - Adaptive
##################################################
pattern: Periodic

##################################################
# Measurement links
# Please use node names as source and destination
# Supported metrics:
# - RoundtripDelay
# - Throughput
# - Loss
# - Jitter
# - RouteChanges
##################################################
links:
- source: WASH
  destination: SALT
  metric: [Throughput, RoundtripDelay, Jitter, RouteChanges]

- source: SALT
  destination: WASH
  metric: [Jitter, RoundtripDelay, Throughput, RouteChanges]
Create your own measurement configuration file by following the example and comments in the file. Then run the "task_manage.py" with parameter "-c <measurement_config_file.yaml>".
An example:
python task_manage.py -c measurement.yaml

Note: The above instruction corresponds to the Request Specification step in the web portal.
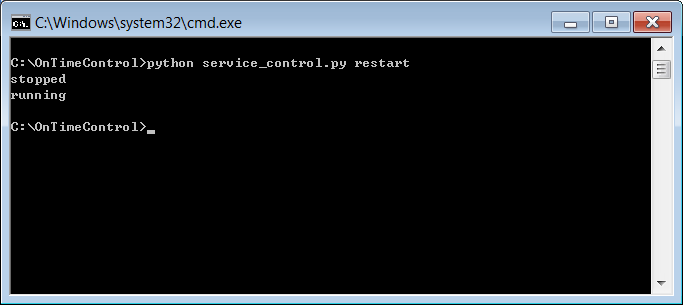
4.3 Measurement service control
"service_control.py" controls the measurement service. Supported parameters are "start", "stop", "restart".
python service_control.py restart

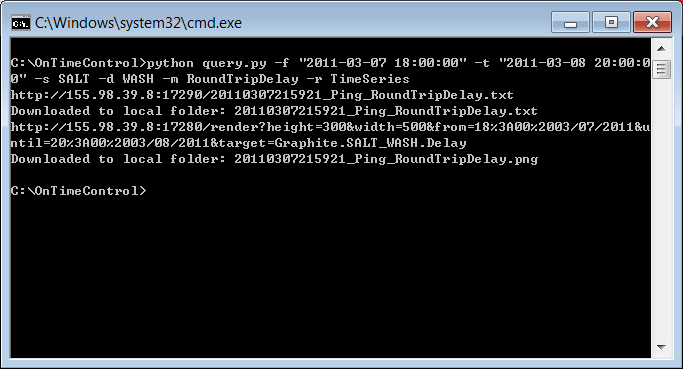
4.4 Query measurement results
"query.py" queries the measurement results. Parameters for the query are:
-f from time "YYYY-MM-DD HH:MM:SS" in UTC
-t to time "YYYY-MM-DD HH:MM:SS" in UTC
-s source node name
-d destination node name
-m metric {RountTripDelay|Throughput|Loss|Jitter}
-r result type {RawFiles|TimeSeries|TimeSeriesPlusAnomalies|TimeSeriesPlusForecasts}
Measurement results are automatically downloaded into the local folder.
An example query:
python query.py -f "2011-03-07 18:00:00" -t "2011-03-08 20:00:00" -s SALT -d WASH -m RoundTripDelay -r TimeSeries

In this example, two file 20110307215921_Ping_RoundTripDelay.txt and 20110307215921_Ping_RoundTripDelay.png were created in folder C:\OnTimeControl to display the result in text and graph plots. The result can also be accessed from the URL listed.
Note : The above instruction corresponds to the Measurement Query step in the web portal.
4.5. Query measurement archive for centralized measurement
"request_measurement_archive.py" queries the measurement archive in the Root Beacon and automatically downloads the archive into a local folder.
python request_measurement_archive.py

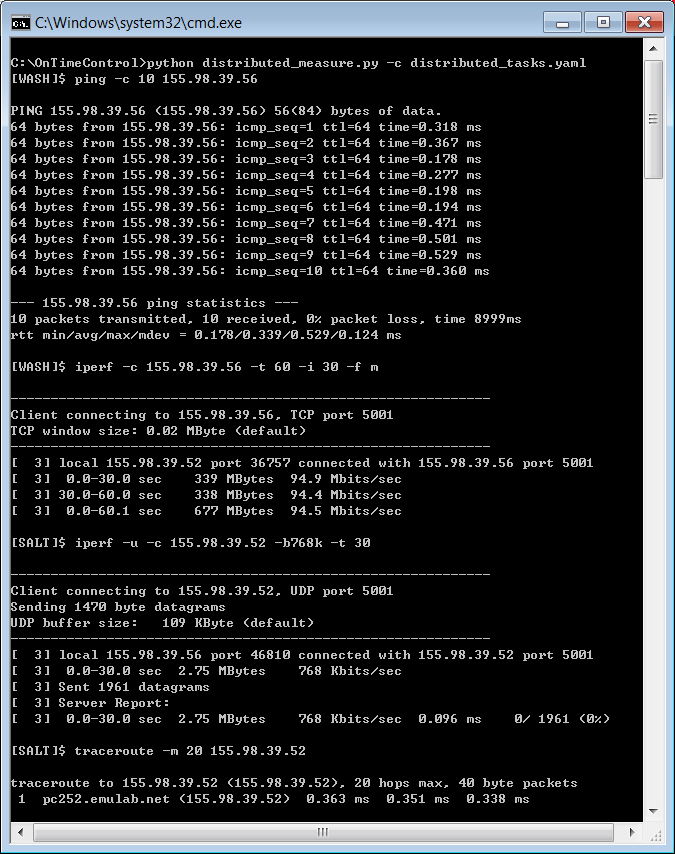
5. Usage for distributed measurement
"distributed_measure.py" manages the measurement tasks, which are configured in a YAML file.
Create your own measurement configuration file(such as "distributed_tasks.yaml") by following the example and comments in the file "distributed_task_example.yaml"
An example "distributed_task_example.yaml" is included in the package with contents:
# Measurement task settings
# Hint: A space is required after ':'
##################################################
# Measurement tasks
# Supported metrics:
# - RoundtripDelay
# - Throughput
# - Loss
# - Jitter
# - RouteChanges
##################################################

tasks:
- source: WASH
  destination: SALT
  metric: RoundTripDelay

- source: WASH
  destination: SALT
  metric: Throughput

- source: SALT
  destination: WASH
  metric: Jitter

- source: SALT
  destination: WASH
  metric: RouteChanges
Then run the "distributed_measure.py" with parameter "-c <measurement_config_file.yaml>".
An example:
python distributed_measure.py -c distributed_tasks.yaml

Attachments (7)
- distribute_measurement.PNG (43.1 KB) - added by 13 years ago.
- measurement_archive.PNG (11.8 KB) - added by 13 years ago.
- query.PNG (17.8 KB) - added by 13 years ago.
- service_control.PNG (12.6 KB) - added by 13 years ago.
- service_status.PNG (11.6 KB) - added by 13 years ago.
- task_manage.PNG (15.7 KB) - added by 13 years ago.
- OTM-Control.png (180.6 KB) - added by 13 years ago.
Download all attachments as: .zip