
| Version 52 (modified by , 12 years ago) (diff) |
|---|
1. Using Omni
1a. Configure Omni
In order to configure Flack, you needed to login to your account in Emulab and instruct Flack to load your user information (certificate and public keys). For Omni we need to do something similar. Omni uses a configuration file, and there is a script that will automatically generate the file with some default options and place it in the default place of ~/.gcf/.
Go back to your browser, and go to the ProtoGENI WebUI tab. On the left of your screen, there should be a link "Download your cert".

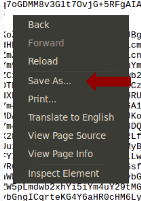
Click on that and select the option about downloading as a pem file.
Press Ctrl-s to save this page. Save it under ~/.ssl/geni_cert.pem. You will need to type the path, instead of navigating to the folder.

Open a terminal window and type :
omni-configure.py
This should configure your Omni, with your downloaded certificate and create an ssh key pair for logging in to nodes. When prompted for a passphrase, type the same passphrase you used in Flack. You might be asked for a passphrase multiple times.
The output should look like:
geni@geni-vm:~$ omni-configure.py
{'framework': 'pg', 'configfile': '~/.gcf/omni_config', 'plkey': '~/.ssh/geni_pl_key', 'cert': '~/.ssl/geni_cert', 'verbose': False}
INFO:omniconfig:Using configfile: /home/geni/.gcf/omni_config
INFO:omniconfig:Using certfile /home/geni/.ssl/geni_cert.pem
INFO:omniconfig:

	CREATING SSH KEYPAIR
INFO:omniconfig:Private key stored at: /home/geni/.ssh/geni_key
Enter passphrase:
INFO:omniconfig:Public key stored at: /home/geni/.ssh/geni_key.pub
INFO:omniconfig:Added to /home/geni/.ssh/config this line:
	'IdentityFile /home/geni/.ssh/geni_key
'
INFO:omniconfig:Wrote omni configuration file at: /home/geni/.gcf/omni_config
OPTIONAL
Open the file ~/.gcf/omni_config using either vim or emacs. Close to the top of the file you will see two parameters called default_cf and users. Your username should be at least listed in the user section. Look for the sections in the file that are named [pg] and [<username>].
In the [<username>] section, the information need for logging-in to reserved compute resources are provided. It includes your unique user URN and a public key that would be uploaded to the hosts that you reserve.
In the [pg] section you configure Omni to use your personal information. The cert and the key attribute point to files that we have manually downloaded from pgeni.gpolab.bbn.com. This is equivalent to the Download action of Flack.
Another interesting section to look at is the [aggregate-nicknames] sections. Flack already knows the URL for all the AMs and present you a list of AMs to choose from using a short, descriptive name. In Omni a user is required to pass the URL for each call to the GENI AM API. In this section the user gets a chance to provide short descriptive names to the URLs that are easier to memorize and use.
1b. Clear the passphrase from your cert
When you first logged in to Flack, you had to type your passphrase (password). Flack cashes this information and re-uses it for the duration of the session. Omni will ask you for the phrase multiple times per command. To save time during the tutorial, we are going to remove the passphrase from your cert and your ssh key. There is a script to clear the passphrases. Run :
clear-passphrases.py
Use the same passphrase(password) as in Flack, you might be prompted for a passphrase multiple times make sure you always use the same passphrase.
The output should look like
geni@geni-vm:~$ clear-passphrases.py
Do you want to remove the passphrase from your cert (/home/geni/.ssl/geni_cert.pem) [Y,n]?y
INFO:clearcert:
	THIS SCRIPT WILL REPLACE /home/geni/.ssl/geni_cert.pem WITH AN UNENCREPTED CERT. A BACKUP OF THE ORIGINAL CERT WILL BE CREATED

INFO:clearcert:The encoded certificate file is backed up at /home/geni/.ssl/geni_cert_enc.pem
INFO:clearcert:Removing passphrase from cert...
Enter pass phrase for /home/geni/.ssl/geni_cert.pem:
writing RSA key
INFO:clearcert:Change permissions of /home/geni/.ssl/geni_cert.pem to 0600
Do you want to remove the passphrase from you ssh-key (/home/geni/.ssh/geni_key, key used to login to compute resources) [Y,n]?y
INFO:clearcert:
	THIS SCRIPT WILL REMOVE THE PASSPHRASE FROM YOUR SSH KEY. NO COPY OF THE ORIGINAL PRIVATE KEY WILL BE KEPT
Enter PEM pass phrase:
Enter passphrase:
geni@geni-vm:~$
Verify that you have the necessary credential and key files
ls ~/.ssh ~/.ssl
The output looks like :
geni@geni-vm:~$ ls ~/.ssh ~/.ssl
/home/geni/.ssh:
config  geni_key  geni_key.pub

/home/geni/.ssl:
geni_cert_enc.pem  geni_cert.pem
geni_cert.pem Cleartext certificate, i.e. does not require any passphrase geni_cert_enc.pem Encrypted certificate geni_key The private key that you will use to login to the nodes geni_key.pub The corresponding public key that will be uploaded to the nodes
1c. Test Omni setup
In order to test that our configuration is correct, you can issue a getversion command. For this step we have used PlanetLab's AM, but you can use any Aggregate Manager(AM).
omni.py getversion -a http://www.planet-lab.org:12346
Or equivalently using the PlanetLab nickname:
omni.py getversion -a plc
For the rest of the tutorial we are going to use aggregate nicknames.
1d. Omni Commands
Listresources in Omni
Flack goes behind the scenes and call listresources for the AMs that you chose, and draws the resources in a map. In Omni in order to see what is available in each AM you will have to manually invoke listresources. Invoke listresources on utah's ProtoGENI cluster
omni.py listresources -a pg-utah -o
The -o option will save the output to a file. The filename is chosen by Omni and printed as part of the output. The output will look like :
geni@geni-vm:~$ omni.py listresources -a pg-utah -o
INFO:omni:Loading config file /home/geni/.gcf/omni_config
INFO:omni:Using control framework pg
INFO:omni:Saving output to a file.
INFO:omni:Substituting AM nickname pg-utah with URL https://www.emulab.net/protogeni/xmlrpc/am, URN unspecified_AM_URN
INFO:omni:Listed resources on 1 out of 1 possible aggregates.
INFO:omni:Writing to 'rspec-www-emulab-net-protogeni.xml'
INFO:omni: ------------------------------------------------------------
INFO:omni: Completed listresources:

  Options as run:
		aggregate: pg-utah
		framework: pg
		native: True
		output: True

  Args: listresources

  Result Summary: Retrieved resources from 1 aggregates.
Wrote rspecs from 1 aggregates to 1 files
Saved listresources RSpec at 'unspecified_AM_URN' to file rspec-www-emulab-net-protogeni.xml; .
INFO:omni: ============================================================
Open the file that Omni saved and just take a look to see how an advertisement RSpec looks like.
Listmyslices in Omni
Both Flack and Omni can see all the slices that are created by a user. In Flack there is a list of slices under the user on the left side of the window.
In order to see your active slices with Omni, you will have to use the listmyslices command.
omni.py listmyslices <username>
You should see the slice that you created through Flack.
1e. Logging Into the nodes -- Omni Scripting
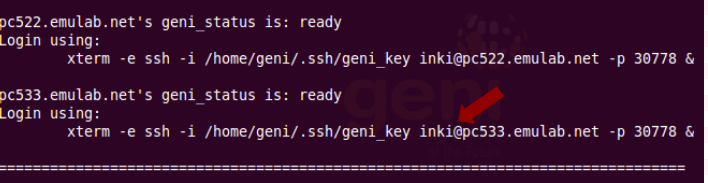
After reserving the nodes, you are ready to login. The login name and port are listed as part of the sliverstatus call, so you can figure out where to login. For common functionality like this that is expected to be used often, omni gives you the capability of writing scripts and including omni as a library. Omni comes with a set of examples (under gcf/examples). One script that is available is the readyToLogin.py script that will return the exact command for logging-in to the nodes in your sliver.
readyToLogin.py -a pg-utah <slicename>
The script will return the actual command that you would need to use for logging in.
2. Topology used for the tutorial
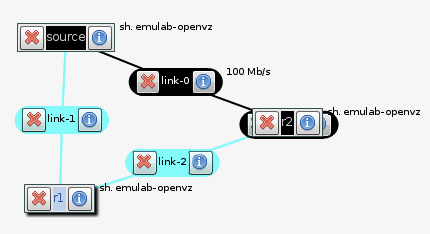
In the first part of the tutorial, each of you created a topology that looks like:

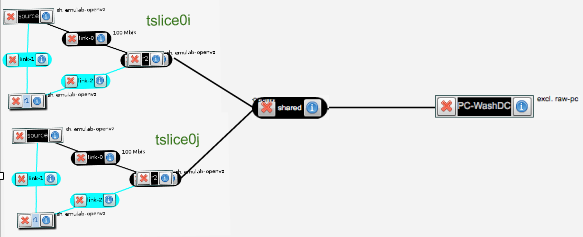
If you notice under node R2 there is a hidden link : 
Try and drug the link behind the node. This is a link on a shared VLAN that connects all of your nodes R2 with a node that is in Washington DC. The connection between your hosts in Utah and the node in Washington is at Layer 2, i.e. you can send non-IP traffic between your hosts. The actual topology looks more like this:

3. Sending IP traffic
For the rest of the tutorial we are going to use the whole topology that has been setup. We will start testing our setup by sending IP traffic between our hosts.
3a. Login to host R2
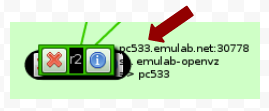
First login to the R2 host. To do that go to the Flack page and see what is the name of the machine

In the terminal copy and paste the line from the readyToLogin.py output that corresponds to this machine.

3b. Ping source
After you login to the R2, try to ping source. Run :
ping source -c 5
Note that you can use the name that is assigned to the host to directly ping the host.
An example output should look like :
[[inki@r2 ~]$ ping source -c 5
PING 10.10.2.1 (10.10.2.1) 56(84) bytes of data.
64 bytes from 10.10.2.1: icmp_seq=1 ttl=64 time=1.95 ms
64 bytes from 10.10.2.1: icmp_seq=2 ttl=64 time=2.27 ms
64 bytes from 10.10.2.1: icmp_seq=3 ttl=64 time=2.04 ms
64 bytes from 10.10.2.1: icmp_seq=4 ttl=64 time=1.95 ms
64 bytes from 10.10.2.1: icmp_seq=5 ttl=64 time=1.72 ms

--- 10.10.2.1 ping statistics ---
5 packets transmitted, 5 received, 0% packet loss, time 4005ms
rtt min/avg/max/mdev = 1.728/1.992/2.278/0.179 ms
From R2 you should also be able to ping PC-WashDC. The IP of PC-WashDC is "10.1.1.2".
[inki@r2 ~]$ ping 10.1.1.2 -c 5


--- 10.1.1.2 ping statistics ---
5 packets transmitted, 5 received, 0% packet loss, time 4004ms
rtt min/avg/max/mdev = 0.218/1.504/2.398/1.037 ms
Now let's try and ping the PC-WashDC from source. Login to source the same way you logged in to R2 and run:
ping 10.1.1.2 -c 5 -w 5
The ping should work. Run a traceroute to see how your packets are routed:
traceroute 10.1.1.2
You see that you packets are routed through R2. This is because IP forwarding is enabled at R2. Go back to the terminal of R2 and run :
[inki@r2 ~]$ cat /proc/sys/net/ipv4/ip_forward
1
Disable IP forwarding:
echo "0" | sudo tee /proc/sys/net/ipv4/ip_forward
Now try to ping again from source. The ping should time out
[inki@source ~]$ ping 10.10.4.2 -c 5 -w 5
4. Sending Layer 2 traffic
GENI provides the capability of creating diverse, layer two topologies. The topology you have created includes connection at Layer 2.
In this exercise we are going to send layer 2 traffic between the hosts of our topology.
4a. Bring Down IP at R2
First of all lets bring down the IP configuration from our hosts. At the terminal of r2 first run ifconfig to figure out which are the dataplane interfaces. Run :
/sbin/ifconfig
The output should look like :
[inki@r2 ]$ /sbin/ifconfig
VLAN02    Link encap:UNSPEC  HWaddr 9B-62-24-9B-6F-00-F4-EF-00-00-00-00-00-00-00-00
          inet addr:192.168.5.2  P-t-P:192.168.5.2  Mask:255.255.255.0
          UP POINTOPOINT RUNNING NOARP  MTU:1476  Metric:1
          RX packets:0 errors:0 dropped:0 overruns:0 frame:0
          TX packets:0 errors:0 dropped:0 overruns:0 carrier:0
          collisions:0 txqueuelen:0
          RX bytes:0 (0.0 b)  TX bytes:0 (0.0 b)

eth0      Link encap:Ethernet  HWaddr 00:02:B3:23:6D:12
          inet addr:155.98.36.155  Bcast:155.98.39.255  Mask:255.255.252.0
          inet6 addr: fe80::202:b3ff:fe23:6d12/64 Scope:Link
          UP BROADCAST RUNNING MULTICAST  MTU:1500  Metric:1
          RX packets:9593 errors:0 dropped:0 overruns:0 frame:0
          TX packets:1119 errors:0 dropped:0 overruns:0 carrier:0
          collisions:0 txqueuelen:1000
          RX bytes:1823255 (1.7 MiB)  TX bytes:118901 (116.1 KiB)

eth1      Link encap:Ethernet  HWaddr 00:02:B3:23:6D:13
          inet addr:10.10.2.2  Bcast:10.10.2.255  Mask:255.255.255.0
          inet6 addr: fe80::202:b3ff:fe23:6d13/64 Scope:Link
          UP BROADCAST RUNNING MULTICAST  MTU:1500  Metric:1
          RX packets:82 errors:0 dropped:0 overruns:0 frame:0
          TX packets:54 errors:0 dropped:0 overruns:0 carrier:0
          collisions:0 txqueuelen:1000
          RX bytes:7542 (7.3 KiB)  TX bytes:4632 (4.5 KiB)

eth2      Link encap:Ethernet  HWaddr 00:03:47:94:C5:7B
          inet addr:10.10.4.1  Bcast:10.10.4.255  Mask:255.255.255.0
          inet6 addr: fe80::203:47ff:fe94:c57b/64 Scope:Link
          UP BROADCAST RUNNING MULTICAST  MTU:1500  Metric:1
          RX packets:32 errors:0 dropped:0 overruns:0 frame:0
          TX packets:41 errors:0 dropped:0 overruns:0 carrier:0
          collisions:0 txqueuelen:1000
          RX bytes:2794 (2.7 KiB)  TX bytes:3338 (3.2 KiB)

lo        Link encap:Local Loopback
          inet addr:127.0.0.1  Mask:255.0.0.0
          inet6 addr: ::1/128 Scope:Host
          UP LOOPBACK RUNNING  MTU:16436  Metric:1
          RX packets:57 errors:0 dropped:0 overruns:0 frame:0
          TX packets:57 errors:0 dropped:0 overruns:0 carrier:0
          collisions:0 txqueuelen:0
          RX bytes:4913 (4.7 KiB)  TX bytes:4913 (4.7 KiB)
The two interface that are connected to source and PC-WashDC are eth1 and eth2 respectively. To bring them down run :
sudo /sbin/ifconfig eth1 0.0.0.0

sudo /sbin/ifconfig eth2 0.0.0.0
4b. Run Layer 2 Ping
From source try to ping r2. First we will need to figure out the MAC address of r2. We can find the MAC address the same way as the IP addresses by checking the information on the link.
Run :
cd pingPlus
sudo ./pingPlus <MAC_ADDRESS> <INTERFACE_NAME> 12345
The result should look like :
[inki@source ~/pingPlus]$ sudo ./pingPlus 00:24:E8:7A:97:DD eth419 12345
audit_log_user_command(): Connection refused
RQ:'9561+2063' to 0:24:e8:7a:97:dd.
RL:9561+2063=11624 from 0:24:e8:7a:97:dd.
4c. Enable Layer 2 forwarding at R2
If we try to ping PC-WashDC from source, the packets will not get through, since there is no
router running at R2 that will forward the packets along. For this tutorial we have installed
click router on R2, and we are going to run a simple learning switch module. However you can
imagine that you can implement a more complicated routing algorithm.
Lets generate the click configuration file. In the terminal of R2 run:
cd
[inki@r2 ~]$ python /local/tutorial/makeClickConfig.py > switch.click
In order to start the click router, at R2 run :
sudo /usr/local/bin/click switch.click
The MAC address of PC-WashDC is 00:02:B3:23:78:E5
Then from source, try to ping PCRemote
[inki@source /local/tutorial/pingPlus]$ sudo ./pingPlus 00:24:E8:77:89:B6 <INTERFACE_NAME> 12345
The output should look like :
[inki@source ~/pingPlus]$ sudo ./pingPlus 00:02:B3:23:78:E5 eth419 12345
audit_log_user_command(): Connection refused
RQ:'7124+8793' to 0:24:e8:77:89:b6.
RL:7124+8793=15917 from 0:24:e8:77:89:b6
Congratulations you have run a Layer 2 experiment that spans across the United States!
5. Cleanup resources
Although all your reservations, have expiration times, its always good practice to release the resources after your experiment is over to make them available to other experimenters.
5a. Deletesliver with Omni
We are going to use Omni to release our resources, For each AM that you have used you should delete your sliver. In the tutorial we used the AMs at Kentucky and at Utah.
From the terminal that you were using to run your Omni commands, run
omni.py deletesliver -a  pg-utah <slicename>
omni.py deletesliver -a  pg-ky <slicename>
You can not delete your slice. Although this will be cleaned up when it expires, it should be an empty container and thus does not hold up any resources.
Congratulations, you have finished the tutorial! Now you are ready to design and run your own experiments. Don't hesitate to email us with any questions you might have.
6. Fill out the tutorial survey
We love to hear what you think so that we can improve the tutorials in the future. Please complete the online survey and get a temporary GENI tatoo!
7. Get Your Own Account
The accounts, that you used in the above steps will be deactivated after the tutorial. If you do not already have an account at GPO's ProtoGENI cluster, you should get your own account so that you can further experiment with GENI.
If you would like to run your own experiments in this infrastructure, please contact us at help@geni.net to get a permanent account. Look at the Omni Configuration page about how to configure your Omni with your personal info.
AM URL Table
| AM | Nickname | URL |
| Utah's ProtoGENI | pg-utah | http://www.emulab.net/protogeni/xmlrpc/am |
| Kentucky's ProtoGENI | pg-ky | https://www.uky.emulab.net/protogeni/xmlrpc/am |
| OTHER | ||
| PlanetLab | plc | http://www.planet-lab.org:12346 |
| GPO's ProtoGENI | pg-gpo | http://www.pgeni.gpolab.bbn.com/protogeni/xmlrpc/am |
Attachments (10)
- save_cert.png (20.3 KB) - added by 12 years ago.
- browser_save.png (23.7 KB) - added by 12 years ago.
- hostname.png (14.2 KB) - added by 12 years ago.
- readytologin_output.png (57.1 KB) - added by 12 years ago.
- linkinfo.png (7.2 KB) - added by 12 years ago.
- download_cert.png (12.5 KB) - added by 12 years ago.
- full_topo.png (31.0 KB) - added by 12 years ago.
- full_topo_sigmetrics.png (21.5 KB) - added by 12 years ago.
- node_link.png (5.9 KB) - added by 12 years ago.
- actual_topo.png (39.3 KB) - added by 12 years ago.
Download all attachments as: .zip