
| Version 13 (modified by , 14 years ago) (diff) |
|---|
LAMP I&M System: Tutorial
Welcome to the LAMP Instrumentation & Measurement (I&M) System tutorial. This tutorial will take you through the steps in creating a ProtoGENI slice with Instrumentation & Measurement (I&M) capabilities based on the perfSONAR framework and the perfSONAR-PS software suite. This tutorial and the full documentation for the LAMP I&M System is still under development, but we have made a Quick Start Guide to get you started right away. Please feel free to contact us with questions or any type of feedback at lamp@damsl.cis.udel.edu.
Getting Ready
The LAMP I&M System is currently tailored to characteristics of the ProtoGENI Control Framework. The LAMP I&M System is also limited to the UBUNTU91-LAMP disk image that can be found on Utah's (Emulab.net) ProtoGENI testbed. We intend to create software packages and instructions for customizing existing or new images with the LAMP software. In the meantime, the following steps must be taken prior to testing our system:
- Get a ProtoGENI account and familiarize yourself with using ProtoGENI. The ProtoGENI tutorial is a great resource for this. Make sure you follow the instructions to get your SSH Keys set up.
- Download the ProtoGENI test scripts. We will use these to create and start our slice.
- Download the following LAMP scripts: lamp-getcertificate.py and lamp-sendmanifest.py. These scripts will be used to help setup your LAMP-enabled slice. You can place them on the same directory as the test scripts.
Quick Start
This section will guide you through creating and starting a slice, requesting a LAMP services certificate for you slice, uploading your experiment's topology to UNIS, and setting up the instrumentation and measurement facilities of your slice. The expected time required to setup your slice with the LAMP I&M System is around 10 minutes. Following this guide through the end is aimed to take about 30 minutes. Let us know how long it takes you and places for improvement!
Few words on the LAMP I&M System design
It is useful to understand the general principles behind the steps we will take throughout this tutorial. The LAMP I&M System is built on top of three pillars:
- LAMP Portal: The LAMP Portal is the goto resource for experimenters to manage and visualize their I&M services and data. The portal is deployed with the LAMP image and will usually be enabled through the initial RSpec configuration for the experiment. The portal can run on any node or (nodes) within the slice. The LAMP Portal is derived from the Web Admin component of the pS-Performance Toolkit 3.2 RC1 (although not required, looking at the comprehensive Quick Start guide of the pS Toolkit can be very useful to understand the LAMP I&M System setup).
- UNIS and Topology-based Configuration: xxxxxxx
- I&M software (measurement tools and perfSONAR services): xxxxx
All the services on the LAMP I&M System have Authentication and Authorization (AA) capabilities based on the ProtoGENI AA model. See our AA page for more information.
1. Modify the RSpec
There's only one thing that must be done to have LAMP I&M on your slice: specify the LAMP disk image to be loaded on each node that needs I&M. The URN for the LAMP disk image is urn:publicid:IDN+emulab.net+image+GeniSlices//UBUNTU91-LAMP. See the RSpec Disk Image Example and our tutorial RSpec below for how to specify the disk image to be used on a node.
Nodes booting the LAMP disk image will have all the LAMP services available, but only the topology-based configuration service (pSConfig) will be running by default. This isn't very useful for the experimenter as not even the LAMP Portal will be accessible (remember that you have to specify in which node(s) the portal will be enabled). To make the process simpler to the user, an initial configuration for the slice can be specified on a LAMP extension to the RSpec. Let's see our tutorial's RSpec and go through the different elements to understand how this configuration can be specified. For this Quick Start guide we will use a very simple topology: two nodes will be connected through a link with 100ms latency and 0.05 loss, and a third node with no interfaces (only the control plane interface) will lodge the LAMP Portal (and eventually store host monitoring data). This is our RSpec:
<rspec xmlns="http://protogeni.net/resources/rspec/0.2"
   xmlns:lamp="http://protogeni.net/resources/rspec/0.2/ext/lamp/1">

   <node virtual_id="node1" virtualization_type="raw" exclusive="1"
      startup_command="/usr/local/etc/lamp/bootstrap.sh urn:publicid:IDN+emulab.net+slice+lamptutorial urn:publicid:IDN+emulab.net+user+fernande">

      <node_type type_name="pc" type_slots="1"/>

      <disk_image name="urn:publicid:IDN+emulab.net+image+GeniSlices//UBUNTU91-LAMP" />

      <lamp:config />

      <interface virtual_id="iface0"/>
   </node>

   <node virtual_id="node2" virtualization_type="raw" exclusive="1"
      startup_command="/usr/local/etc/lamp/bootstrap.sh urn:publicid:IDN+emulab.net+slice+lamptutorial urn:publicid:IDN+emulab.net+user+fernande">

      <node_type type_name="pc" type_slots="1"/>
      <disk_image name="urn:publicid:IDN+emulab.net+image+GeniSlices//UBUNTU91-LAMP" />
      <lamp:config />
      <interface virtual_id="iface0"/>
   </node>

   <link virtual_id="link1" >
      <interface_ref virtual_node_id="client1" virtual_interface_id="iface0"/>
      <interface_ref virtual_node_id="client2" virtual_interface_id="iface0"/>
      <link_type type_name="ethernet" />
      <latency>100</latency>
      <packet_loss>0.05</packet_loss>
   </link>

   <node virtual_id="lamp" virtualization_type="raw" exclusive="1"
      startup_command="/usr/local/etc/lamp/bootstrap.sh urn:publicid:IDN+emulab.net+slice+lamptutorial urn:publicid:IDN+emulab.net+user+fernande">

      <node_type type_name="pc" type_slots="1"/>
      <disk_image name="urn:publicid:IDN+emulab.net+image+GeniSlices//UBUNTU91-LAMP" />

      <lamp:config>
         <lamp:service type="lamp_portal" enable="true" />
      </lamp:config>

   </node>
</rspec>
We can see on the above RSpec three LAMP specific elements: the startup_command for running the bootstrapping script, the disk image element with the LAMP image, and the <lamp:config> extension (note the XML namespace for this extension at the top). The startup_command will run a shell script that sets up a few basic variables describing the node so that the LAMP services know where they're running. Services will not be able to run without these variables set. The usage for this script is as follows.
/usr/local/etc/lamp/bootstrap.sh <slice_urn> <user_urn>
Bootstrapping only needs to be done once, but the script is idempotent and can thus be run through the startup_command directive of the ProtoGENI CF. Alternatively, you can also run this command manually on the nodes and restart the configuration service (more on this later).
The next element of our RSpec, the disk_image directive, has already been discussed above. Finally, the <lamp:config /> extension lets us specify the initial configuration for our nodes. For example, looking at the lamp node in the RSpec, we see that we have specified that the lamp_portal service should be enabled. This extension, however, also specifies which nodes can be configured through the LAMP Portal (and topology annotations). This is why we have the empty config element <lamp:config /> on the node1 and node2 nodes. In other words, the lamp node will be our host for accessing the LAMP Portal, wherein we can configure all three nodes of our slice.
Other services can be enabled using the same mechanism, but on this quick start guide we will only cover enabling and configuring services through the LAMP Portal (who wants to read and write XML after all? :).
2. Create and Start our Slice
Attachments (26)
-
lamptutorial-manifest.xml (3.7 KB) - added by 14 years ago.
An example manifest for the slice of the tutorial.
-
lamptutorial-credential.xml (5.9 KB) - added by 14 years ago.
Credential example for the LAMP tutorial slice.
-
lamp-getcertificate.py (2.0 KB) - added by 14 years ago.
Script that allows users to get a certificate for their LAMP services.
-
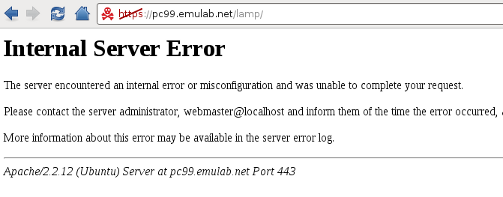
portal-error.png (34.0 KB) - added by 14 years ago.
Error accessing LAMP Portal without a (or proper) certificate.
-
portal1.png (96.1 KB) - added by 14 years ago.
LAMP Portal - slice overview after initial setup.
-
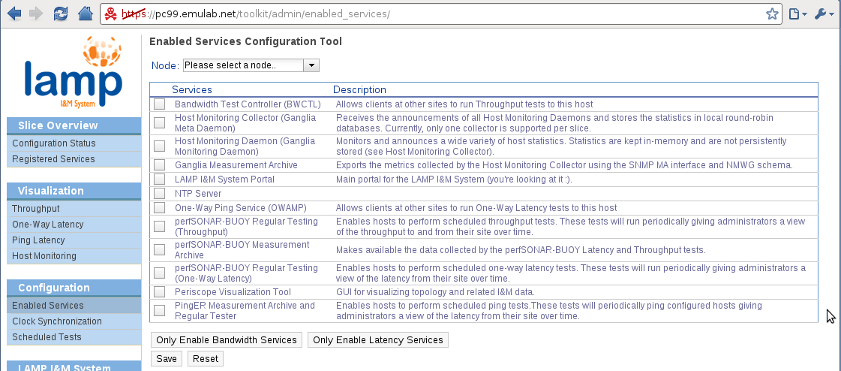
portal2.png (154.7 KB) - added by 14 years ago.
LAMP Portal - Enabled Services configuration page.
-
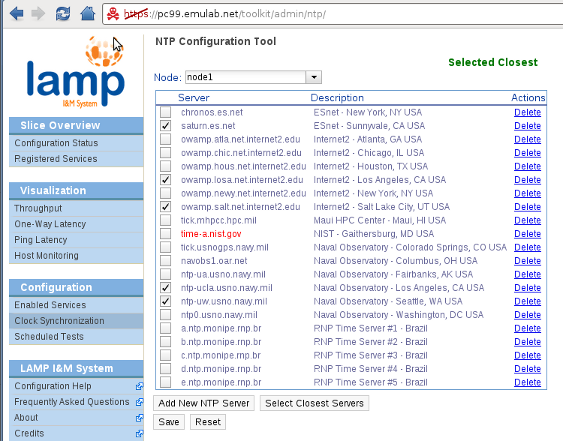
portal5.png (139.6 KB) - added by 14 years ago.
LAMP Portal - NTP configuration of node1.
-
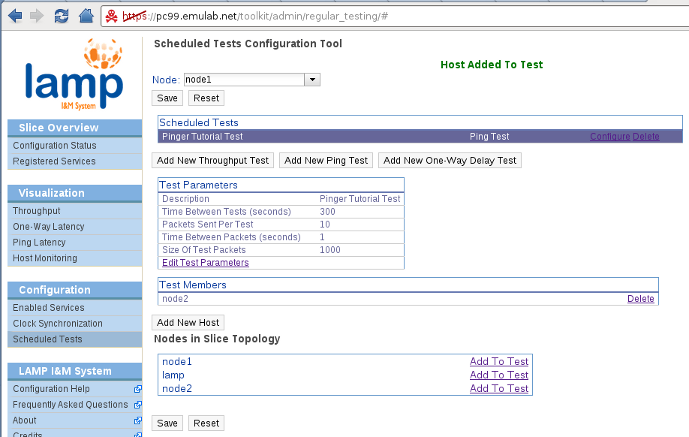
node1-pinger.png (90.0 KB) - added by 14 years ago.
LAMP Portal - Scheduled test for ping on node1.
-
node1-owd.png (66.1 KB) - added by 14 years ago.
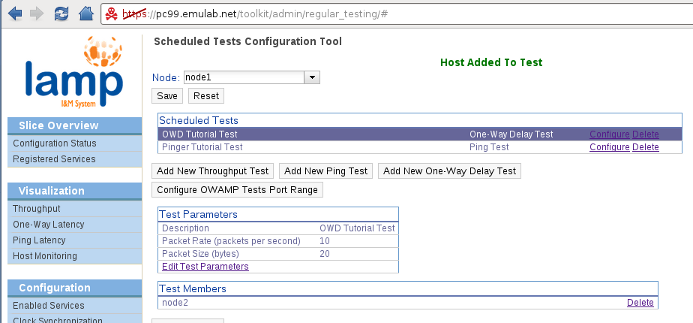
LAMP Portal - Scheduled test for one-way delay on node1.
-
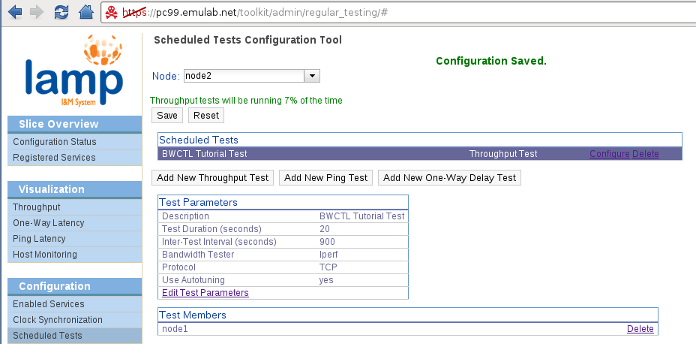
node2-bwctl.png (69.4 KB) - added by 14 years ago.
LAMP Portal - Scheduled test for throughput on node2.
-
portal4.png (129.4 KB) - added by 14 years ago.
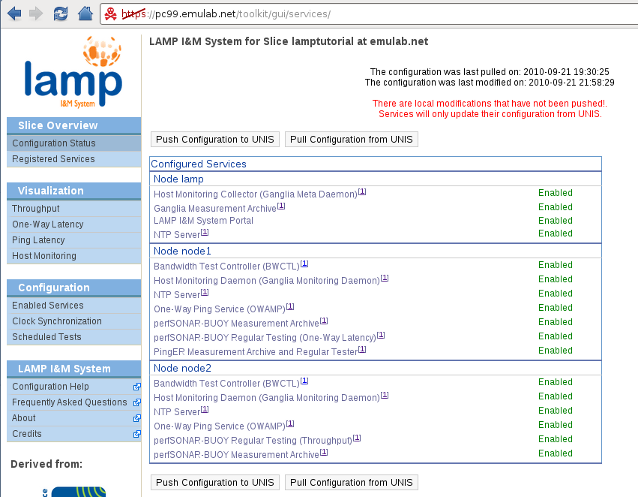
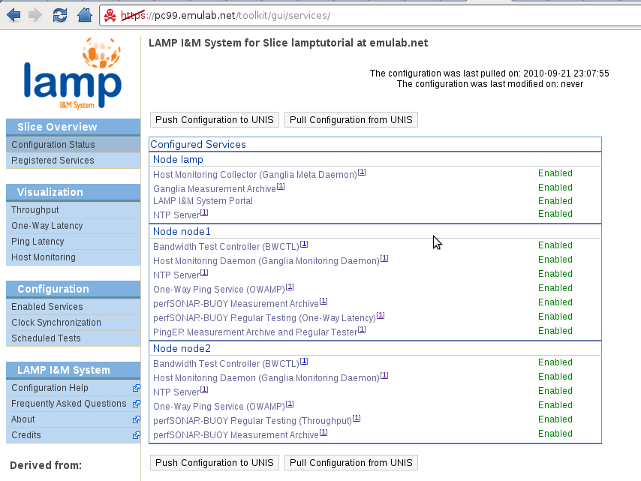
LAMP Portal - Overview of configuration after services have been enabled
-
portal3.png (132.9 KB) - added by 14 years ago.
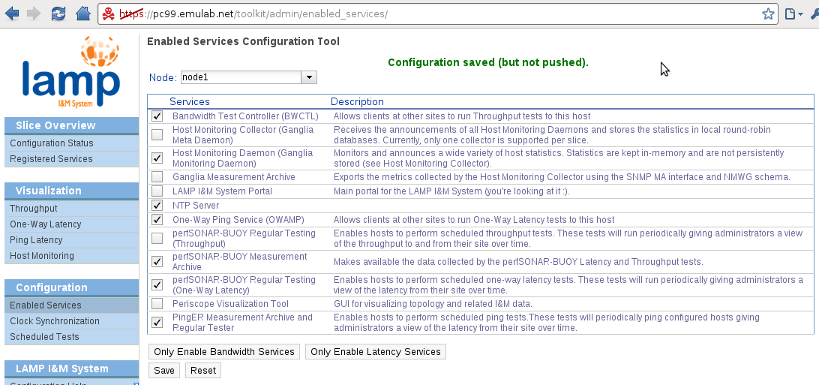
LAMP Portal - Enabling services on node1.
-
portal7.png (177.3 KB) - added by 14 years ago.
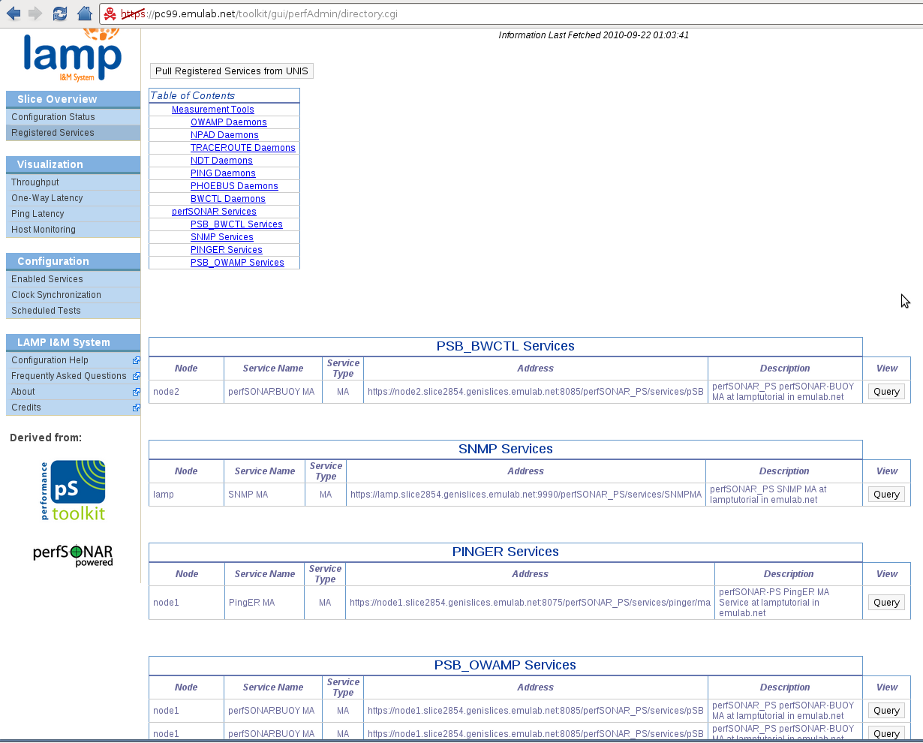
LAMP Portal - Registered Services directory.
-
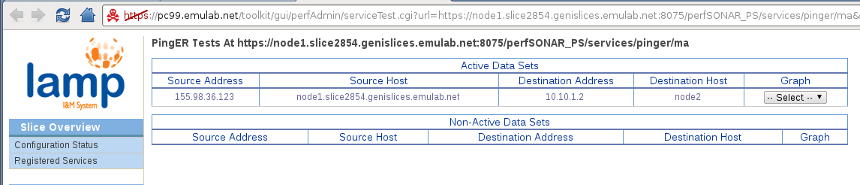
pingerma.png (58.8 KB) - added by 14 years ago.
LAMP Portal - Visualizing PingER MA metadata
-
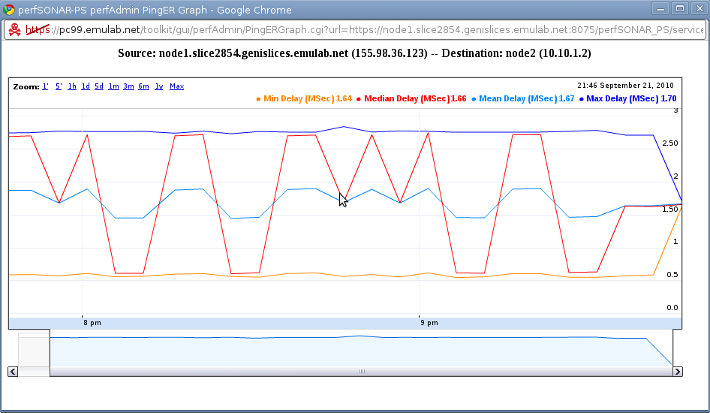
pingerma-graph.png (68.7 KB) - added by 14 years ago.
LAMP Portal - PingER MA data retrieved as a graph.
-
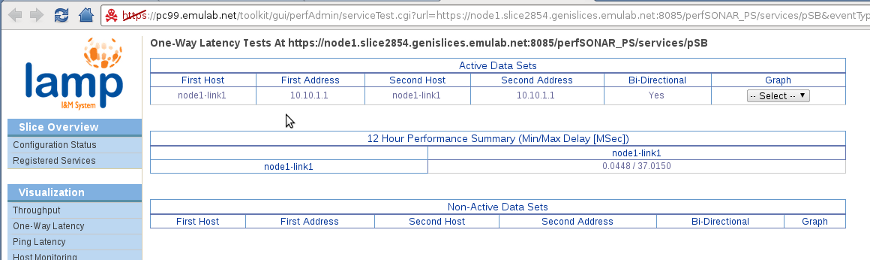
psb_owamp.png (64.3 KB) - added by 14 years ago.
LAMP Portal - perfSONARBUOY MA (One-way Latency) dataset metadata page.
-
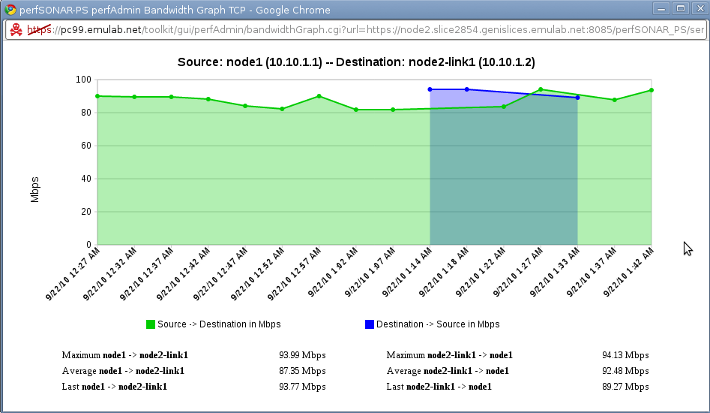
bwctl-line.png (74.5 KB) - added by 14 years ago.
LAMP Portal - Throughput data from perfSONARBUOY as line graph.
-
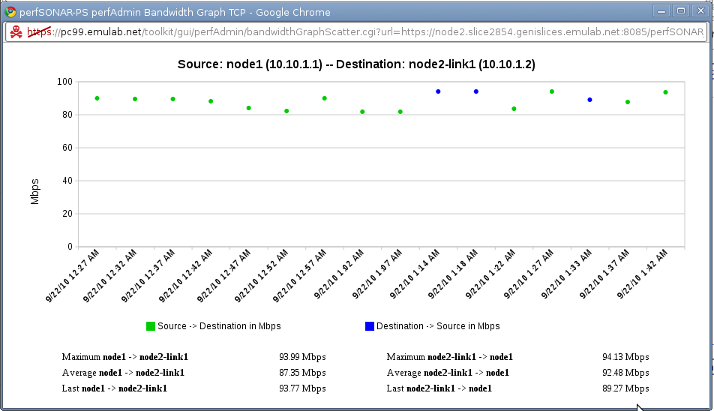
bwctl-scatter.png (54.6 KB) - added by 14 years ago.
LAMP Portal - Throughput data from perfSONARBUOY as scatter graph.
-
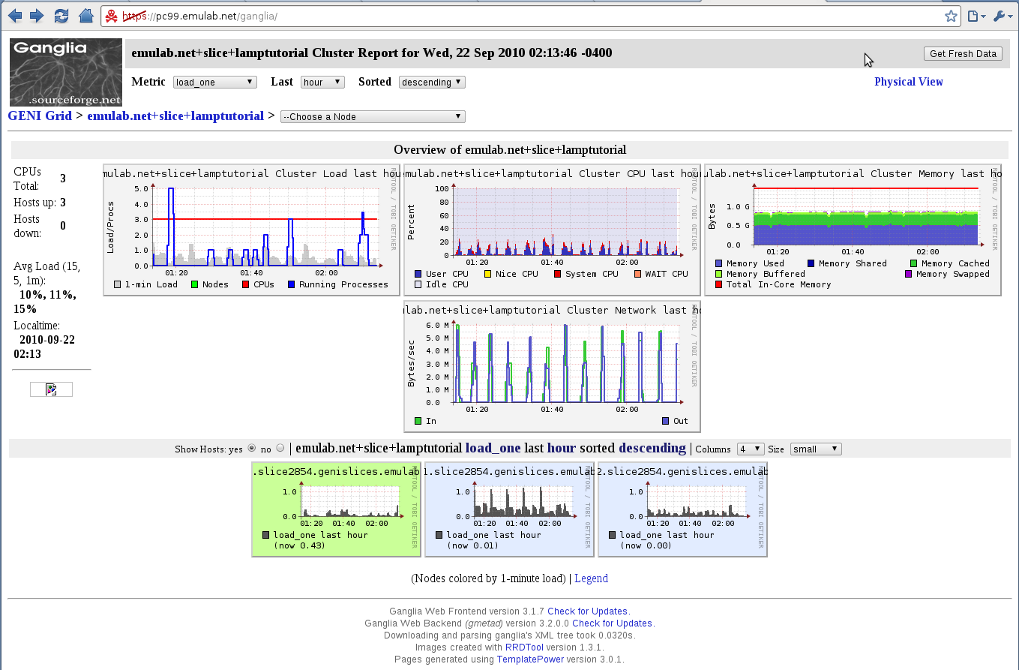
ganglia-web.png (232.1 KB) - added by 14 years ago.
Ganglia Web visualization tool for host monitoring data.
-
ganglia-node2.png (175.0 KB) - added by 14 years ago.
Ganglia Web visualization tool showing data for node2.
-
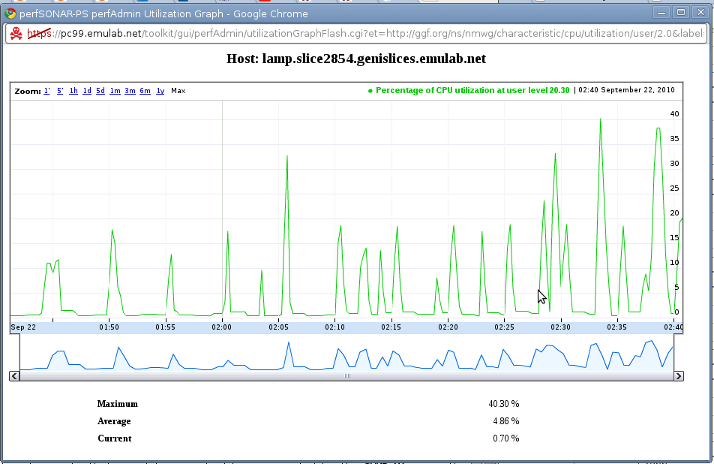
cpu-utilization.png (75.5 KB) - added by 14 years ago.
Percentage of CPU Utilization at user level for 'lamp' node.
-
portal6.png (123.3 KB) - added by 14 years ago.
LAMP Portal - Configuration Status after pushing changes to UNIS.
-
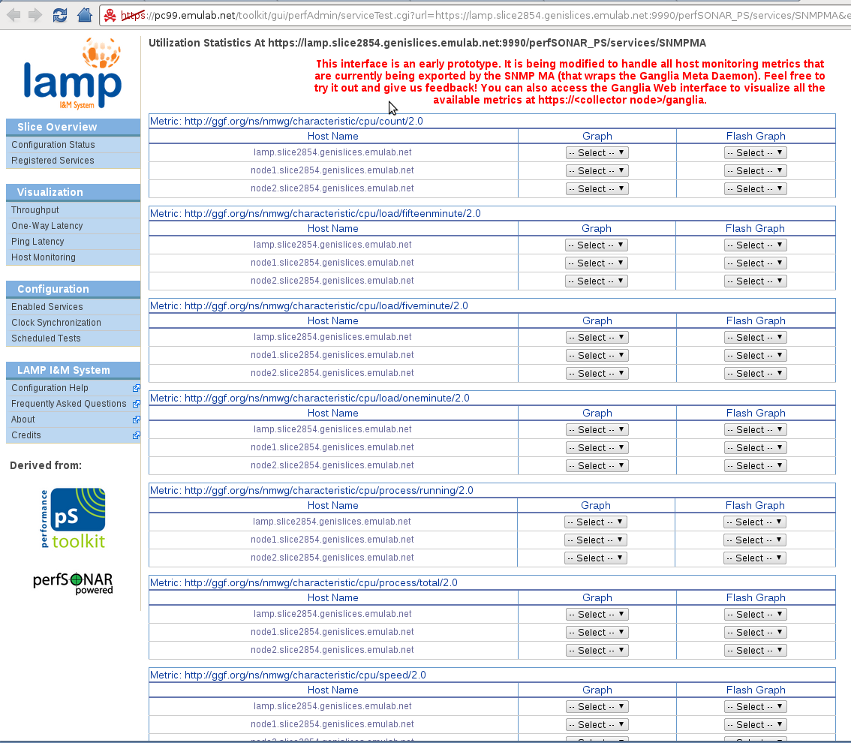
snmpma.png (250.8 KB) - added by 14 years ago.
LAMP Portal - SNMP MA metadata information.
-
psb_bwctl.png (100.2 KB) - added by 14 years ago.
LAMP Portal - perfSONARBUOY MA (Throughput) dataset metadata page.
-
lamp-sendmanifest.2.py (31.0 KB) - added by 12 years ago.
send-manifest with rspec v3 support
-
lamp-sendmanifest.py (31.0 KB) - added by 12 years ago.
send-manifest with rspec v3 support