
| Version 57 (modified by , 10 years ago) (diff) |
|---|
This page describes how to login to hosts that you have reserved through the GENI AM API. For any comments please contact us at help@geni.net.
Login to GENI hosts
 |
|
When you reserve nodes through the GENI AM API, you can login to your nodes using ssh . You get access to reserved hosts only through ssh keys. This page will give you some useful tips about how to login to your nodes.
In order to login to your nodes you need the following things:
|
|
SSH Client
Depending on which OS you are using there are different ssh client options.
Linux/Mac OS
All linux and Mac distributions come with a built-in ssh client, just open a Terminal and type ssh, you should get the usage for the ssh command.
Windows OS
There are multiple windows ssh clients. A list of some popular ones can be found here. Some commonly used options are:
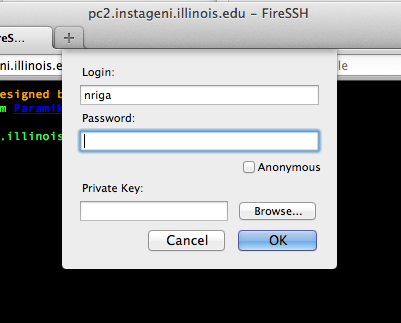
- The FireSSH add-on for Firefox: Install the FireSSH add-on for Firefox and use this as your ssh client. Instructions for using FireSSH are at http://firessh.net/help.html. *Recommended*
- Cygwin: a complete Linux-type environment that also includes an ssh client. If you have already installed cygwin on your host then you should just run it and follow the instructions for Linux for the rest of the instructions
- Putty: a lightweight free ssh client. Note: If you are using Putty you will also need to download puttygen to convert your private key to putty's format.
Get your Login, Host names and ports
In order to figure out your login name the best way is to use the status command of the GENI AM API. Depending of which tool you used to reserve the resources you can get this information in different ways.
Using the GENI Experimenter Portal
If you are using an account from the GPO Clearinghouse, i.e. have access to the GENI Experimenter Portal then the easiest way to get the information you need, you can simply load your slice in the portal:
- Login to the portal
- From the Home tab locate your slice and click on it to load it.
- On the top click the Details button. This page should have all the information you need.
Tip: The page that loaded has also ssh links available, If you are on a Mac computer, or a computer that has FireSSH you can simply press on these links.
Using Flack
If you are using Flack for building your experiment then in order to get the login name you need to load your slice in Flack and press on the (i) icon that is next to the node.
 . On the top of the information window it has a field that says
 Username, and Hostname. In the end of the host name there will be `:<port number>', e.g. 'pcwf171.emulab.net:22'.
This is the port number you should use.
Note: If you are on a Mac computer, or a computer that has [FireSSH installed then you can directly use the 'SSH' button that is on the top on the information pane for the host.
Using Omni
If you are using Omni, then you can run the sliverstatus command and get back a text output. If you search within that output you should find a field about the hostname and one about the login.
If you are trying to ssh to your hosts from the same machine that you used to reserve your hosts then you can use a script that comes with Omni and you can directly skip to this section.
Other tools
If you used another tool to reserve your resources, then you should figure out how to get the output of the sliverstatus command. If you can't figure this out please send us an email and let us which tool you used.
Get a copy of your ssh key
When you reserve your resources, the tool that you use for the reservation also installs one or more public keys on the hosts so that you can get ssh access. In order to ssh to the machines you will need to get a copy of the private ssh key that correspond to the installed public keys. As before, how to get a copy of the needed ssh key depends on the specific tool.
Using the GENI Experimenter Portal
If you are using your account with the GPO Clearinghouse then if you have used this option, the portal will have a copy of your SSH private key. When configuring your account in the portal you had an option to let the portal generate an SSH key pair for you. If you have chosen this option then you can:
- Login to the portal
- Go the to Profile tab
- Under the SSH Keys section you will find a button to download your Private key. When you click it the downloaded file will probably be named :id_geni_ssh_rsa. If you have upload your public key (under the private key column it says N/A) then you are the only person that has access to their private key. Locate that file and use it in the next steps.
Using Flack
Flack has a list of ssh keys that it uploads to nodes during the reservation. After you login to flack, on the left pane there should be a button with your login name.  If you click on that you will get a window that has different tabs. One of the tabs says
 SSH Keys.

In the information that will appear on the left pane there should be a private key. Press to the Save to File option and save it in your computer.
Note: If you are on a Mac computer then you can directly use the 'SSH' button that is on the top on the information pane for the host.
Using Omni
If you made your reservation with Omni then you will need to access the host where your Omni is installed to get a copy of your SSH Key. If you use the host that has Omni installed to ssh to your nodes then you skip to this section. If you just want to get a copy of your private key and use it for logging into your nodes from another host, then you should :
- Login to the host where you have Omni installed
- Open your omni configuration file. For most users this file is located at ~/.gcf/omni_config. Tip: When you run any command with omni, it prints the location of the configuration file towards the top.
- In the omni_config file there should be a section about your user that has an attribute called `keys', that has a list of all the public keys that are installed in the nodes. Usually in the same directory as the public keys there are also the private keys (a private key usually has the same name as the public key but without the '.pub' extension.
- Copy the private key over to your host, either by using scp or any other file transfer program. You can also just copy-paste the contents of the file.
Other tools
Any tool that uses the GENI AM API to reserve resources, provides the public keys to the AM to be installed on the compute resources. If you can't figure out which keys the tool you used installed on the hosts, please send an email to help@geni.net telling us which tool you used and we will be happy to help.
Logging in
Now that you have gathered all the different elements you are ready to login to your nodes.
Linux/Mac OS/Windows Cygwin
Follow these steps:
- Open a terminal
- Ensure that your private key has the right permissions. Type :
chmod 700 <private_key_file>
- Run ssh and enter your passphrase when prompted. Note: If you are prompted for a password then something went wrong. Make sure that all the information is correct.
ssh -i <private key location> <username>@hostname -p <port>
Windows BitVise/FireSSH/Putty
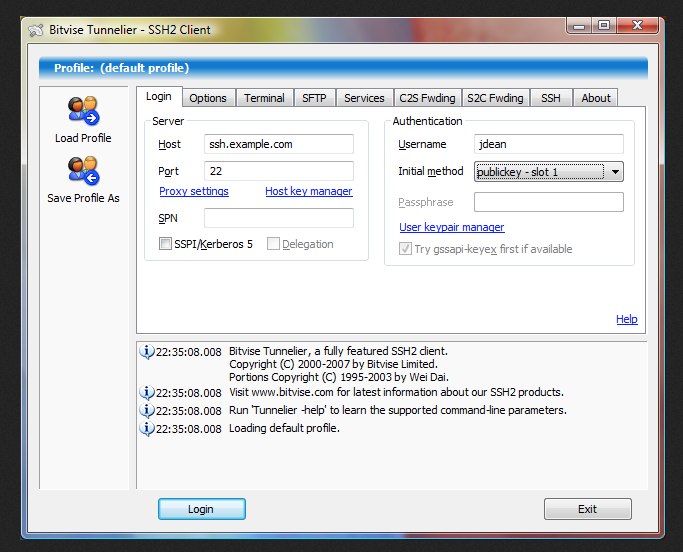
BiteVise
- Import your private key into bitvise through the User KeyPair Manager.

The Keypair Manager will let you import a private key with or without a passphrase. If you have a passphrase, bitvise will prompt you to enter it.

- To login, get the hostname and port of the machine you want to ssh into. Enter that into the appropriate host and port field. Enter your user name and then for Initial Method, pick the appropriate publickey-slot #. Hit the blue Login key and a terminal should appear to the machine. Refer to the picture above in Step 1.
FireSSH
Putty
If you are using putty on a windows machine, follow these steps:
- Convert your private key to the format that putty is expecting to. To do this use the puttygen program. For more information look here
- Create a new session that uses the username, hostname and port that you have gathered. Under the authentication menu make sure you point the key field to the key that you generated with puttygen.
Omni ReadyToLogin Script
If you are trying to login to the hosts from the machine where you have Omni installed, then you can use the readyToLogin.py script that comes with Omni to give you the exact command you need to run. To do this follow these steps:
- Modify your PYTHONPATH to include the omni src directory
export PYTHONPATH=$PYTHONPATH:<path_to_gcf_directory>/src
- The readyToLogin.py script uses the same arguments as Omni. You will need to provide the script the same input as the input you would provide to the sliverstatus command. While at the gcf directory run:
readyToLogin -a <AM_URL> <slicename>
In the end of the output there should be information about the ssh commands:
           nriga@pella:~/gcf$ ./examples/readyToLogin.py websrv -a pg-utah
           <MISSING OUTPUT>
================================================================================
Aggregate [https://www.emulab.net:12369/protogeni/xmlrpc/am] has a ProtoGENI sliver.


pc522.emulab.net's geni_status is: changing
Login using:
	xterm -e ssh -i /home/nriga/.ssh/geni_key inki@pc522.emulab.net -p 32570 &

pcwf171.emulab.net's geni_status is: ready
Login using:
	xterm -e ssh -i /home/nriga/.ssh/geni_key inki@pcwf171.emulab.net &

================================================================================
You can directly copy and paste the commands to your terminal and execute them. If you don't want the ssh to be opened in a new window you can omit the 'xterm -e' part.
Troubleshoot/Useful tips
I am trying to login to the hosts and I am prompted for a password.
When you are trying to login to GENI hosts you should only be prompted for your ssh passphrase. If you are prompted for a password then there is something wrong. Things that might be wrong:
- the permissions of your private key . If while trying to login you get a warning that says :
@@@@@@@@@@@@@@@@@@@@@@@@@@@@@@@@@@@@@@@@@@@@@@@@@@@@@@@@@@@
@         WARNING: UNPROTECTED PRIVATE KEY FILE!          @
@@@@@@@@@@@@@@@@@@@@@@@@@@@@@@@@@@@@@@@@@@@@@@@@@@@@@@@@@@@
Then you have a permission problem, try running:chmod 600 <private_key_location>
- wrong username : if you are using a wrong username you won't be able to login to the hosts, make sure that you get the right username especially if you are using planetlab resources
- wrong port : make sure you use the right port when trying to login, especially if you are using VMs in ProtoGENI.
- your sliver is not ready yet : make sure that the status of your liver is ready before you try to login. If you are using PlanetLab nodes then you might have to wait up to 30 minutes before your nodes are configured.
If you have tried everything but you still can't login, email us at help@geni.net.
My GENI host is behind a firewall.
Some hosts in GENI are behind a firewall. In most cases where nodes are behind a firewall, there is one or more machines that are accessible from the public internet that can be used as "stepping stones" to access these machines, i.e. you should login to them first and then login to the hosts that are behind the firewall. Currently in GENI the two most common cases of nodes that are behind a firewall are:
- Wide Area ProtoGENI hosts in Internet 2 PoPs : Any node in Utah can be used as a "stepping stone". If your slice doesn't already have a host in Utah, then you should add a VM in Utah that you will use for this purpose.
- Mesoscale hosts in some campuses: If you are using nodes in Mesoscale that are behind a firewall, you can use ops.pgeni.gpolab.bbn.com as a "stepping stone". You can login to ops.pgeni.gpolab.bbn.com using the your pgeni credentials file as your private key.
Once you have determined which host you will use as your stepping stone (pub_host from now on) to get to the host behind the firewall(priv_host from now on), you have several options:
- Recommended Use the
-Assh option to enable forwarding of the authentication agent. So try :ssh -A <username>@<pub_host>
Then from <pub_host> you can ssh to the private host without the need to upload your private key to <pub_host>.
user@<pub_host>$> ssh <username>@<priva_host>
- If the above option does not work then you can try using ssh port forwarding to get to your host. The main idea is that you will forward a local port on the client to go through the connection to <pub_host> and from there to ssh to <priv_host>. If you want to do this in command line then first login to the public host:
ssh -L <local port>:<priv_host>:22 <username>@<pub_host>
Then on a different terminal, try logging to the private host through the local port :
ssh -i <private key> <username>@localhost -p <local port>
You can also modify the ssh configuration file to that effect. This way it is easier to port-forward multiple firewalled hosts by adding the following lines in the file :
Host <pub_host_alias>
  Hostname <pub_host>
  LocalForward <local port1> <priv_host_1>:22
  LocalForward <local port2> <priv_host_2>:22
  user <username>

Host <priv_host_alias_1>
  Hostname localhost
  port <local port1>
  user <username>

Host <priv_host_alias_2>
  Hostname localhost
  port <local port2>
  user <username>
Then on one terminal do :
ssh <pub_host_alias>
And on another terminal:
ssh <priv_host_alias_1>
Managing SSH Keys
Depending on which type of OS You are using, there are ways to make the management of ssh keys and pathphrases simpler. In most linux systems there is a program called ssh-agent that runs automatically when you login and can help you manage your ssh keys so that you don't have to type your passphrase every time you use it.
|
|
|
|
ssh-add <private_key_filename>
It will ask you for the passphrase once but it won't ask you every time you try to use the key. If the
ssh-agentis not running you can take a look at these instructions for how to automatically run it when you login.
I don't want to keep typing my passphrase
It is highly recommended that you keep passphrases in all your ssh keys. You should first consider all the above options of using ssh agents before considering removing the passphrase from your ssh keys. If this does not work for you and you want to remove the passphrase from your private keys then you can use the following steps (assuming that your private key is id_rsa):
mv id_rsa id_rsa.encrypted
openssl rsa -in id_rsa.encrypted -out id_rsa
<type your passphrase when prompted>
chmod 400 id_rsa
Simplify the ssh command
If you don't want to always specify the '-i' command when you try to login to your hosts, then you can modify your ssh config file to use your key by default. The default location for your ssh configuration file is at ~/.ssh/config. For more information on the ssh configuration files use man ssh_config. If you want to setup your configuration so that it affects only your GENI hosts then you can add these lines to your configuration file for each host :
Host <your_alias>
     Port <port>
     HostName <hostname>
     User <username>
     IdentityFile <private_key_location>
Now you can simply run ssh <your_alias>, where <your_alias> can be any nickname you choose.
Attachments (7)
- pc-info.png (9.2 KB) - added by 12 years ago.
- user-info.png (8.7 KB) - added by 12 years ago.
- sshkey-info.png (12.8 KB) - added by 12 years ago.
- CoffeeWoman.png (25.2 KB) - added by 12 years ago.
- bitvise1.png (104.7 KB) - added by 10 years ago.
- bitvise2.png (65.6 KB) - added by 10 years ago.
- firessh-login.png (33.7 KB) - added by 10 years ago.
Download all attachments as: .zip