
| Version 35 (modified by , 10 years ago) (diff) |
|---|
Configure OVS With Layer 3 Routing
What is the problem?
Sometimes it is desirable to have a box which provides a custom network function (e.g. firewall, NAT, etc) using a custom OpenFlow controller. However we want the box to also provide default routing behaviour as would be provided by the kernel or using a software router such as XORP.
There are several approaches to solving this problem:
- A straightforward solution is to write your own IP forwarding logic in your controller. While implementing your own IP routing would be fun, it is time consuming and violates the reusability principle of software engineering.
- Another solution is to hope someone has written an OpenFlow router as part of the controller framework you use. But this limits your choices of controller frameworks.
- Finally, you could combine OVS software switches with an existing routing implementation (provided by the kernel, XORP, etc) in the same box.
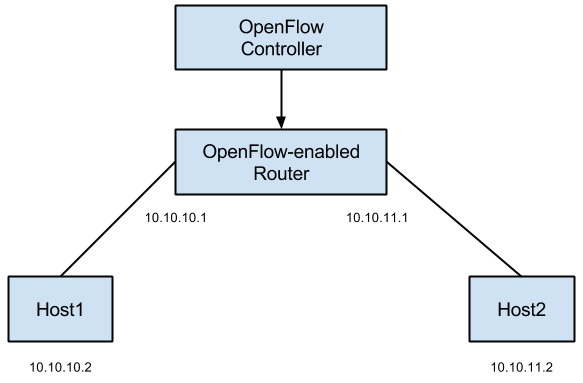
This page explains how to do the last of these options as shown in the figure. That is, it will allow us to make a custom firewall or NAT while IP routing is managed by XORP or Kernel Static Routing.

|
| Combine OpenFlow controlled OVS switch(es) with an existing IP router in the same box. This is the OpenFlow enabled router in the figures below. |
Approach
In this page, we are going to show you how to configure OVS to work with Linux kernel static IP routing. The method is largely from the help of Ryan Izard, rizard@g.clemson.edu, from Clemson University.
The topology we want to have is shown in below figure.
The configuration we want to have is shown in the figure below.
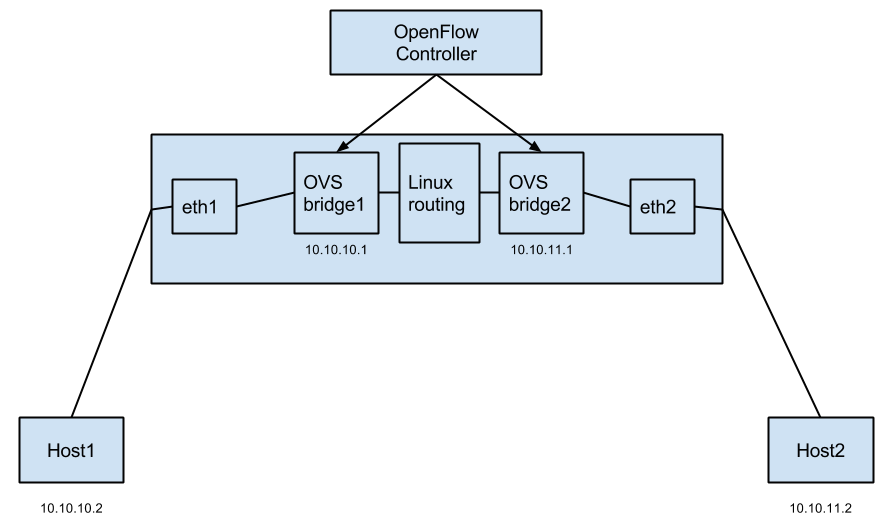
In summary the idea is to create a single OVS bridge for each interface on your machine that you want to assign an IP; pass the packet between the interface and the network stack through the LOCAL port of OVS; and let Linux routing handle the rest.
Instructions
This wiki page provides step-by-step instructions.
We've generated an RSpec http://www.gpolab.bbn.com/exp/NAT/ovs-l3-routing.rspec for you to try out this technique before applying it to your topology. You need to reserve it and login to host OVS to configure it.
- Login into
OVSand create 2 OVS bridges.sudo ovs-vsctl add-br OVSbr1 sudo ovs-vsctl add-br OVSbr2
- Remove the IPs of dataplane interfaces as you will assign them to the OVS bridges (your interface names may vary). On GENI, be careful not to bring down
eth0, because it is your control interface, if you bring that interface down you won't be able to login to your host!sudo ifconfig eth1 0 sudo ifconfig eth2 0
- Attach each interfaces to its own OVS bridge. Again, don't attach control plane interface.
sudo ovs-vsctl add-port OVSbr1 eth1
sudo ovs-vsctl add-port OVSbr2 eth2
- Verify the configurations by:
sudo ovs-ofctl show OVSbr1
See the output here.
sudo ovs-ofctl show OVSbr2
See the output here.
sudo ovs-vsctl show
See the output here.
- Now login into
host1amd try topinghost2.ping 10.10.11.2
The ping should not work.
- Assign the IP addresses to the OVS bridges, and add routing entries.
sudo ifconfig OVSbr1 10.10.10.1/24 up
sudo ifconfig OVSbr2 10.10.11.1/24 up
These will insert the corresponding routes automatically for you, and you can verify it via:
route -n
See the output here.
Alternatively, you could do:
sudo ifconfig OVSbr1 10.10.10.1 up
sudo ifconfig OVSbr2 10.10.11.1 up
sudo route add -net 10.10.10.0 netmask 255.255.255.0 dev OVSbr1
sudo route add -net 10.10.11.0 netmask 255.255.255.0 dev OVSbr2
route -n
- Check the flow table of each bridges.
sudo ovs-ofctl dump-flows OVSbr1
sudo ovs-ofctl dump-flows OVSbr2
You should see something like below for each of them:
NXST_FLOW reply (xid=0x4):
 cookie=0x0, duration=2.135s, table=0, n_packets=0, n_bytes=0, idle_age=2, priority=0 actions=NORMAL
- When an OVS bridge is installed in the Linux OS, it is wired such that any application packets or packets routed via Linux will be sent to the
LOCALport of the OVS bridge, assuming a route to that bridge exists. And, in the reverse direction, any packets sent out an OVS bridge'sLOCALport will be received by the local networking stack.
Let's do an example of how a packet would traverse our network from 10.10.10.2 to 10.10.11.2.
10.10.10.2 sends the packet with destination 10.10.11.2. The packet arrives at eth1. There is an OpenFlow flow in place on OVSbr1 between eth1 and it's LOCAL port, so the packet will match this flow and be sent out the LOCAL port of OVSbr1 (i.e. port 65534). The packet is then received by the local machine's network stack. It has a destination IP of 10.10.11.2, so the routing table we have established will send the packet to the OVSbr2 network interface. OVSbr2 will receive this packet from the local network stack via it's LOCAL port (i.e. port 65534). There is an OpenFlow flow in place on OVS2 between OVS2's LOCAL port and eth2, so this packet will match that flow and be sent out through eth2. From there, it will arrive at 10.10.11.2. The same process will occur in reverse. This assumes though that you insert the flows between the physical interfaces (eth1 and eth2) and the OVS LOCAL ports. That's the key to handing packet to and receiving packets from the local OS.
- If you want to insert these flows with OVS itself, you can do something like the following:
sudo ovs-ofctl add-flow OVSbr1 in_port=port_number_of_eth1,actions=LOCAL
sudo ovs-ofctl add-flow OVSbr1 in_port=LOCAL,actions=output:port_number_of_eth1
sudo ovs-ofctl add-flow OVSbr2 in_port=port_number_of_eth2,actions=LOCAL
sudo ovs-ofctl add-flow OVSbr2 in_port=LOCAL,actions=output:port_number_of_eth2
You can determine port_number_of_eth1 via:
sudo ovs-ofctl show OVSbr1
According to the output here, the port number of eth1 is 1.
- Now, if you check the flow table, for each of them you should see:
NXST_FLOW reply (xid=0x4):
 cookie=0x0, duration=993.757s, table=0, n_packets=0, n_bytes=0, idle_age=993, priority=0 actions=NORMAL
 cookie=0x0, duration=61.364s, table=0, n_packets=0, n_bytes=0, idle_age=61, in_port=1 actions=LOCAL
 cookie=0x0, duration=15.21s, table=0, n_packets=0, n_bytes=0, idle_age=15, in_port=65534 actions=output:1
- If you want to insert these flows via your controller, you will need to either specify port 65534 explicitly or use whatever convention your controller uses to specify the
LOCALport of a bridge.
Remember to set your controller to all OVS bridges you want to control:
sudo ovs-vsctl set-controller OVSbr1 tcp:127.0.0.1:6653 ptcp:6634:127.0.0.1
sudo ovs-vsctl set-controller OVSbr2 tcp:127.0.0.1:6653 ptcp:6634:127.0.0.1
- Apart from these, remember to verify IP forwarding is enabled:
cat /proc/sys/net/ipv4/ip_forward
sudo echo 1 > /proc/sys/net/ipv4/ip_forward
- Now you should be able to ping each other between
host1andhost2.ping 10.10.11.2
For an example of using this configuration, you may want to try out the OpenFlow NAT Example.
Attachments (6)
- OVS Routing abstract.png (23.9 KB) - added by 10 years ago.
- OVS Routing detail.png (40.1 KB) - added by 10 years ago.
- 2boxes.png (31.4 KB) - added by 10 years ago.
- 2boxes.pptx (20.7 KB) - added by 10 years ago.
- OVS Routing abstract.pptx (20.7 KB) - added by 10 years ago.
- OVS Routing detail.pptx (21.2 KB) - added by 10 years ago.
Download all attachments as: .zip