
| Version 1 (modified by , 13 years ago) (diff) |
|---|
Provisioning Service Evaluation
The Raven Provisioning Service project provides a suite of tools:
- Raven - Meta-tool that provides combined interface to Stork, Tempest, and Owl tools.
- Stork - Secure package management
- Tempest - Collective package management
- Owl - Slice monitoring
- IFTD - Efficient file transfer
- Service Monitor - Monitor services and restart as necessary
The Raven version 2.2.14-2652 and the Owl v1.0 packages were evaluated for this effort.
Time Frame: This evaluation took place Jyly 20-28, 2010.
Provisioning Service Findings
As Owl was reviewed, information was sufficient to get to the resource and use them.
Found it difficult to determine the content of my SFA GID credentials, used the Slice-Based Federation Architecture Specification document to determine what this credential is about.
Initially Stork Version 2.0b was evaluated, which was deemed incorrect. After discussion with Scott Baker found that the repository web interface is deprecated and that the command line raven tool should be used.
Also while installing SFA on an ubuntu system found that I should not use the trunk version, but that the tagged version should be used due to the fact that the SFA trunk uses a different credential and certificate format than the PlanetLab's public SFA server. The Tag version sfa-0.9-14 was used.
Provisioning Service How-to
The GENI Integration section at the Raven page states that there are 2 GENI Integration tasks done:
- Authenticating using SFA credentials - The Raven repository has been updated to allow logging in via SFA (Cluster B) GIDs and/or Credentials instead of using a PlanetLab account. The supported format is the GENI Cluster B GID or Credential file. This support has been developed in conjunction with Princeton's Geniwrapper.
- Owl Support on SeattleGENI - The Owl client has been ported to the Seattle Million Node Geni project.
Raven tool Authentication using SFA Credentials How-to
The Raven tool is listed as tested on Fedora 8 and requiring: Python 2.5 or newer, with Python libraries: pyOpenSSL, PyXML, and M2Crypto, also required is rpm-build package. Instruction from the Raven Enduser Tool page were used to executed the steps captured below.
- The SFA should be installed which can be achieved in two ways.
1a. SFA install from SVN check out
    $ svn co http://svn.planet-lab.org/svn/sfa/tags/sfa-0.9-14 sfa-0.9-14
    $ cd sfa-0.9-14/
    $ sudo make instal
SFA required two additionall packages to be installed:
- libxml2:
$ git clone git://git.gnome.org/libxml2 $ cd libxml2 $ ./autogen $ make $ sudo make install - libxslt-1.1.22 downloaded from [from http://www.at.linuxfromscratch.org/blfs/view/6.3/general/libxslt.html libxslt] site.
        $ tar xvzf libxslt-1.1.22.tar.gz
        $ cd libxslt-1.1.22
        $ ./configure --prefix=/usr
        $ make && sudo make install
1b. SFA install with yum
Edit the vi /etc/yum.repos.d/myplc.repo, which should point to the latest RPMS:
   [myplc]
   name=MyPLC
   baseurl=http://build.planet-lab.org/planetlab/f8/planetlab-f8-i386-5.0-rc14/RPMS/
   enabled=1
   gpgcheck=0
Install the sfa and sfa-client packages:
$ sudo yum install sfa sfa-client
- Created an ~/.sfi/sfi_config containing:
  SFI_AUTH='plc.bbn'
  SFI_USER='plc.bbn.lnevers'
  SFI_REGISTRY='http://www.planet-lab.org:12345/'
  SFI_SM='http://www.planet-lab.org:12347/'
  SFI_GENI_AM='http://www.planet-lab.org:12348'
- Copy RSA private key to ~/.sfi directory:
$ cp ~/.ssh/id_rsa ~/.sfi/lnevers.pkey
- Get Planet Lab Central listing to verify that settings are correct:
   $ sfi.py list plc.bbn
   $ sfi.py show plc.bbn
The above command will generate 2 additional files in the ~/.sfi directory: <username>.cert and <username>.cred
- Using the files raven and arizona-lib from the Raven Software Download area and installed packages:
$ sudo rpm --install arizona-lib-2.2.14-2652.noarch.rpm raven-2.2.14-2652.noarch.rpm
The above creates a /usr/local/raven and places a binary in /usr/bin/.
- Created a Raven Experiment:
  $ mkdir ~/Provisioning/raven_experiment
  $ cd ~/Provisioning/raven_experiment/
  $ raven create

  Experiment name: [None] ? ln_raven_experiment

  Location of your private key: [None] ? ~/.sfi/lnevers.pkey

  A GENI Credential file may be used to automatically upload files to the Raven
  repository. This file is optional, but without it you will be responsible
  for manually uploading the files.

  Location of GENI cred file: [None] ? ~/.sfi/lnevers.cred

  Raven may be configured to manage the config files on your slices for you.
  You may enter multiple slice names separated by commas. Enterning no
  slice names will cause packages and tpfiles to be uploaded, but not
  slice configuration files.

  Slices that should be managed by this experiment: [] ? bbn_gusheval

  The packages.pacman file controls which packages will be installed
  on your nodes. This tool can be configured to automatically manage
  this file, by installing all of your packages on all of your nodes.

  Automatically manage your packages.pacman (y/n): [y] ?
  $
The above populates a raven.conf file:[packagerules] noinstall = [container] version = 1 [experiment] name = ln_raven_experiment slices = bbn_gusheval [manage_packages] upgrade_owld = True manage_packages = True upgrade_stork = True [identity] credname = /home/lnevers/.sfi/lnevers.cred privatekeyname = /home/lnevers/.sfi/lnevers.pkey [dir] uploaddir = upload userdir = users packagedir = packages builderdir = build tempestdir = tempest configdir = config
- Created a tar package in the raven_experiment directory, using instructions from Raven Package Instructions page:
  $ mkdir helloworld
  $ echo "date >> /tmp/helloworld.txt" > helloworld/autorun.sh
  $ tar -czf helloworld-1.0.tar.gz helloworld
  $ cp helloworld-1.0.tar.gz packages/.
The package must be published, from the experiment directory:
  $ cd raven_experiment
  $ raven publish
    building: helloworld2
      version incremented to 0.1
      built:  ./packages/helloworld2-0.1-0.noarch.rpm
    trusting: helloworld-1.0.tar.gz
    trusting: helloworld2-0.1-0.noarch.rpm
    trusting user: stork
    trusting user: fedora8
    adding to packages.pacman: helloworld
    adding to packages.pacman: helloworld2
    building: ln_raven_experiment_ravenconfig RPM
      version incremented to 0.1
      re-building tpfiles due to change in tempest rpm
    trusting: helloworld-1.0.tar.gz
    trusting: helloworld2-0.1-0.noarch.rpm
    trusting: ln_raven_experiment_ravenconfig-0.1-0.noarch.rpm
    trusting user: stork
    trusting user: fedora8
    adding to packages.pacman: helloworld
    adding to packages.pacman: helloworld2
    building: ln_raven_experiment_ravenconfig RPM
      already up-to-date
    linking: helloworld-1.0.tar.gz
    linking: helloworld2-0.1-0.noarch.rpm
    linking: ln_raven_experiment_ravenconfig-0.1-0.noarch.rpm
    signing: ln_raven_experiment.tpfile
    signing: bbn_gusheval.stork.conf
  repository: https://stork-repository.cs.arizona.edu/REPOAPI/
    uploading: bbn_gusheval.27fcf8b05f7cbbedcd5ca6bd2ba63a683d779d5d.stork.conf
      True
    uploading: ln_raven_experiment_ravenconfig-0.1-0.noarch.rpm
      True
    uploading: helloworld2-0.1-0.noarch.rpm
      True
    uploading: helloworld-1.0.tar.gz
      True
    uploading: ln_raven_experiment.27fcf8b05f7cbbedcd5ca6bd2ba63a683d779d5d.tpfile
      True
  $
- Accessed the node via gush to verify that package raven_experiment is being run:
$ ./gush -P 15555
here
gush> Gush has learned about the slice bbn_gusheval.
gush>  connect node2.lbnl.nodes.planet-lab.org
Connecting to host bbn_gusheval@node2.lbnl.nodes.planet-lab.org:61414.
bbn_gusheval@node2.lbnl.nodes.planet-lab.org:61414 has joined the mesh.

gush> shell "ps -eaf|grep raven|egrep -v grep"
bbn_gusheval@nis-planet2.doshisha.ac.jp:61414,7493: root      7410  7371 28 14:48 ?        00:00:00 python /usr/bin/stork --upgrade ln_raven_experiment_ravenconfig
- It is also possible to install external packages by referencing their name. The package
sources that are included by default a Stork and Fedora 8 distribution packages. In this next step two packages are installed from the Fedora 8 distribution:
  $ cd raven_experiment
  $ echo > packages/emacs.name
  $ echo > packages/java.name
  $ raven publish
    building: helloworld2
      already current:  ./packages/helloworld2-0.1-0.noarch.rpm
    trusting: helloworld-1.0.tar.gz
    trusting: helloworld2-0.1-0.noarch.rpm
    trusting: ln_raven_experiment_ravenconfig-0.1-0.noarch.rpm
    trusting user: stork
    trusting user: fedora8
    adding to packages.pacman: emacs
    adding to packages.pacman: helloworld
    adding to packages.pacman: helloworld2
    adding to packages.pacman: java
    building: ln_raven_experiment_ravenconfig RPM
      version incremented to 0.2
      re-building tpfiles due to change in tempest rpm
    trusting: helloworld-1.0.tar.gz
    trusting: helloworld2-0.1-0.noarch.rpm
    trusting: ln_raven_experiment_ravenconfig-0.2-0.noarch.rpm
    trusting user: stork
    trusting user: fedora8
    adding to packages.pacman: emacs
    adding to packages.pacman: helloworld
    adding to packages.pacman: helloworld2
    adding to packages.pacman: java
    building: ln_raven_experiment_ravenconfig RPM
      already up-to-date
    linking: helloworld-1.0.tar.gz
    linking: helloworld2-0.1-0.noarch.rpm
    linking: ln_raven_experiment_ravenconfig-0.2-0.noarch.rpm
    signing: ln_raven_experiment.tpfile
    signing: bbn_gusheval.stork.conf
  repository: https://stork-repository.cs.arizona.edu/REPOAPI/
    uploading: ln_raven_experiment_ravenconfig-0.2-0.noarch.rpm
      True
    uploading: bbn_gusheval.27fcf8b05f7cbbedcd5ca6bd2ba63a683d779d5d.stork.conf
      True
    already-uploaded: helloworld2-0.1-0.noarch.rpm
    already-uploaded: helloworld-1.0.tar.gz
    uploading: ln_raven_experiment.27fcf8b05f7cbbedcd5ca6bd2ba63a683d779d5d.tpfile
      True
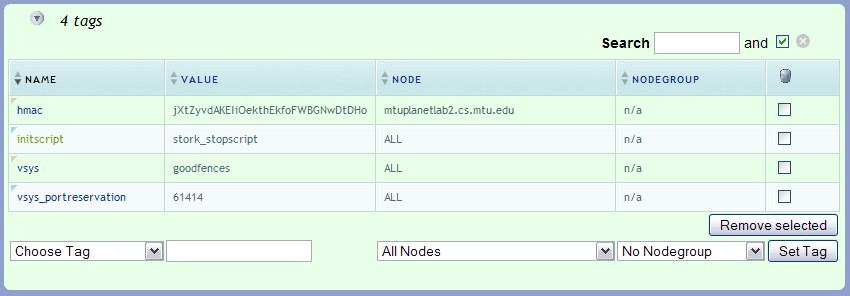
It is also possible to see stork tags in the PlanetLab Slice details:

OWL Support on SeattleGENI How-to
Pre-requisites:
- Get an account at SeattleGENI portal.
- Request key generation as part of the account creation.
- Download userid.privatekey and userid.publickey and place keys in seatlleGENI install directory.
- Login into Seattle GENI
- Request resources at My Vessels
Once the above steps are completed you may install and use the Owl slice monitoring package.
Installed the OwlSeattle package as instructed in the Owl support for Seattle page:
- Unpacked the Owl package in the same directory of the MillionNode Seattle GENI.
- Used the repypp.py tool to create a preprocessed code file named owltest.pp.repy:
$python ./repypp.py owltest.repy owltest.pp.repy
Set up key for seash which supports the following options:
A target can be either a host:port:vesselname, %ID, or a group name.

on target [command] -- Runs a command on a target (or changes the default)
as keyname [command]-- Run a command using an identity (or changes the default).
add [target] [to group]      -- Adds a target to a new or existing group
remove [target] [from group] -- Removes a target from a group
show                -- Displays shell state (use 'help show' for more info)
set                 -- Changes the state of the targets (use 'help set')
browse              -- Find vessels I can control
genkeys fn [len] [as identity] -- creates new pub / priv keys (default len=1024)
loadkeys fn [as identity]   -- loads filename.publickey and filename.privatekey
list               -- Update and display information about the vessels
upload localfn (remotefn)   -- Upload a file
download remotefn (localfn) -- Download a file
delete remotefn             -- Delete a file
reset                  -- Reset the vessel (clear the log and files and stop)
run file [args ...]    -- Shortcut for upload a file and start
start file [args ...] -- Start an experiment
stop               -- Stop an experiment
split resourcefn            -- Split another vessel off of each vessel
join                        -- Join vessels on the same node
help [help | set | show ]    -- help information
exit                         -- exits the shell
loadstate fn -- Load saved states from a local file. One must call 'loadkeys
                 username' and 'as username' first before loading the states,
                 so seash knows whose RSA keys to use in deciphering the state
                 file.
savestate fn -- Save the current state information to a local file.
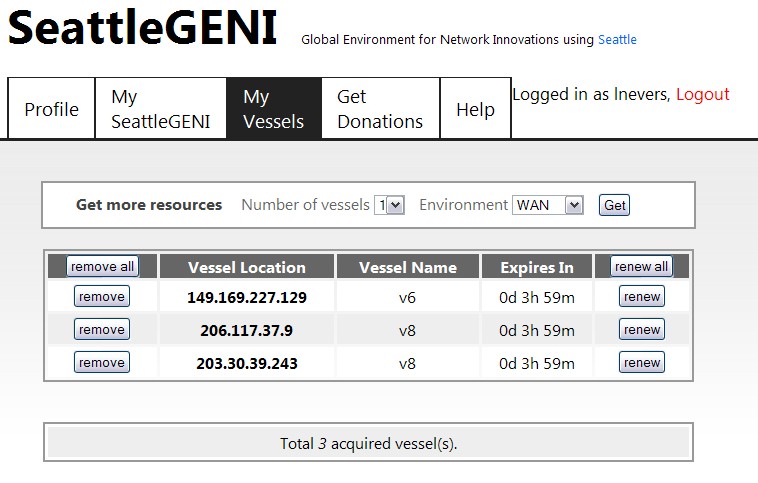
In the following example, 3 vessels(nodes) had been requested from SeattleGENY->My Vessels to run the owl script:

The Owl script can now be run:
$ python ./seash.py
 !> genkeys lnevers
Created identity 'lnevers'
 !> loadkeys lnevers
 !> as lnevers
lnevers@ !> browse
['130.161.40.154:1224', '133.9.81.166:1224', '203.178.143.10:1224', '152.3.138.5:1224', '208.117.131.116:1224', '133.9.81.164:1224', '206.117.37.9:1224', '149.169.227.129:1224', '203.30.39.243:1224']
Added targets: %1(149.169.227.129:1224:v6), %3(203.30.39.243:1224:v8), %2(206.117.37.9:1224:v8)
Added group 'browsegood' with 3 targets
lnevers@ !> on browsegood
lnevers@browsegood !> run owltest.pp.repy
Various details can be shown within the seash.py interface:
lnevers@browsegood !> update
lnevers@browsegood !> show info
149.169.227.129:1224:v6 {'nodekey': {'e': 65537L, 'n': 108700547230965815030281892518836265406880649144319241850548452379387629334687581413313579314495983534078661105889728950154775555961574530604793952431511451091235346680564399627840628247477370016596965218186643920418626097706670807761103530971073488453100773168860730126434481991452870333859427518267898057957L}, 'version': '0.1r', 'nodename': '149.169.227.129'}
206.117.37.9:1224:v8 {'nodekey': {'e': 65537L, 'n': 111036927216391924654743705931909443359542286095079239170551986946721053435455525436183696732328791173792811118797954615349469544359991891203741636400610278508657796796074694320840320112973045053175565741280334677219128496811085304825114209253189982049737395182708371542628957434089203105688361256978110320889L}, 'version': '0.1r', 'nodename': '206.117.37.9'}
203.30.39.243:1224:v8 {'nodekey': {'e': 65537L, 'n': 99870974570855030753474234333944335808140240269544700795681203201656260374719692200619947292539967608982021680255874385683566208312961321822579665850598146823642597999046217853884862228809734080873008121222523381717514460448115073333642563631881087440881392384369718908915671660586118345893265826964714853589L}, 'version': '0.1r', 'nodename': '203.30.39.243'}

lnevers@browsegood !> list
  ID Own                      Name     Status              Owner Information
  %1       149.169.227.129:1224:v6    Started
  %2          206.117.37.9:1224:v8    Started
  %3         203.30.39.243:1224:v8    Started

lnevers@browsegood !> show hostname
149.169.227.129 is known as planetlab1.eas.asu.edu
206.117.37.9 has unknown host information
203.30.39.243 has unknown host information
lnevers@browsegood !> show location
%1(149.169.227.129): Tempe, AZ, United States
%2(206.117.37.9): Pasadena, CA, United States
%3(203.30.39.243): Singapore, Singapore

lnevers@browsegood !> show files
Files on '206.117.37.9:1224:v8': 'owltest.pp.repy'
Files on '149.169.227.129:1224:v6': 'owltest.pp.repy'
Files on '203.30.39.243:1224:v8': 'owltest.pp.repy'

lnevers@browsegood !> show log
Log from '206.117.37.9:1224:v8':
owl experiment start
calling update
calling update
calling update
calling update

Log from '149.169.227.129:1224:v6':
owl experiment start
calling update
calling update
calling update
calling update

Log from '203.30.39.243:1224:v8':
owl experiment start
calling update
calling update
calling update
calling update
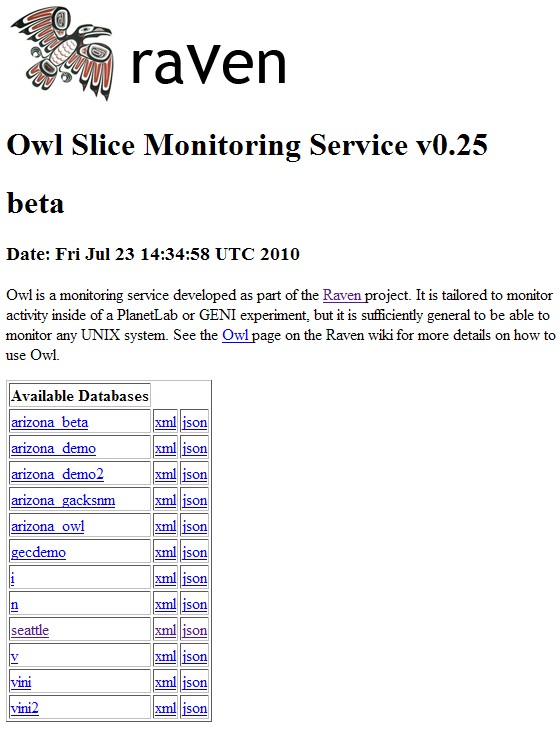
Once the experiment is running, you can view the Owl data collected at the Owl Slice Monitoring Service website. At this location you will be presented with a list of databases:

The database to choose is "seattle":

and if one of the vessels is chosen:

Attachments (5)
- 2010-07-23_Provisioning-raven-owl-2.jpg (77.4 KB) - added by 14 years ago.
- 2010-07-23_Provisioning-raven-owl-3.jpg (59.7 KB) - added by 14 years ago.
- 2010-07-23_Provisioning-raven-owl-1.jpg (78.3 KB) - added by 14 years ago.
- 2010-07-23_seattleGENI-1.jpg (68.5 KB) - added by 14 years ago.
- 2010-07-28_Provisioning-raven-tags.jpg (39.7 KB) - added by 14 years ago.
Download all attachments as: .zip