
| Version 8 (modified by , 11 years ago) (diff) |
|---|
1. Configure Omni
 |
|
Omni is a tool that will help you reserve resources in GENI, using your GENI
credentials. The first step is to load into Omni your information.
Omni uses a configuration file, and there is a script that will automatically generate the file with
some default options and place it in the default place of `~/.gcf/`. Follow these steps:
|
omni-configure.py -f portal
. Follow these steps:
- In the web browser login to
www.pgeni.gpolab.bbn.comusing the information in the paper slip - On the menu on the left, press
Download your cert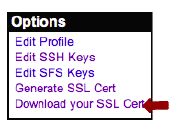
- Select the option about downloading as a pem file.
- Press
Ctrl-sto save this page. Type~/.ssl/geni_cert.pem, if file already exists replace it.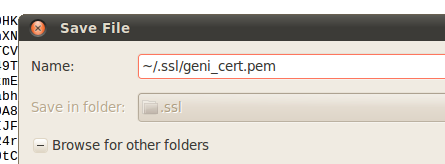
- In the terminal type:
omni-configure.py
This should configure your Omni, with your downloaded certificate and create an ssh key pair for logging in to nodes.


Tip: When prompted for a passphrase, type the passphrase in your slip. You might be asked for a passphrase multiple times. Note: If you have taken other tutorials, you might have configured omni with other accounts, select to overwrite existing setting if asked.
The output should look like:
geni@geni-vm:~$ omni-configure.py
{'framework': 'pg', 'configfile': '~/.gcf/omni_config', 'plkey': '~/.ssh/geni_pl_key', 'cert': '~/.ssl/geni_cert', 'verbose': False}
INFO:omniconfig:Using configfile: /home/geni/.gcf/omni_config
INFO:omniconfig:Using certfile /home/geni/.ssl/geni_cert.pem
INFO:omniconfig:

	CREATING SSH KEYPAIR
INFO:omniconfig:Private key stored at: /home/geni/.ssh/geni_key
Enter passphrase:
INFO:omniconfig:Public key stored at: /home/geni/.ssh/geni_key.pub
INFO:omniconfig:Added to /home/geni/.ssh/config this line:
	'IdentityFile /home/geni/.ssh/geni_key
'
INFO:omniconfig:Wrote omni configuration file at: /home/geni/.gcf/omni_config
1a. Look around the omni_config file -- Optional
Open the file ~/.gcf/omni_config using either vim or emacs. Close to the top of the file you will see two parameters called default_cf and users. Your username should be at least listed in the user section. Look for the sections in the file that are named [pg] and [<username>].
In the [<username>] section, the information need for logging-in to reserved compute resources are provided. It includes your unique user URN and a public key that would be uploaded to the hosts that you reserve.
In the [pg] section you configure Omni to use your personal information. The cert and the key attribute point to files that we have manually downloaded from pgeni.gpolab.bbn.com. This is equivalent to the Download action of Flack.
Another interesting section to look at is the [aggregate-nicknames] sections. Flack already knows the URL for all the AMs and present you a list of AMs to choose from using a short, descriptive name. In Omni a user is required to pass the URL for each call to the GENI AM API. In this section the user gets a chance to provide short descriptive names to the URLs that are easier to memorize and use.
2. Clear the passphrase from your cert
When Omni talks to different authorities in GENI, it will need to identify you as a valid GENI user, so it will ask you for your passphrase multiple times. To save time during the tutorial, we are going to remove the passphrase from your cert and your ssh key. There is a script to clear the passphrases.
- In the terminal run
clear-passphrases.py
Use the passphrase given to you in the paper slip, you might be prompted for a passphrase multiple times make sure you always use the same passphrase. The output should look likegeni@geni-vm:~$ clear-passphrases.py Do you want to remove the passphrase from your cert (/home/geni/.ssl/geni_cert.pem) [Y,n]?y INFO:clearcert: THIS SCRIPT WILL REPLACE /home/geni/.ssl/geni_cert.pem WITH AN UNENCREPTED CERT. A BACKUP OF THE ORIGINAL CERT WILL BE CREATED INFO:clearcert:The encoded certificate file is backed up at /home/geni/.ssl/geni_cert_enc.pem INFO:clearcert:Removing passphrase from cert... Enter pass phrase for /home/geni/.ssl/geni_cert.pem: writing RSA key INFO:clearcert:Change permissions of /home/geni/.ssl/geni_cert.pem to 0600 Do you want to remove the passphrase from you ssh-key (/home/geni/.ssh/geni_key, key used to login to compute resources) [Y,n]?y INFO:clearcert: THIS SCRIPT WILL REMOVE THE PASSPHRASE FROM YOUR SSH KEY. NO COPY OF THE ORIGINAL PRIVATE KEY WILL BE KEPT Enter PEM pass phrase: Enter passphrase: geni@geni-vm:~$
- Add the key to the ssh agent
ssh-add ~/.ssh/geni_key
- Verify that you have the necessary credential and key files
ls ~/.ssh ~/.ssl
The output looks like :geni@geni-vm:~$ ls ~/.ssh ~/.ssl /home/geni/.ssh: config geni_key geni_key.pub /home/geni/.ssl: geni_cert_enc.pem geni_cert.pem
geni_cert.pem Cleartext certificate, i.e. does not require any passphrase geni_cert_enc.pem Encrypted certificate geni_key The private key that you will use to login to the nodes geni_key.pub The corresponding public key that will be uploaded to the nodes
Note: You might see more files than the ones listed above, which are probably backup files from configuring omni, or files from other tutorials.
3. Test Omni setup
In order to test that our configuration is correct, you can issue a getversion
command. For this step we have used PlanetLab's AM, but you can use any
Aggregate Manager(AM).
- In the terminal type:
omni.py getversion -a plc
In GENI each AM can be contacted using a specific URL. In order to make it easier to talk to AMs, Omni uses nicknames; i.e. it maps each URL into an easy to remember nickname. For example the PlanetLab AM listens for requests athttp://www.planet-lab.org:12346, however you can use the nicknameplcto refer to that URL. Nicknames are defined in each user's omni_config file.
For the rest of the tutorial we are going to use aggregate nicknames.