
| Version 16 (modified by , 11 years ago) (diff) |
|---|
IPv4 Routing Assignment
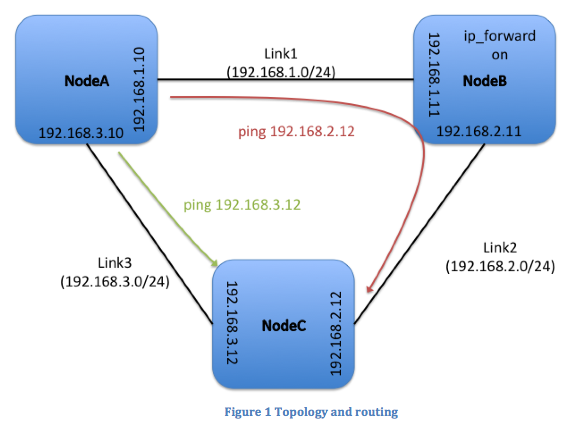
Overview:In this experiment you will learn how to set up static routing with the route command. We will use the following network topology for this experiment:
|
|
Prerequisites:For this tutorial you need :
|
Tools:All the tools will already be installed at your nodes. For your reference we are going to use: |
|
Where to get help:For any questions or problem with the tutorial ask your TA or Professor for help. If you are doing this exercise outside the context of a course, please email help@geni.net |
 |
1. Verify your Environment Setup:
This exercise assumes you have already setup your account at the GENI Portal. In particular ensure that:- You can login to the GENI Portal
- You are a member of a GENI Project (there is at least a project listed under the ''Projects'' tab.
- You have setup your ssh keys (there is at least one key listed under the ''Profile->SSH Keys'' tab.
2. Setup the Topology:
- Login to the GENI Portal
- Reserve resources within this slice using the EG-3nodes-mesh rspec
Action: Take a screenshot of the topology in Flack after it is ready and include it in your write up
 |
3. Setup the routing
The goal of this exercise is to setup the routing as indicated in Figure 1; i.e. packets from A send to IP address 192.168.2.12 on node C should be routed via node B. In order to create this routing behavior you will need to modify the routing tables in your nodes using the linux route command
 |
Step 5: Cleanup experiment:
After you are done with your experiment, you should always release your resources so that other experimenters can use the resources. In order to cleanup your slice :- Press the Delete button in the bottom of your canvas
- Select Delete at used managers and confirm your selection.
 Step 1: Verify your Environment Setup
This experiment assumes you have already setup your account at the GENI Portal. In particular ensure that:
- You can login to the GENI Portal
- You are a member of a GENI Project (there is at least a project listed under the Projects tab.
- You have setup your ssh keys (there is at least one key listed under the Profile->SSH Keys tab.
Step 2: Setup the Topology
- Login to the GENI Portal and create a slice
- Reserve resources within this slice using the EG-3nodes-mesh rspec
Hand in: A screenshot of the topology after it is ready from Flack.

Tips

- Remember that you can use “ifconfig” to determine which Ethernet interface (e.g., eth0) is bound to what IP address at each of the nodes.
- In order to enable forwarding of packets on node B you have to execute the following command:
echo 1 > /proc/sys/net/ipv4/ip_forward
- A new slice will always be in its initial state with NO routing set up!
Finish

- Return to the Slice page on Portal. On the row in the aggregate table for the aggregate you used, press the Delete Resources button.
- When prompted, confirm that you want to delete this sliver. Then, make sure you see a message that you have successfully deleted resources at this aggregate.
- Do this for as many aggregates as you got resources from.
Attachments (1)
- routetopology.png (106.3 KB) - added by 11 years ago.
Download all attachments as: .zip