
- Advanced Topics in Networking Experiments using GENI
- Prework
- Useful Tips
- Overview of Alice's Experiment
- I. Configure Omni
- II. Make a slice
- III. Make a ProtoGENI sliver
- IV. Make a MyPLC sliver
- V. Run a Layer 2 ping
- VI. Make an OpenFlow sliver
- VII. Cleanup resources
- VIII. Get Your Own Account
- AM URL Table
Advanced Topics in Networking Experiments using GENI
04/10/2012 : This page might contain outdated information, please contact help@geni.net if you would like to go through a similar tutorial
Prework
- Download and install VirtualBox on your machine, we have tested versions 4.0.8, 4.0.10, 4.0.12.
- If you run Ubuntu 10.04, it comes with VirtualBox 3.1.6_OSE, which will not work, please download the latest version.
- Download the VM image
- Run VirtualBox and Import Appliance (File->Import Ampliance), accept the default settings for the VM.
- If you are using a FAT32 filesystem you will NOT be able to load the image.
- Start the VM
- Change the default password, click on the task bar on the top, on the right on the user 'geni', and choose the Change Password button.
- Verify that the VM has connectivity. Start Firefox (shortcut on the top bar) and try to load Google. If you can't reach any website, restore VM's Network connection.
- On the far right on the top bar, there is the network icon (two opposite facing arrows).
- Click that icon and choose 'Auto eth0'.
- Try loading the webpage again.
Useful Tips
- You can copy-paste between the host and the guest VM.
- In the terminal within the VM, use Ctrl-Shift-C to copy and Ctrl-Shift-V to paste.
- vim and emacs editors are installed on the VM, so feel free to use them for editing your files
- If you are using vim, while in command mode to replace a pattern in the file type
%s/pattern/replace_text/gc
And press 'y' for the instances of the pattern you want replaced, 'n' otherwise. - If you are using emacs, press Alt-x and then type
query-replace
and press ENTER. Enter the pattern to be replaced, press ENTER, enter the text you want to replace it with and press ENTER. Press 'y' for the instances of the pattern you want replaced, 'n' otherwise.
- If you are using vim, while in command mode to replace a pattern in the file type
- If you want to have a shared folder between your machine and the VM so that it's easier to transfer files during the tutorial, you have to do this before starting the VM. Follow these instructions
- If you get an error running Omni, look at the troubleshoot page for help.
Overview of Alice's Experiment
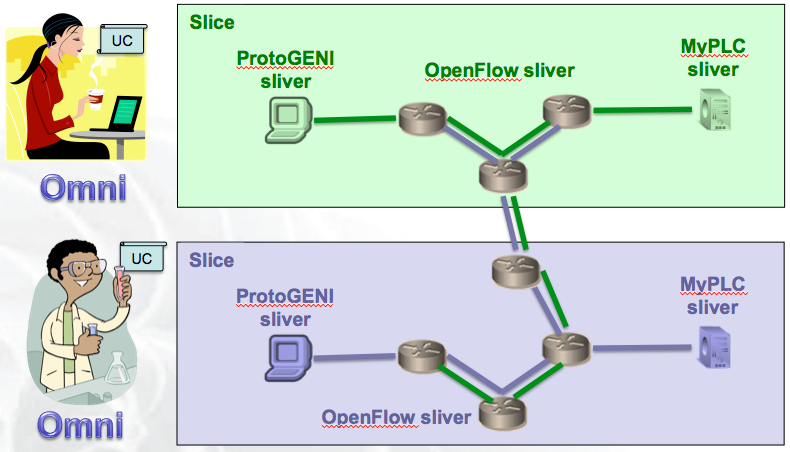
Alice and Bob, two GENI experimenters, have volunteered to help us write these instructions. They are going to reserve separate hosts but they will be sharing the network infrastructure.

Alice's information for the tutorial is :
| <USERNAME> | alice | The user name for the tutorial's GPO ProtoGENI account |
| ProtoGENI host | pg46.emulab.net (@clemson) | Node controlled by Utah's ProtoGENI AM |
| <PCNAME> | pg46 | For PG rspec |
| MyPLC host | of-planet1.stanford.edu | Node controlled by Stanford's MyPLC AM |
| Backup MyPLC host | navis.gpolab.bbn.com | Node controlled by GPO's MyPLC AM, if you run into problems with the first MyPLC host, you can try again with this host |
| <SUBNET> | 10.42.122.0/24 | The subnet to use for Layer3 ping |
| <SUBNET-OCT> | 122 | For the OF rspec |
| <ETH-TYPE> | 10122 | The ethernet type for Layer2 ping, for the OF rspec |
| <PORT> | 10122 | The port that the OpenFlow controller is listening on |
And after Alice and Bob completed the tutorial, Alice's scratchpad is :
| SCRATCHPAD | Complete this info | |
| My MyPLC host IP(131) | 10.42.131. 90 | IP address of your MyPLC host on the pre-configured subnet |
| MyPLC login name | pgenigpolabbbncom_aliceslice | Your login name to the MyPLC hosts |
| Neighbor's MyPLC host IP(131) | 10.42.131. 52 | IP address of your neighbor's MyPLC host on the pre-configured subnet |
| My MyPLC host IP(your subnet) | 10.42 . 122 . 90 | The IP address of your MyPLC host on your subnet |
| Neighbor's MyPLC host IP(your subnet) | 10.42 . 122 . 52 | IP address of your neighbor's MyPLC host on the your subnet |
I. Configure Omni
The purpose of this first exercise is to configure Omni to use your credentials and keys. We strongly recommend that you use the preset account that has been assigned to you, however if you have your own account and you are comfortable with GENI, credentials and ssh keys, you might want to setup Omni to use your own personal credentials, by following these instructions.
1. Personalize omni_config
Omni uses as input a configuration file, where you can specify information such as which clearinghouse to use, where your certificate and keys are located, etc. Under the omni_tutorial directory, there is a template configuration file, omni_config, which you should modify based on your user's settings.
- Open a terminal (there is a shortcut on the top bar).
- The rest of the tutorial assumes that you are under the omni_tutorial directory :
cd omni_tutorial
- Remove the passphrase from your certificate. For security best practices you should keep a passphrase on your certificate.To avoid typing the passphrase throughout the tutorial, we will temporarily remove the passphrase. Run
./clear_cert.sh <username>
It will prompt you for the passphrase which should be included on the slip that was given to you. - Verify that you have the necessary credential and key files
ls ssh |grep <username>
For alice the output looks like :geni@geni-vm:~/omni_tutorial$ ls ssh | grep alice alice_cert_ct.pem alice_cert.pem alice_key alice_key.pub
alice_cert_ct.pem Cleartext certificate for Alice, i.e. does not require any passphrase alice_cert.pem Encrypted certificate for Alice alice_key The private key that Alice would use to login to the nodes alice_key.pub The corresponding public key that Alice will ask to be loaded to the nodes
- Edit the template omni_config. Open omni_config and personalize it. For the tutorial you should use the cleartext certificate, but when running your own experiments, for security best practices always use your encrypted certificate.
For alice using a cleartext certificate the omni_config file looks like :
[omni]
default_cf = pgeni
users = alice

# ---------- Users ----------
[alice]
urn = urn:publicid:IDN+pgeni.gpolab.bbn.com+user+alice
keys = ~/omni_tutorial/ssh/alice_key.pub

# ---------- Frameworks ----------
[pgeni]
type = pg
ch = https://www.emulab.net:443/protogeni/xmlrpc/ch
sa = https://www.pgeni.gpolab.bbn.com:443/protogeni/xmlrpc/sa

# Uncomment the following two lines if you are using
# a certificate with a passphrase
#cert = ~/omni_tutorial/ssh/<username>_cert.pem
#key = ~/omni_tutorial/ssh/<username>_cert.pem

# Uncomment the following two lines if you are using
# a cleartext cert.
cert = ~/omni_tutorial/ssh/alice_cert_ct.pem
key = ~/omni_tutorial/ssh/alice_cert_ct.pem
Note, the pgeni framework definition includes the Utah Emulab clearinghouse, which is the only clearinghouse for ProtoGENI aggregates. For additional configuration details please see the Omni page for more details. The omni_configuration parameters shown define the following:
Parameter Use default_cf Default Clearinghouse and credentials used if not specified on the command line. users users setting used when reserving slices. urn The username URN keys A comma separated list of public ssh key files to be uploaded to the Clearinghouse and to your resources type Clearinghouse/credentials type "pg" indicates ProtoGENI, see the Omni page. ch ProtoGENI Clearinghouse URL. sa Slice Authority URL. cert Location of your SSL encrypted certificate (contains both a certificate and a key). key Location of your SSL encrypted key (contains both a certificate and a key).
- Verify that the user URN is correct.
Get the URN from your omni config
grep urn omni_config
Verify that it matches the urn in your cert (disregard the leading URI:)openssl x509 -noout -text -in ./ssh/<username>_cert_ct.pem | grep 'urn:publicid'
For Alice the output looks likegeni@geni-vm:~/omni_tutorial$ grep urn omni_config urn = urn:publicid:IDN+pgeni.gpolab.bbn.com+user+alice geni@geni-vm:~/omni_tutorial$ openssl x509 -noout -text -in ./ssh/alice_cert_ct.pem | grep 'urn:publicid' URI:urn:publicid:IDN+pgeni.gpolab.bbn.com+user+alice, email:alice@pgeni.gpolab.bbn.com
2. Test configuration
In order to test that our configuration is correct, you can issue a getversion command. For this step we have used PlanetLab's AM, but you can use any Aggregate Manager(AM).
omni.py getversion -a http://www.planet-lab.org:12346
Alice decided to use PlanetLab central :
geni@geni-vm:~/omni_tutorial$ omni.py getversion -a http://www.planet-lab.org:12346
INFO:omni:Loading config file omni_config
INFO:omni:Using control framework pgeni
INFO:omni:AM URN: unspecified_AM_URN (url: http://www.planet-lab.org:12346) has version:
INFO:omni:{   'ad_rspec_versions': [   {   'extensions': [   'http://www.protogeni.net/resources/rspec/ext/gre-tunnel/1',
                                                   'http://www.protogeni.net/resources/rspec/ext/other-ext/3'],
                                 'namespace': 'http://www.protogeni.net/resources/rspec/2',
                                 'schema': 'http://www.protogeni.net/resources/rspec/2/ad.xsd',
                                 'type': 'ProtoGENI',
                                 'version': '2'},
                             {   'extensions': [],
                                 'namespace': None,
                                 'schema': None,
                                 'type': 'SFA',
                                 'version': '1'}],
    'code_tag': '1.0-27',
    'code_url': 'git://git.onelab.eu/sfa.git@sfa-1.0-27',
    'default_ad_rspec': {   'extensions': [],
                            'namespace': None,
                            'schema': None,
                            'type': 'SFA',
                            'version': '1'},
    'geni_api': 1,
    'hostname': 'www.planet-lab.org',
    'hrn': 'plc',
    'interface': 'aggregate',
    'request_rspec_versions': [   {   'extensions': [   'http://www.protogeni.net/resources/rspec/ext/gre-tunnel/1',
                                                        'http://www.protogeni.net/resources/rspec/ext/other-ext/3'],
                                      'namespace': 'http://www.protogeni.net/resources/rspec/2',
                                      'schema': 'http://www.protogeni.net/resources/rspec/2/request.xsd',
                                      'type': 'ProtoGENI',
                                      'version': '2'},
                                  {   'extensions': [],
                                      'namespace': None,
                                      'schema': None,
                                      'type': 'SFA',
                                      'version': '1'}],
    'sfa': 1,
    'testbed': 'myplc'}
INFO:omni: ------------------------------------------------------------
INFO:omni: Completed getversion:

  Options as run:
                aggregate: http://www.planet-lab.org:12346
                framework: pgeni
                native: True

  Args: getversion

  Result Summary:
Got version for 1 out of 1 aggregates

INFO:omni: ============================================================
II. Make a slice
Before we continue with the rest of the tutorial, we need to create a slice that will contain all our slivers with the different AMs. Since the omni_config specifies using GPO's ProtoGENI as the Slice Authority (SA), your slice will be created in the pgeni.gpolab.bbn.com namespace.
1. Createslice
For this tutorial we will create a slice named <username>slice; you should always choose a slice name that is meaningful to you. To avoid confusion, avoid creating a slice with the same name as your username (i.e. if your username is alice, don't name your slice alice too).
omni.py createslice <username>slice
For Alice this would look like
geni@geni-vm:~/omni_tutorial$ omni.py createslice aliceslice
INFO:omni:Loading config file omni_config
INFO:omni:Using control framework pgeni
INFO:omni:Created slice with Name aliceslice, URN urn:publicid:IDN+pgeni.gpolab.bbn.com+slice+aliceslice, Expiration 2011-07-09 19:41:35
INFO:omni: ------------------------------------------------------------
INFO:omni: Completed createslice:

  Options as run:
		framework: pgeni
		native: True

  Args: createslice aliceslice

  Result Summary: Created slice with Name aliceslice, URN urn:publicid:IDN+pgeni.gpolab.bbn.com+slice+aliceslice, Expiration 2011-07-09 19:41:35

INFO:omni: ============================================================
2. Renew Slice
Note in the above output that our new slice expires soon. Your slivers can not last longer then your slice, and your resources will go away when the reservation expires. For your experiments be sure to renew your slice for the duration of your experiment. For the tutorial you don't need to extend the lifetime, but if you wanted to, this is what it would look like:
omni.py renewslice <username>slice 20110727T00:00:00
For Alice the output would like:
geni@geni-vm:~/omni_tutorial$ omni.py renewslice aliceslice 20110726T23:00:00
INFO:omni:Loading config file omni_config
INFO:omni:Using control framework pgeni
INFO:omni.protogeni:Requesting new slice expiration '2011-07-26T23:00:00'
INFO:omni:Slice aliceslice now expires at 2011-07-26 23:00:00 UTC
INFO:omni:Slice urn:publicid:IDN+pgeni.gpolab.bbn.com+slice+aliceslice expires on 2011-07-26 23:00:00 UTC
INFO:omni: ------------------------------------------------------------
INFO:omni: Completed renewslice:

  Options as run:
		framework: pgeni
		native: True

  Args: renewslice aliceslice 20110726T23:00:00

  Result Summary: Slice aliceslice now expires at 2011-07-26 23:00:00 UTC
Slice urn:publicid:IDN+pgeni.gpolab.bbn.com+slice+aliceslice expires on 2011-07-26 23:00:00 UTC
INFO:omni: ============================================================
Note: You can not renew the slice expiration time to an earlier time that its current expiration time. Also there is no deleteslice operation. However, you can delete all the slivers in your slice and let the slice expire.
3. List your Slices
If you want to find out what slices you currently have, you can use an Omni command to listmyslices.
omni.py listmyslices <username>
For Alice the output would look like :
geni@geni-vm:~/omni_tutorial$ omni.py listmyslices alice
INFO:omni:Loading config file omni_config
INFO:omni:Using control framework pgeni
INFO:omni:User 'alice' has slices:
	urn:publicid:IDN+pgeni.gpolab.bbn.com+slice+aliceslice
INFO:omni: ------------------------------------------------------------
INFO:omni: Completed listmyslices:

  Options as run:
		framework: pgeni
		native: True

  Args: listmyslices alice

  Result Summary: Found 1 slices for user 'alice'.

INFO:omni: ============================================================
geni@geni-vm:~/omni_tutorial$
III. Make a ProtoGENI sliver
The first resource we are going to add to our slice is a ProtoGENI host.
1. Createsliver
Under the omni_tutorial directory, there is a directory called rspecs that has all the necessary template RSpecs for the tutorial. For this tutorial we are going to use ProtoGENI hosts from GPO's ProtoGENI cluster, as well as Wide Area ProtoGENI hosts from Utah's ProtoGENI cluster.
- If your ProtoGENI host is in the emulab.net(e.g. pg30.emulab.net), namespace then it belongs to Utah's cluster and you should use Utah's AM, and use rspecs/pg_utah.rspec
- If your ProtoGENI host is in the pgeni.gpolab.bbn.com(e.g. pc1.pgeni.gpolab.bbn.com), namespace then it belongs to GPO's cluster and you should use GPO's AM, and use rspecs/pg_gpo.rspec
- Edit the appropriate RSpec, and modify it based on your information.
Alice was assigned host pg46.emulab.net so she should modify pg_utah.rspec:
<!--
This rspec will reserve one wide-area ProtoGENI host

AM: http://www.emulab.net/protogeni/xmlrpc/am
-->
<!--  This file is a template rspec for GEC 11 tutorial
      Advnaced topics in Networking Experiments using GENI
      Make sure to replace
       - <PCNAME>
       - <USERNAME>
-->

<rspec type="request" xsi:schemaLocation="http://www.protogeni.net/resources/rspec/2 http://www.protogeni.net/resources/rspec/2/request.xsd" xmlns:flack="http://www.protogeni.net/resources/rspec/ext/flack/1" xmlns:xsi="http://www.w3.org/2001/XMLSchema-instance" xmlns="http://www.protogeni.net/resources/rspec/2">
  <node client_id="pg46"
        component_manager_id="urn:publicid:IDN+emulab.net+authority+cm"
        component_id="urn:publicid:IDN+emulab.net+node+pg46"
        component_name="pg46" exclusive="true">
    <sliver_type name="raw-pc">
      <disk_image name="urn:publicid:IDN+emulab.net+image+emulab-ops//FEDORA10-STD"/>
    </sliver_type>
    <services>
      <execute command="cd /home/alice/config_dir;./install.sh" shell="sh " />
      <install install_path="/home/alice" url="http://192.1.249.147:8383/gec11tutorial_fedora.tar.gz" file_type="tar.gz"/>
    </services>
  </node>
</rspec>
- After you have modified the RSpec, you are ready to reserve your host on the appropriate AM. For easy access and to be able to copy and paste AM URLs that are used in this tutorial, we made a table. If your node is pg46.emulab.net, you are sharing your node with Alice. Alice has already created the sliver for you, so you can run the 'createsliver' command, and its ok if it fails.
omni.py createsliver -a <AM_URL> <username>slice rspecs/<rspec_file>
The output should look like :
geni@geni-vm:~/omni_tutorial$ omni.py createsliver -a http://www.emulab.net/protogeni/xmlrpc/am aliceslice rspecs/pg_utah.rspec
INFO:omni:Loading config file omni_config
INFO:omni:Using control framework pgeni
INFO:omni:Slice urn:publicid:IDN+pgeni.gpolab.bbn.com+slice+aliceslice expires on 2011-07-26 23:00:00 UTC
INFO:omni:Creating sliver(s) from rspec file rspecs/pg_utah.rspec for slice urn:publicid:IDN+pgeni.gpolab.bbn.com+slice+aliceslice
INFO:omni:Asked http://www.emulab.net/protogeni/xmlrpc/am to reserve resources. Result:
INFO:omni:<?xml version="1.0" ?>
INFO:omni:<!-- Reserved resources for:
        Slice: aliceslice
        At AM:
        URL: http://www.emulab.net/protogeni/xmlrpc/am
 -->
INFO:omni:<rspec type="manifest" xmlns="http://www.protogeni.net/resources/rspec/2" xmlns:flack="http://www.protogeni.net/resources/rspec/ext/flack/1" xmlns:xsi="http://www.w3.org/2001/XMLSchema-instance" xsi:schemaLocation="http://www.protogeni.net/resources/rspec/2 http://www.protogeni.net/resources/rspec/2/manifest.xsd">
    <node client_id="pg46" component_id="urn:publicid:IDN+emulab.net+node+pg46" component_manager_id="urn:publicid:IDN+emulab.net+authority+cm" component_name="pg46" exclusive="true" sliver_id="urn:publicid:IDN+emulab.net+sliver+44220">
        <sliver_type name="raw">
            <disk_image name="urn:publicid:IDN+emulab.net+image+emulab-ops//FEDORA10-STD"/>
        </sliver_type>
        <services>
            <execute command="cd /home/alice/config_dir;./install.sh" shell="sh "/>
            <install file_type="tar.gz" install_path="/home/alice" url="http://192.1.249.147:8383/gec11tutorial_fedora.tar.gz"/>
          <login authentication="ssh-keys" hostname="pg46.emulab.net" port="22" username="alice"/>    </services>
      <rs:vnode name="pg46" xmlns:rs="http://www.protogeni.net/resources/rspec/ext/emulab/1"/>  </node>
</rspec>
INFO:omni: ------------------------------------------------------------
INFO:omni: Completed createsliver:

  Options as run:
                aggregate: http://www.emulab.net/protogeni/xmlrpc/am
                framework: pgeni
                native: True

  Args: createsliver aliceslice rspecs/pg_utah.rspec

  Result Summary: Slice urn:publicid:IDN+pgeni.gpolab.bbn.com+slice+aliceslice expires on 2011-07-26 23:00:00 UTC
Reserved resources on http://www.emulab.net/protogeni/xmlrpc/am.
INFO:omni: ============================================================
2. Sliverstatus
We asked for an exclusive ProtoGENI host, which means that the node needs to be loaded with the right OS and booted, before our sliver is ready to use. This will take a while. We can check the status of our sliver, using the sliverstatus call.
omni.py sliverstatus -a <AM_URL> <username>slice
The status will probably be 'not ready', you can continue with the next steps of the tutorial, and we will come back to this node later.
IV. Make a MyPLC sliver
The next resource to reserve is a MyPLC host. In the previous step, you have modified an example RSpec to request the resources you need. There is a better way to create RSpecs by asking the AM what resources are available and then deciding what you need. Running the listresources command against an AM returns an advertisement RSpec, that can be used as a base to create the reservation RSpec.
1. Listresources
To find out the available resources in an AM do the following:
- Find out the URL of the MyPLC AM you have been assigned (AM table)
- Run listresources, the '-o' option will save the advertisement rspec in a file.
omni.py listresources -a <AM_URL> -o
If alice has been assigned a MyPLC host at Stanford this would likeomni.py listresources -a https://myplc.stanford.edu:12346 -o
Alice's output would like :eni@geni-vm:~/omni_tutorial$ omni.py listresources -a https://myplc.stanford.edu:12346 -o INFO:omni:Loading config file omni_config INFO:omni:Using control framework pgeni INFO:omni:Saving output to a file. INFO:omni:Listed resources on 1 out of 1 possible aggregates. INFO:omni:Writing to 'rspec-myplc-stanford-edu.xml' INFO:omni: ------------------------------------------------------------ INFO:omni: Completed listresources: Options as run: aggregate: https://myplc.stanford.edu:12346 framework: pgeni native: True output: True Args: listresources Result Summary: Retrieved resources from 1 aggregates. Wrote rspecs from 1 aggregates to 1 files. INFO:omni: ============================================================
There is a line that specifies what is the output file (INFO:omni:Writing to 'rspec-myplc-stanford-edu.xml')
2. Modify advertisement rspec
We need to modify the advertisement rpec to make it a reservation rspec.
- Copy the advertisement to a reservation rspec
cp rspec-<AM>.xml rspecs/myplc-<PLACE>.rspec
For Alice :cp rspec-myplc-stanford-edu.xml rspecs/myplc-stanford.rspec
- Modify the rspec file you just created, to request your node. In the SFA rspecs, in order to reserve a node you have to add the sliver tag(<sliver/>) right before the end of the node section(</node>). You can either choose to leave the rest of the hosts in the rspec, or remove them; only the nodes with the 'sliver' section would be reserved. So for example Alice needs to reserve node of-planet1.stanford.edu, the rspec would look like
<?xml version="1.0" ?>
<!-- Resources at AM:
        URN: unspecified_AM_URN
        URL: https://myplc.stanford.edu:12346
 -->
<RSpec type="SFA">
    <network name="plc">
        <site id="s1">
            <name>        MyPLC      </name>
            <node id="n1">
                <hostname>          of-planet1.stanford.edu        </hostname>
                <sliver/>
            </node>
        </site>
    </network>
</RSpec>
3. Reserve the node
omni.py createsliver -a <AM_URL> <username>slice rspecs/<rspec_file>
For Alice this would look like:
geni@geni-vm:~/omni_tutorial$ omni.py createsliver -a https://myplc.stanford.edu:12346 aliceslice rspecs/myplc-stanford.rspec
INFO:omni:Loading config file omni_config
INFO:omni:Using control framework pgeni
INFO:omni:Slice urn:publicid:IDN+pgeni.gpolab.bbn.com+slice+aliceslice expires on 2011-07-26 23:00:00 UTC
INFO:omni:Creating sliver(s) from rspec file rspecs/myplc-stanford.rspec for slice urn:publicid:IDN+pgeni.gpolab.bbn.com+slice+aliceslice
INFO:omni:Please run the omni sliverstatus call on your slice aliceslice to determine your login name to PL resources.
INFO:omni:Asked https://myplc.stanford.edu:12346 to reserve resources. Result:
INFO:omni:<?xml version="1.0" ?>
INFO:omni:<!-- Reserved resources for:
        Slice: aliceslice
        At AM:
        URL: https://myplc.stanford.edu:12346
 -->
INFO:omni:<!-- Resources at AM:
        URN: unspecified_AM_URN
        URL: https://myplc.stanford.edu:12346
 --><RSpec type="SFA">
      <network name="plc">
            <site id="s1">
                  <name>                MyPLC            </name>
                  <node id="n1">
                        <hostname>                    of-planet1.stanford.edu                </hostname>
                        <sliver/>
                  </node>
            </site>
      </network>
</RSpec>
INFO:omni: ------------------------------------------------------------
INFO:omni: Completed createsliver:

  Options as run:
                aggregate: https://myplc.stanford.edu:12346
                framework: pgeni
                native: True

  Args: createsliver aliceslice rspecs/myplc-stanford.rspec

  Result Summary: Slice urn:publicid:IDN+pgeni.gpolab.bbn.com+slice+aliceslice expires on 2011-07-26 23:00:00 UTC
Reserved resources on https://myplc.stanford.edu:12346. . Please run the omni sliverstatus call on your slice aliceslice to determine your login name to PL resources.
INFO:omni: ============================================================
If you wanted to reserve MyPLC hosts in other campuses as well, you would need to repeat this process. If for some reason this reservation fails, we have assigned you a backup node, repeat this process for the backup node.
4. Login to the nodes --- Omni Scripting
After reserving the nodes, we are ready to login. When reserving PlanetLab resources, using a different clearinghouse, the login name that should be used to access the nodes is 'not' the username. The username is listed as part of the sliverstatus call. For common functionality like this that is expected to be used often, omni gives you the capability of writing scripts and including omni as a library. Under omni_tutorial there is a folder 'example_scripts' that includes example python scripts that use Omni. One script that is available is the getMyLogin.py script that will return the exact command for logging-in to your nodes.
./omni_scripts/getMyLogin.py -a <AM URL> <username>slice
The script will return the actual command that you would need to use for logging in.
For Alice the script would return :
================================================================================
Aggregate [https://myplc.stanford.edu:12346] has a PlanetLab sliver.
of-planet1.stanford.edu's pl_boot_state is:
	boot
Login using:
	xterm -e ssh -i ssh/alice_key pgenigpolabbbncom_aliceslice@of-planet1.stanford.edu &

================================================================================
5. Test connectivity
To verify that everything is working as expected, you should try to ping another host, using a subnet that has pre-established connectivity. First of all let's see how we can figure out the IP of the host we reserved :
- List all the interfaces in your host. You will see that there many interfaces of the form eth1.XXXX
/sbin/ifconfig
Part of the output would look like :eth1.1750:42147 Link encap:Ethernet HWaddr 00:B0:D0:E1:6F:78 inet addr:10.42.147.90 Bcast:10.42.147.255 Mask:255.255.255.0 UP BROADCAST RUNNING MULTICAST MTU:1500 Metric:1 eth1.1750:42148 Link encap:Ethernet HWaddr 00:B0:D0:E1:6F:78 inet addr:10.42.148.90 Bcast:10.42.148.255 Mask:255.255.255.0 UP BROADCAST RUNNING MULTICAST MTU:1500 Metric:1
- Figure out the last octet of the IP address of your host. The way these MyPLC hosts are setup, is that they have multiple subinterfaces, each configured to be part of a different IP subnet. Almost all subnets in the hosts are in the form of 10.42.Y.0/24. You will notice that for all these subnets, your host has the same last octet. In the example above all the subinterfaces of eth1, will have an IP address that will end in 90 (10.42.147.90, 10.42.148.90)
- Proconfigured subnet. We have already made the necessary configuration for subnet with Y=131(10.42.131.0/24), so the IP of your host is 10.42.131.<octet>.
Alice has reserved node of-planet1.stanford.edu, whose IP ended up being 10.42.131.90.
Ask your neighbor about their MyPLC IP and try pinging it. Alice's neighbor has reserved node 'gardil.gpolab.bbn.com', with IP (10.42.131.52), feel free to use Alice, or her neighbor, if your's is not ready yet (make sure the node you are pinging is not your own node).
[pgenigpolabbbncom_aliceslice@of-planet1 ~]$ ping 10.42.131.52
PING 10.42.131.52 (10.42.131.52) 56(84) bytes of data.
64 bytes from 10.42.131.52: icmp_seq=1 ttl=64 time=3466 ms
64 bytes from 10.42.131.52: icmp_seq=3 ttl=64 time=1479 ms
64 bytes from 10.42.131.52: icmp_seq=4 ttl=64 time=510 ms
V. Run a Layer 2 ping
The mesoscale GENI resources are connected on Layer 2, which enables Layer 2, i.e. non-IP experiments. In this exercise we are going to run a layer 2 ping program, where we are going to send raw Ethernet frames of a custom Ethernet type to a server and receive a reply. Currently MyPLC only supports IP experiments, so we will use our ProtoGENI host which we have reserved in the beginning.
- check that your sliver is ready
omni.py sliverstatus -a <AM_URL> <username>slice
- If your sliver is ready, login to the node (if your host is pg33, pg32 or pg46 please read the notes):
ssh -i /ssh/<username>_key <username>@<host>
For Alice, that has reserved nod pg46.emulab.net:
ssh -i /ssh/alice_key alice@pg46.emulab.net
NOTE 1: If your node is pg32.emulab.net or pg33.emulab.net, you will need to do some extra work to login to the node. The control interface of these nodes is behind a firewall so you will login to your node through 'ops.pgeni.gpolab.bbn.com'. Run
xterm -e ssh -i ssh/<username>_key -L2222:<host>:22 <username>@ops.pgeni.gpolab.bbn.com &This command forwards local port 2222 to go through the connection at ops.pgeni.gpolab.bbn.com and from there connect to your host on port 22. Now you are ready to login to your node
ssh -i /ssh/<username>_key <username>@localhost -p 2222
NOTE 2: If your node is pg46.emulab.net, remember you are sharing your node with Alice. To login to the node do :
xterm -e ssh -i ~/omni_tutorial/ssh/<USERNAME>_key alice@pg46.emulab.net &
- Check to see that the software has been downloaded :
[alice@protogeni1 ~]$ ls
config_dir  pingPlus
- Configure the node. When you login to the node, the data interface of the host is not configured.
[alice@protogeni1 ~]$ /sbin/ifconfig
This should list only two interface, the loopback and the control interface. Part of the tarball that was downloaded, is a script that will configure the node, and compile the Layer 2 ping software. Run./config_dir/configure.sh
The output for Alice would look like[alice@protogeni1 ~]$ ./config_dir/configure.sh DEVICE=eth1.1750 USERCTL=no VLAN=yes IPADDR=10.42.131.146 NETMASK=255.255.255.0 BOOTPROTO=static ONBOOT=yes Added VLAN with VID == 1750 to IF -:eth1:- gcc -c -o packetFunctions.o packetFunctions.c gcc -c -o pingPlusListener.o pingPlusListener.c gcc packetFunctions.o pingPlusListener.o -o pingPlusListener gcc -c -o pingPlus.o pingPlus.c gcc packetFunctions.o pingPlus.o -o pingPlus
Verify that the data interface is up :[alice@protogeni1 ~]$ /sbin/ifconfig
and note the name of the data interface, the data interface is the one that has an IP address in the 10.42.131.0/24 subnet:eth1.1750 Link encap:Ethernet HWaddr 00:1F:29:32:92:4D inet addr:10.42.131.146 Bcast:10.42.131.255 Mask:255.255.255.0 inet6 addr: fe80::21f:29ff:fe32:924d/64 Scope:Link UP BROADCAST RUNNING MULTICAST MTU:1500 Metric:1 RX packets:118 errors:0 dropped:0 overruns:0 frame:0 TX packets:115 errors:0 dropped:0 overruns:0 carrier:0 collisions:0 txqueuelen:0 RX bytes:5428 (5.3 KiB) TX bytes:3482 (3.4 KiB)In this case the name is 'eth1.1750'.
- Run the Layer 2 Ping
We have pre-configured the network to forward along Layer2 packets of Ethernet type '10131', so let's try pinging with that.
The software that is going to send Layer 2 pings, is called pingPlus. Change to the pingPlus directory :
cd pingPlus
There is a server running at a host with mac address '00:15:17:d4:64:c2'. Run the client :sudo ./pingPlus 00:15:17:d4:64:c2 <interface_name> 10131
For Alice the output would be :[alice@protogeni1 ~/pingPlus]$ sudo ./pingPlus 00:15:17:d4:64:c2 eth1.1750 10131 RQ:'5019+6242' to 0:15:17:d4:64:c2. RL:5019+6242=11261 from 0:15:17:d4:64:c2.
Send a stream of packets, by specifying the number of packets as the last parameter :sudo ./pingPlus 00:15:17:d4:64:c2 <interface_name> 10131 10
Note:If the program is stuck waiting for a reply for more than 1 minute, press Ctrl-C to exit.
Congratulations you ran a Layer two experiment across the country!
VI. Make an OpenFlow sliver
In the previous step, we have used a pre-configured setup to run our test. In the mesoscale OpenFlow GENI resources, the data interface of your hosts is connected to an OpenFlow switch, which by default does not forward any traffic, unless there is an OpenFlow controller running that handles predefined traffic patterns.
1. OpenFlow controller
In a typical OpenFlow experiment, the first step is to figure out where you are going to run your controller. The OpenFlow controller should be able to accept connections from switches. To make this tutorial simpler we are running multiple OpenFlow controllers centrally, and you can point your traffic to the corresponding controller. The controllers we are running are simple switch controllers, i.e. they make the OpenFlow switches behave like typical layer 2 switches.
In the previous example we have pointed all the traffic for subnet 10.42.131.0/24 to a switch OpenFlow controller, that's why you were able to ping between your hosts, using that subnet.
2. OpenFlow sliver
Until you have reserved an OpneFlow sliver, traffic would not be forwarded between your hosts on your assigned subnet.
- From your MyPLC host, ping using your assigned subnet.
ping 10.42.<subnet-oct>.<host_octet>
For Alice, that has been assigned subnet 122, this looks likePING 10.42.122.52 (10.42.122.52) 56(84) bytes of data. From 10.42.122.90 icmp_seq=2 Destination Host Unreachable From 10.42.122.90 icmp_seq=3 Destination Host Unreachable
- Personalize your rspec. There is a sample OpenFlow rspec, under the rspecs folder (rspecs/of.rspec), that you would need to modify in order to reserve the flowspace that has been assigned to you. In the beginning of the file there is a list of tags you would need to replace. More specifically
- <PORT> : This is the port that your controller is listening on; for Alice this is 10122. The host that is running the controller is gardil.gpolab.bbn.com.
- <SUBNET-OCT> : This is the subnet octet that has been assigned to you; for Alice this is 122 (e.g. subnet 10.42.122.0/24)
- <ETH_TYPE> : This is the custom ethernet type that has been assigned to you for the next exercise; for Alice this is 10122
- Create the OpenFlow sliver. The flowspace for the tutorial is managed by an AM running at GPO :
omni.py createsliver <username>slice ./rspecs/of.rspec -a https://expedient-tutorial.gpolab.bbn.com:1443/openflow/gapi/
- Request for traffic to be opted-in. The OpenFlow Aggregate Administrator has to allow traffic from various nodes to be routed by your OpenFlow controller. Please let us know that you have created your sliver, so that we can opt-in your traffic.
3. Layer 3 ping using your controller
Once your slice has been opted in, you can now try pinging again from your MyPLC host. For Alice this would look like :
[pgenigpolabbbncom_aliceslice@pl01 ~]$ ping 10.42.122.52
PING 10.42.122.90 (10.42.122.52) 56(84) bytes of data.
64 bytes from 10.42.122.52: icmp_seq=1 ttl=64 time=3978 ms
64 bytes from 10.42.122.52: icmp_seq=2 ttl=64 time=2979 ms
4. Layer 2 ping using your controller
Now that your slice has been opted-in, you can run a layer two ping using your assigned ETH_TYPE, that you specified in your OpenFlow rspec. From your ProtoGENI host :
sudo ./pingPlus 00:15:17:d4:64:c2 <interface_name> <eth_type> 10
Part of Alice's output would be :
[alice@protogeni1 ~/pingPlus]$ sudo ./pingPlus 00:15:17:d4:64:c2 eth1.1750 10122 10
RQ:'5019+6242' to 0:15:17:d4:64:c2.
RL:5019+6242=11261 from 0:15:17:d4:64:c2.
VII. Cleanup resources
Although all your reservations, have expiration times, its always good practice to release the resources, after your experiment is over to make them available to other experimenters.
1. Deletesliver
For each createsliver that you have run, you will need to run deletesliver to release the resources
omni.py deletesliver -a <AM URL> <username>slice
For Alice this would look like
# Delete ProtoGENI sliver
omni.py deletesliver -a http://www.emulab.net/protogeni/xmlrpc/am aliceslice

# Delete MyPLC slivers
omni.py deletesliver -a https://myplc.stanford.edu:12346 aliceslice

#Delete OpenFlow slivers
 omni.py deletesliver -a https://expedient-tutorial.gpolab.bbn.com:1443/openflow/gapi/ aliceslice
You can not delete your slice. Although this will be cleaned up when it expires, it should be an empty container and thus does not hold up any resources.
Congratulations, you have finished the tutorial! Now you are ready to design and run your own experiments. Don't hesitate to email us with any questions you might have.
VIII. Get Your Own Account
The accounts, that you used in the above steps, will be deactivated after the tutorial. If you do not already have an account at GPO's ProtoGENI cluster, you should get your own account so that you can further experiment with GENI.
1a. Get a temporary account
To get a temporary account that will be deactivated on August 12th 2011, apply for an account at this page https://www.pgeni.gpolab.bbn.com/joinproject.php3. For Project name use : Gec11Gpo.
1b. Get a permanent account
If you would like to run your own experiments in this infrastructure, please contact us at help@geni.net to get a permanent account.
2. Configure Omni with your personal info
Now that you have your own account, you should configure Omni to use your own personal info, instead of the pre-made accounts.
1. Generate and Download your ProtoGENI certificate
- Start Firefox within the VM and https://www.pgeni.gpolab.bbn.com/login.php3 log in to your account.
- Select Generate SSL Cert and follow instructions.
- Select Download your SSL Cert (it's on the left of the page), and click on the 'Download it in PEM format' link.
- Copy the contents of the page (Ctrl-A, Ctrl-C)
- Open a terminal (there is a shortcut on the top bar) under the omni_tutorial directory there should be an ssh directory
cd omni_tutorial/ssh
- Open a file called <username>_cert.pem, paste your cert(Ctrl-Shift-V) and save.
pico <username>_cert.pem>
Ctrl-Shift-V
Ctrl-X
- Remove the passphrase from your certificate. For security best practices you should keep a passphrase on your certificate. If you want to avoid typing your passphrase throughout the tutorial, you might want to temporarily remove your passphrase
openssl rsa -in ./<username>_cert.pem -out ./<username>_cert_ct.pem
openssl x509 -in ./<username>_cert.pem >> ./<username>_cert_ct.pem
chmod 400 ./<username>_cert_ct.pem
If you want a way to type your passphrase only once per session, look here.
2. Generate a pair of private/public keys.
In order to be able to login to the resources you will reserve will need a pair of keys. You can use any set of existing keys you might have, or you can generate a new pair. For security best practices you should have a passphrase on your keys.
ssh-keygen -f <username>_key
Now you can go back to (I) and follow the steps using your own certificate and key.
AM URL Table
| AM | URL |
| TUTORIAL AM | |
| Clemson's MyPLC | http://myplc.clemson.edu:12346 |
| GPO's ProtoGENI | http://www.pgeni.gpolab.bbn.com/protogeni/xmlrpc/am |
| GPO's MyPLC | http://myplc.gpolab.bbn.com:12346 |
| GPO's Tutorial OF | https://expedient-tutorial.gpolab.bbn.com:1443/openflow/gapi/ |
| Rutgers MyPLC | https://plc.orbit-lab.org:12346/ |
| Stanford's MyPLC | https://myplc.stanford.edu:12346 |
| Utah's ProtoGENI | http://www.emulab.net/protogeni/xmlrpc/am |
| Washington's MyPLC | https://of.cs.washington.edu:12346/ |
| Wisconsin's MyPLC | https://wings-openflow-1.wail.wisc.edu:12346/ |
| OTHER | |
| PlanetLab | http://www.planet-lab.org:12346 |
| Kentucky's ProtoGENI | https://www.uky.emulab.net/protogeni/xmlrpc/am |
Attachments (1)
- alice-bob-setup.png (170.2 KB) - added by 13 years ago.
Download all attachments as: .zip