= Delay and Disruption Tolerant Networking =
== 1. Introduction ==
Current Internet protocols work well in well-connected and low latency networks; however, not all scenarios experience those characteristics. For instance, when a mobile node moves out of the communication range of a base station and back in, the connection should be re-established. Another example is deep space communication, where the RTT between Mars rovers and Earth is in the order of ten minutes, making an ordinary TCP connection to time out. Below we present a list of possible uses for DTN, but not limited to.
==== Applications ====
{{{
#!html
- Interplanetary Overlay Networks (IPN)
- Rural Networks
- Underwater Acoustic Communication
- DIL Tactical Networks
- Mobile Ad hoc Networks (MANET)
- Vehicular Ad hoc Networks (VANET)
- Disaster response
}}}
The goal of this instructions is to get the reader familiar with the concepts of DTN and to provide a stepping stone towards your DTN experiments. We provide an image with the [https://sites.google.com/site/dtnresgroup/ DTN2 software] installed. The VMs are capable of sending and receiving bundles (very large packets, usually in the order of GB, with very large time-out).
==== Delay vs. Disruption ====
DTN is commonly referred to as Delay Tolerant Networking or Disruption Tolerant Networking, depending on the application. The figure below depicts the two concepts.
{{{
#!html
|
Source: Delay and Disruption Tolerant Networks (DTNs): A Tutorial.
|
}}}
== 2. Setting up the environment ==
{{{
#!html
- When creating your topology, please select the following image using the URL (all racks) or URN (Stanford rack). If you are using Jacks, copy and paste the URL into the Disk Image field.
URN: urn:publicid:IDN+instageni.stanford.edu+image+ch-geni-net:dtnnode
URL: https://www.instageni.stanford.edu/image_metadata.php?uuid=189d0191-4ac8-11e6-8cfa-000000000000
|
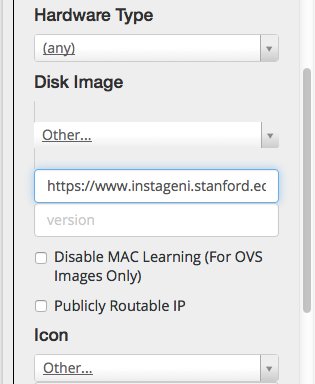
Using a custom image.
|
}}}
Please refer to the documentation on {{{/local/DTN2/doc/manual}}} or online at [https://sites.google.com/site/dtnresgroup/ dtnrg].
{{{
#!comment
== 3. Running an experiment ==
Make your {{{dtn}}} directory and copy the configuration file. ^([#hn note: change for your actual username])^
{{{
mkdir /home//dtn
cp /local/DTN2/daemon/dtn.conf /home//dtn/dtn.conf
}}}
We will edit the configuration file we've just created.
{{{
#!html
- Set the directory to be used for bundle payload files
payloaddir to /home/<your_user>/dtn/bundles
- Set the directory to be used for database files
dbdir to /home/<your_user>/dtn/db
- Create a route to the deamon
route local_eid dtn://<node_name>.dtn
- Interfaces
By default, interfaces listen on port 4556. If you wish to use a different port
you can override by using the local_port=<port_#> argument.
- Links
link add link_name ip address[:port number] ONDEMAND tcp
- Route
route add dtn://george.dtn/* link_tcp
- Save and quit the configuration file
- Start the database
$ daemon/dtnd -c /home/fred/dtn/dtn.conf --init-db
- Run the DTN daemon
$ daemon/dtnd -c /home/fred/dtn/dtn.conf -l info
- Checking connectivity using DTN-Ping
$ ./dtnping localhost
}}}
== 4. Wrap-up ==
Moving on to a bigger topology.
}}}