= How to set up static flows in OVS =
This page demonstrates how to set up static IP traffic flows between two hosts connected to an OVS switch without running a separate !OpenFlow controller and by using custom !OpenFlow table rules.
The following RSpec is used: [https://raw.githubusercontent.com/GENI-NSF/geni-tutorials/master/OVSRyu/openflowovs-all-xen.rspec.xml]
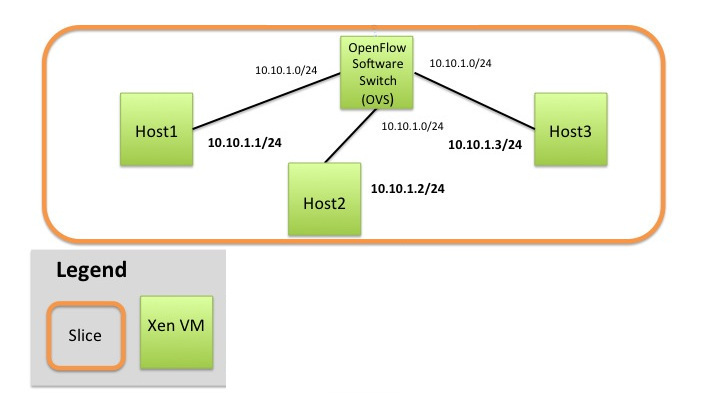
This RSpec requests a network topology with 3 nodes (host1, host2, host3) connected to an OVS switch (OVS). The figure below details the connections.
{{{
#!html
}}}
First we will establish rules for allowing IP traffic to flow between host1 and host2. Later in the howto we will discuss how to setup the OVS switch to allow for host3 to observe the traffic between host1 and host2 using !OpenFlow table rules. An alternative method using the Mirror feature of the OVS switch is also presented if only mirroring is required. These setups maybe be used for network monitoring.
== Setting up the static IP traffic ==
=== Configure OVS Switch === #configureovs
i. Login to the OVS host
ii. Create an Ethernet bridge that will act as our software switch:
{{{
sudo ovs-vsctl add-br br0
}}}
iii. Prepare the interfaces to be added as ports to the OVS switch
* Your OVS bridge will be a Layer 2 switch and your ports do not need IP addresses. Before we remove them let's keep some information
* Run {{{ ifconfig }}}
* Write down the interface names that correspond to the connections to your hosts. The correspondence is
* Interface with IP ''10.10.1.11'' to host1 - ethX
* Interface with IP ''10.10.1.12'' to host2 - ethY
* Interface with IP ''10.10.1.13'' to host3 - ethZ
* Remove the IP from your data interfaces. [[BR]]
[[Image(GENIExperimenter/Tutorials/Graphics:warning-icon-hi.png, 2%)]] Be careful '''not to bring down eth0'''. This is the control interface, if you bring that interface down you ''' won't be able to login''' to your host. For all interfaces other than `eth0` and ` l0` (your interface names may vary) run :
{{{
sudo ifconfig ethX 0
sudo ifconfig ethY 0
sudo ifconfig ethZ 0
}}}
iv. Add all the data interfaces to your switch (bridge). [[BR]]
[[Image(GENIExperimenter/Tutorials/Graphics:warning-icon-hi.png, 2%)]] Be careful ''' not to add interface eth0'''. This is the control interface. The other three interfaces are your data interfaces. (Use the same interfaces as you used in the previous step.)
{{{
sudo ovs-vsctl add-port br0 ethX
sudo ovs-vsctl add-port br0 ethY
sudo ovs-vsctl add-port br0 ethZ
}}}
v. Verify the three ports configured run:
{{{
sudo ovs-vsctl list-ports br0
}}}
vi. We want our switch to act without a separate controller thus setting it to operate as standalone.
{{{
sudo ovs-vsctl set-fail-mode br0 standalone
}}}
vii. Trust but verify. You can verify your OVS settings by issuing the following:
{{{
sudo ovs-vsctl show
}}}
=== Testing the connectivity between host1, host2 and host3 ===
Initially the OVS switch is setup to act like an L2 learning switch. We want to disable this behavior
except for specific IP addresses.
From ovs
{{{
sudo ovs-ofctl del-flows br0
}}}
Next we will test the connectivity of our hosts to each other using the ping command.
From host1
{{{
ping -c 10 host2
}}}
From host2
{{{
ping -c 10 host1
}}}
From host3
{{{
ping -c 10 host2
}}}
Each of these should be unreachable.
=== Setting up the static IP flows ===
With the switch set up we can now setup routing between host1 and host2
First we will add rules to allow the OVS switch to behave like a normal switch for IP traffic between
the two hosts.
From ovs
{{{
sudo ovs-ofctl add-flow br0 ip,nw_src=10.10.1.1,nw_dst=10.10.1.2,actions=normal
sudo ovs-ofctl add-flow br0 ip,nw_src=10.10.1.2,nw_dst=10.10.1.1,actions=normal
}}}
ARP traffic will also need to be able to flow in order for the routes to each host to be learned.
From ovs
{{{
sudo ovs-ofctl add-flow br0 "arp,nw_dst=10.10.1.1 actions=normal"
sudo ovs-ofctl add-flow br0 "arp,nw_dst=10.10.1.2 actions=normal"
}}}
The connectivity can then be tested with:
From host1
{{{
ping -c 10 host2
}}}
From host2
{{{
ping -c 10 host1
}}}
From host3
{{{
ping -c 10 host2
}}}
Pings between host1 and host2 should succeed whereas pings from host3 will fail.
== Setting up mirroring behavior ==
There are two possible ways in which port mirroring can be setup using an OVS switch. The first method presented uses !OpenFlow table rules. An alternative method is presented that does not use !OpenFlow at all.
=== Setting up mirroring of traffic from host1 and host2 to host3 (using ovs-ofctl) ===
Mirroring can be setup by adding flows to the !OpenFlow table that take for {{{in_port}}} the port we want monitored, and by specifying the output port in which we want
the monitoring traffic to be sent to. This is done using {{{actions=output:#.}}}
For example if we want ports 1 and 2 to be monitored by port 3, the following flows need to be added.
From ovs
{{{
ovs-ofctl add-flow br0 in_port=1,actions=normal,output:3
}}}
{{{
ovs-ofctl add-flow br0 in_port=2,actions=normal,output:3
}}}
Port numbers are assigned based on the order that the ports were added to the bridge as presented in [#configureovs Configure OVS Switch]
=== Setting up mirroring of traffic from host1 and host2 to host3 (using ovs-vctl) ===
It is possible to setup mirroring without ever adding any flows to the !OpenFlow table. It can be done independently of setting up the static IP flows. This is done with a single command to ovs-vsctl.
From ovs
{{{
ovs-vsctl -- set Bridge br0 mirrors=@m \
-- --id=@ethX get Port ethX \
-- --id=@ethY get Port ethY \
-- --id=@ethZ get Port ethZ \
-- --id=@m create Mirror name=mymirror select-dst-port=@ethX,@ethY select-src-port=@ethX,@ethY output-port=@ethZ
}}}
Where ethX and ethY are the names of the interfaces connected to host1 and host2 on the OVS node.
ethZ is the interface on the OVS node that connects to host3
== Verifying mirroring behavior ==
Using either mirroring method it is useful to verify the behavior. We will use netcat to pass along messages. To observe the mirroring behavior, three terminal windows will need
to be opened.
In one terminal ssh into host1 and execute
{{{
nc -ul 24565
}}}
In one terminal ssh into host2 and execute
{{{
nc -u host1 24565
}}}
In one terminal ssh into host3 and execute
{{{
sudo tcpdump -i eth1 -vv -X
}}}
In the terminal with host2 type a message and hit return
{{{
A message
}}}
Observe that the message is received on host1. On host3 the packet was also
received and we can observe the message "A message" inside of the packet.