
| Version 137 (modified by , 12 years ago) (diff) |
|---|
GIMI Instrumentation and Measurement Tool: Tutorial Instructions
Prerequisites
- To prepare for the tutorial, each participant should install VirtualBox and the GENI User Workspace image on their computer. Instruction for this step can be found here: User Workspace
- You should have attended the ExoGENI tutorial given right before the GIMI tutorial. (Ideally, you would also have attended the OMF/OML tutorial given at GEC14.
- Besides OMF/OML and ExoGENI, this tutorial will make also use of iRODS and IREEL and the interested participant can find further information at the links given for both tools.
- Account information for all tools will be handed out on paper to the participants at the beginning of the tutorial.
Common Errors
- Be careful cutting and pasting
- Doesn’t work from Trac
- Sometimes even txt file inserts hidden characters
- Some lines require edits; don’t cut and paste the newline
- Make terminal windows big
- Sometimes terminal gets corrupted when pasting a line that runs to the next line (especially when backspacing)
Getting Ready
- Bring up tutorial VM and log in.
- Open Firefox web browser
- Open a terminal window
- The software required for this tutorial is already installed in the tutorial VM.
- Download GIMI tutorial specific configuration files by issuing the following command in a user workspace terminal:
cd ~/Tutorials/GIMI/common/
git pull
- The iRODS client uses a configuration file (~/.irods/.irodsEnv) that sets certain parameter for the icommands. Here is and example:
# iRODS personal configuration file.
#
# This file was automatically created during iRODS installation.
#   Created Thu Feb 16 14:06:27 2012
#
# iRODS server host name:
irodsHost 'emmy9.casa.umass.edu'
# iRODS server port number:
irodsPort 1247

# Default storage resource name:
irodsDefResource 'iRODSUmass1'
# Home directory in iRODS:
irodsHome '/geniRenci/home/gimiXX'
# Current directory in iRODS:
irodsCwd '/geniRenci/home/gimiXX'
# Account name:
irodsUserName 'gimiXX'
# Zone:
irodsZone 'geniRenci'
- First of all copy the template iRODS configuration file to .irodsEnv with the following command:
cp ~/.irods/gimiIrodsEnv ~/.irods/.irodsEnv
- Open ~/.irods/.irodsEnv with your favorite text editor (we recommend nano) and change gimiXX to your assigned username (e.g., gimi04).
- Register with iRODS server by issuing the following command (more details on iRODS will be given shortly):
iinit
- You will be prompted for a password. Please type in the password you were provided with on the paper handout!!
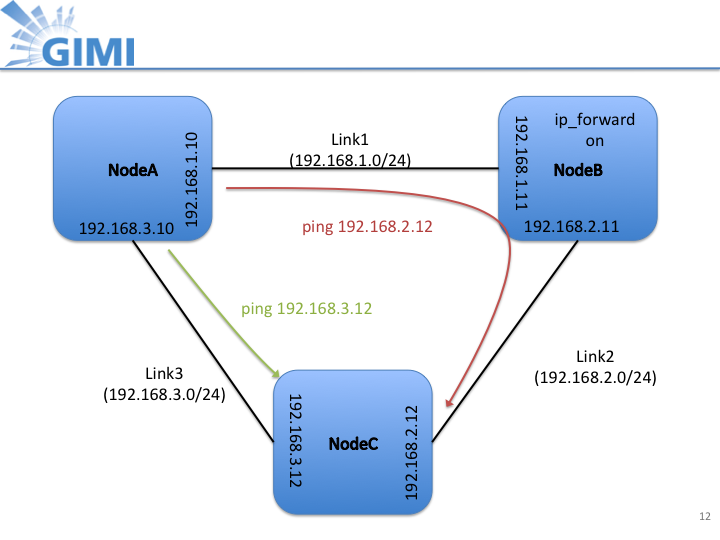
- The image below shows the topology and the interfaces and the routing that has been set up for the measurement:

Part 1: OMF/OML on ExoGENI
The goal of this part of the tutorial is to instrument the topology that has been created by the tutorial participants in the preceding ExoGENI tutorial. Perform Iperf measurement on top of that instrumented topology and analyze data from that measurement.
1.1 Setting up the ExoGENI slice
THESE STEPS ARE ONLY NECESSARY IF NOT PERFORMED IN EXOGENI TUTORIAL:
1.1.1 Download the RDF file that describes the ExoGENI topology for your experiment with the following commands:
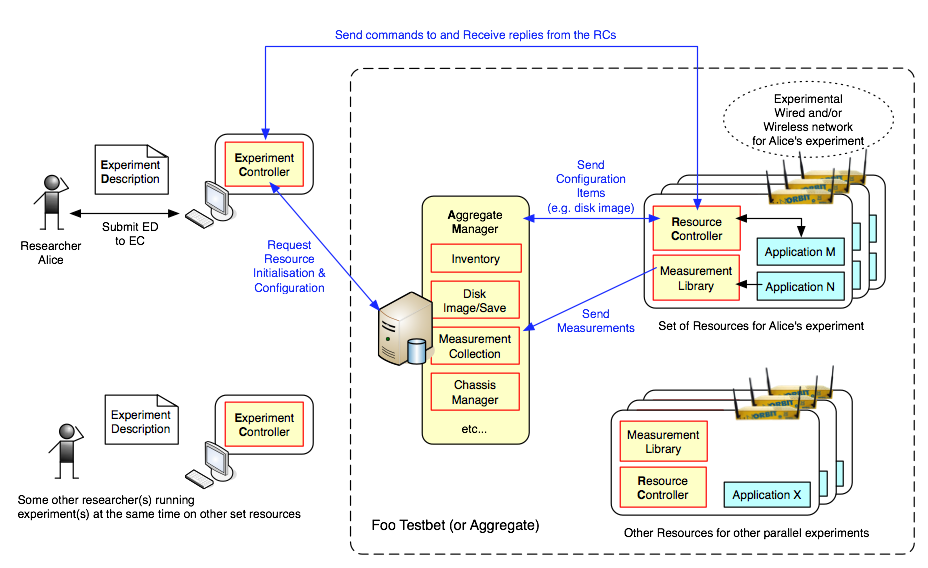
Don't forget to replace gimiXX with your current userID. }}}Don't forget to replace gimiXX with your current userID. {{{ cd ~/Tutorials/GIMI/gimiXX wget http://emmy9.casa.umass.edu/RDFs/gimiXX.rdf }}} 1.1.2 In the tutorial VM start Flukes and load gimiXX.rdf. (Also here, replace gimiXX with your assigned user ID.) In Flukes select ''Files->Open Request->select gimiXX.rdf in ~/Tutorials/GIMI/gimiXX''. 1.1.3 Verify settings and create slice. First select the the ''Request View'' tab. * To verify settings right-click on each node and select ''Edit Properties'' * To create a slice enter your slice name ''gimiXX-tutorial'' in to the empty field next to the ''Submit Request'' button and the click the latter. 1.1.4 To check if all the resources have come up go to the ''Manifest View'' tab and enter your slice name (''gimiXX-tutorial'') into the empty field. Then click ''Query for Manifest''. After a short moment a box with all the requested resources and their respective status will appear. (This box does not update automatically and you have to hit the ''Query for Manifest'' button again to receive and update). 1.1.5 Each node uses the same image but runs a slightly different post boot script. The post boot scripts (specified in Flukes) are shown below. * Node A {{{ echo nodeA > /etc/hostname hostname -F /etc/hostname echo 192.168.1.10 nodeA-L1 nodeA >> /etc/hosts echo 192.168.3.10 nodeA-L3 >> /etc/hosts echo 192.168.1.11 nodeB-L1 nodeB >> /etc/hosts echo 192.168.2.11 nodeB-L2 >> /etc/hosts echo 192.168.2.12 nodeC-L2 nodeC >> /etc/hosts echo 192.168.3.12 nodeC-L3 >> /etc/hosts route add -net 192.168.2.0 netmask 255.255.255.0 gw 192.168.1.11 curl http://emmy8.casa.umass.edu/omf-resctl.yaml -o /etc/omf-resctl-5.4/omf-resctl.yaml perl -i.bak -pe "s/\:name\:/\:name\: \'nodeA\' /g" /etc/omf-resctl-5.4/omf-resctl.yaml perl -i.bak -pe "s/\:slice\:/\:slice\: gimi01-gec14/g" /etc/omf-resctl-5.4/omf-resctl.yaml }}} * Node B {{{ echo nodeB > /etc/hostname hostname -F /etc/hostname echo 192.168.1.10 nodeA-L1 nodeA >> /etc/hosts echo 192.168.3.10 nodeA-L3 >> /etc/hosts echo 192.168.1.11 nodeB-L1 nodeB >> /etc/hosts echo 192.168.2.11 nodeB-L2 >> /etc/hosts echo 192.168.2.12 nodeC-L2 nodeC >> /etc/hosts echo 192.168.3.12 nodeC-L3 >> /etc/hosts echo 1 > /proc/sys/net/ipv4/ip_forward curl http://emmy8.casa.umass.edu/omf-resctl.yaml -o /etc/omf-resctl-5.4/omf-resctl.yaml perl -i.bak -pe "s/\:name\:/\:name\: \'nodeB\' /g" /etc/omf-resctl-5.4/omf-resctl.yaml perl -i.bak -pe "s/\:slice\:/\:slice\: gimi01-gec14/g" /etc/omf-resctl-5.4/omf-resctl.yaml }}} * Node C {{{ echo nodeC > /etc/hostname hostname -F /etc/hostname echo 192.168.1.10 nodeA-L1 nodeA >> /etc/hosts echo 192.168.3.10 nodeA-L3 >> /etc/hosts echo 192.168.1.11 nodeB-L1 nodeB >> /etc/hosts echo 192.168.2.11 nodeB-L2 >> /etc/hosts echo 192.168.2.12 nodeC-L2 nodeC >> /etc/hosts echo 192.168.3.12 nodeC-L3 >> /etc/hosts route add -net 192.168.1.0 netmask 255.255.255.0 gw 192.168.2.11 curl http://emmy8.casa.umass.edu/omf-resctl.yaml -o /etc/omf-resctl-5.4/omf-resctl.yaml perl -i.bak -pe "s/\:name\:/\:name\: \'nodeC\' /g" /etc/omf-resctl-5.4/omf-resctl.yaml perl -i.bak -pe "s/\:slice\:/\:slice\: gimi01-gec14/g" /etc/omf-resctl-5.4/omf-resctl.yaml }}} 1.1.5 The images running on the ExoGENI nodes include the following software: * OMF (AM, RC, EC) * OML * OMLified Iperf, nmetrics * iRODS client 1.1.6 For those who would like to use this image as a basis for their own experiment on ExoGENI it can be found here: [http://emmy9.casa.umass.edu/GEC14-GIMI-Tutorial/dilip-gec14.xml http://emmy9.casa.umass.edu/GEC14-GIMI-Tutorial/dilip-gec14.xml] 1.1.7 '''Note''' * The OMF experiment controller (EC) that controls the experiment is based on unique host name and experiment name * After initial boot up ExoGENI nodes host names are always initially set to "debian" * The node names will be automatically set to the correct names by a post boot script (defined in Flukes). The code snippet below shows the section of the post boot script that performs this step (for the case of node A) : {{{ hostname gimiXX-tutorial-nodeA }}} * The experiment name has to be set to the unique slice name of your ExoGENI request. This is already done in the post boot for this tutorial. * If you want to perform a measurement on a different slice, we here outline the steps to adapt the post boot script for that scenario. * Change the post boot script option to add ''slice name'' as the ''experiment name''. Therefore change the existing experiment name "gec14-gimi01" in line five to the experiment that includes your account name. E.g., if your account name is "gimi05" the experiment name has to be changed to "gimi05-tutorial"!! {{{ curl http://emmy8.casa.umass.edu/omf-resctl.yaml -o /etc/omf-resctl-5.4/omf-resctl.yaml perl -i.bak -pe "s/\:slice\:/\:slice\: gimi05-tutorial/g" /etc/omf-resctl-5.4/omf-resctl.yaml }}} * Request the ExoGENI slice using Flukes '''1.2 Registering the slice with XMPP server''' The RCs and the EC communicate via an XMPP server. The GIMI XMPP is running on emmy9.casa.umass.edu. ''The registration of the RCs and EC for this tutorial is automated in the post boot script. We list the following steps to show you how this can be done manually, if necessary.'' * First the ExoGENI instances and the experiment slice should be registered with the XMPP server. You can achieve this using the OMF AM by issuing the following command from a terminal in the user workspace. In the following command, please change "gimiXX" to the user name provided to you. {{{ omf_create_psnode-5.4 "XMPP Server" mkslice "slice_name" "list_of_nodenames" E.g., omf_create_psnode-5.4 emmy9.casa.umass.edu mkslice gimiXX-tutorial nodeA nodeB nodeC }}} If this succeeds you should see an output similar to the one below {{{ DEBUG: Try to connect to Pubsub Gateway 'emmy9.casa.umass.edu'... DEBUG: Try to connect to Pubsub Gateway 'emmy9.casa.umass.edu:5222'... DEBUG: Connected as 'aggmgr@emmy9.casa.umass.edu' to XMPP server: 'emmy9.casa.umass.edu' Connected to PubSub Server: 'emmy9.casa.umass.edu' }}} '''1.3 Starting the resource controller (RC) ''For this tutorial this step is automated in the post boot script. We list the following steps to show you how this can be done manually, if necessary.'' * Login to nodes A, B, and C through Flukes and start the RC daemon by issuing the following command: {{{ /etc/init.d/omf-resctl.5.4 restart }}} * Finally, verify that the RC has been brought up and is listening to the XMPP server by checking the RC log. {{{ cat /var/log/omf-resctl.log }}} And you should see the following as the last two lines of the log file: {{{ 2012-06-30 23:49:10 DEBUG nodeAgent::OMFPubSubTransport: Listening on '/OMF/dilip-testing/resources/nodeA' at 'emmy9.casa.umass.edu' 2012-06-30 23:49:10 DEBUG nodeAgent::OMFPubSubTransport: Listening on '/OMF/dilip-testing' at 'emmy9.casa.umass.edu' }}} '''1.4 Starting the OML Server (if needed)''' For this tutorial we have an OML server running on emmy9.casa.umass.edu, which collects the measurement data as an sqlite3 database and at the end of the experiment it pushes the data to IRODS. * Here is how you would have to start an OML server if you wanted to run this on a different machine (OML2.8) is required. '''DO NOT perform this task in the tutorial.''' This is explained the [OML installation file]. {{{ oml2-server --listen=3003 --data-dir=~ --logfile=oml_server.log -H ~/oml2-2.8.0/server/oml2-server-hook.sh }}} The latest version of OML offers the capability of executing a script after the measurement has finished. In OML terminology this is called a "hook". The following shows the hook script we execute on the OML server which pushes measurement results into iRODS. {{{ }}} '''1.5 Running the experiment''' The following image gives an overview of the different OMF components and how they interact [[Image(wiki:GIMIv1.0Tutorial:OMF-Single-A-v0.1.png)]] 1.5.1 The experiment will be automatically executed by the OMF EC which is defined by a experiment description file (EDF) written in ruby. 1.5.2 We have prepared the necessary ED files for the experiment described above. The file can be found in the tutorial VM under ~/Tutorials/GIMI/common/tcp_iperf.rb. 1.5.3 We start the experiment running the following command from the user workspace terminal: {{{ cd ~/Tutorials/GIMI/common/tcp_iperf.rb omf-5.4 exec --no-cmc -S
Attachments (8)
-
Slide12.png (95.0 KB) - added by 12 years ago.
ExoGENI topology
- OMF-Single-A-v0.1.png (132.2 KB) - added by 12 years ago.
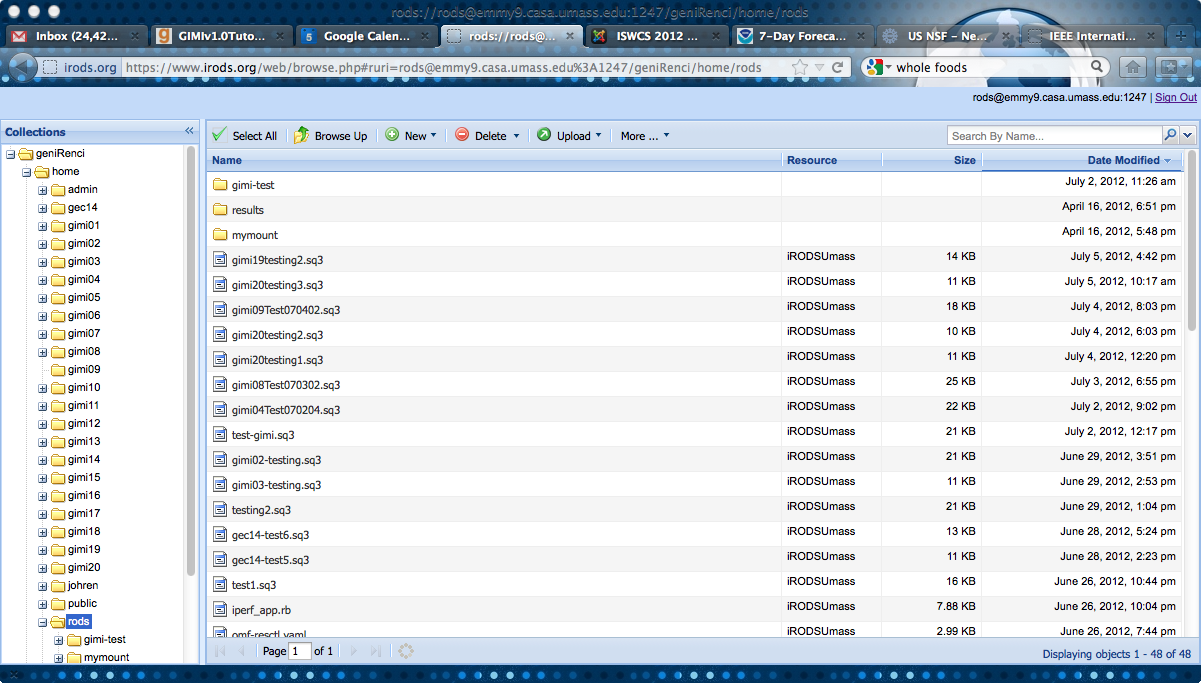
- irods_screen.png (350.9 KB) - added by 12 years ago.
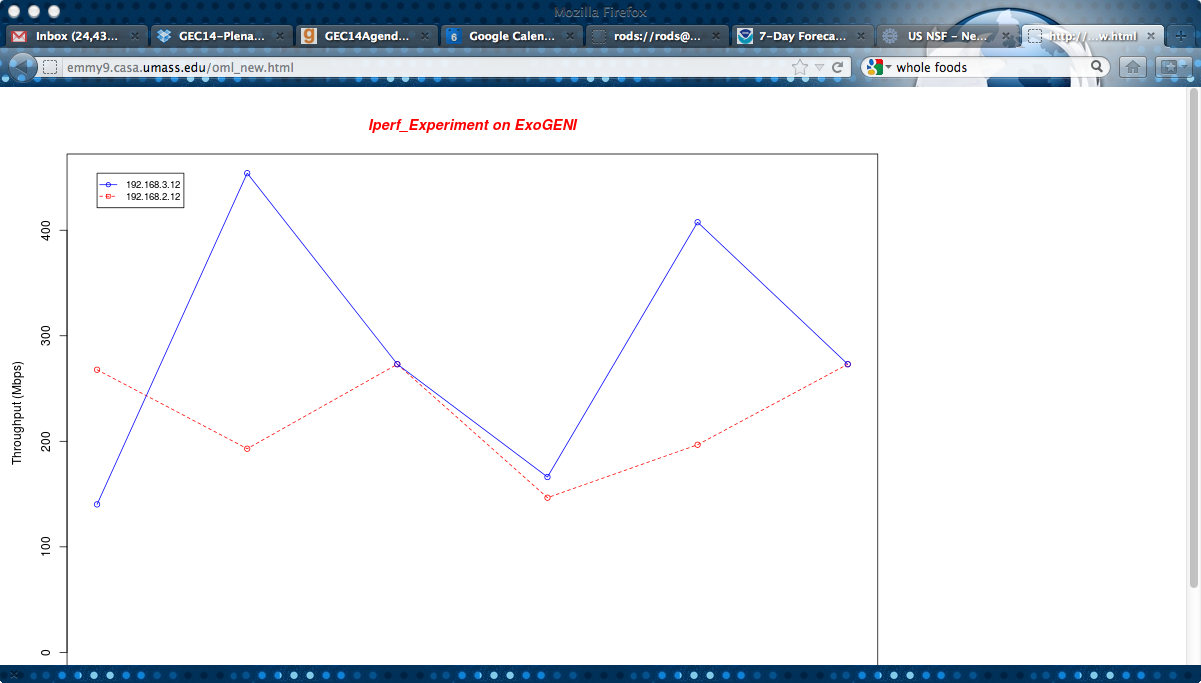
- live_visualization.png (203.7 KB) - added by 12 years ago.
- oml2-server-hook.sh (3.1 KB) - added by 12 years ago.
- GIMI GEC14 tutorial.pptx (790.4 KB) - added by 12 years ago.
-
gec14-gimi-tutorial.txt (239 bytes) - added by 12 years ago.
GEC14 GIMI Commands
- GIMI GEC14 tutorial.pdf (2.8 MB) - added by 12 years ago.