
GRAM Installation Guide
Table of Contents
Introduction
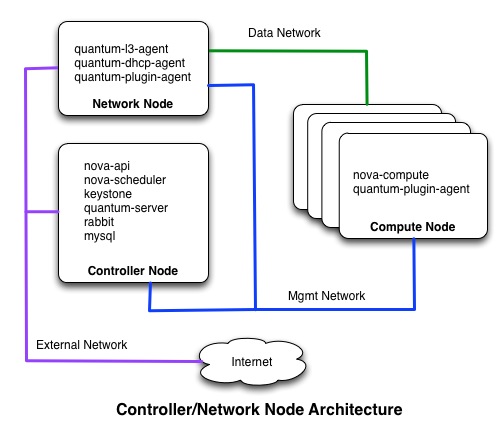
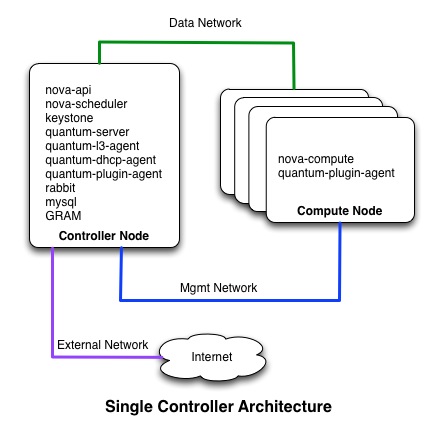
Architecture


Requirements
Hardware Requirements
Software Requirements
Packages
The following Debian packages are required on the controller node
- git
- cloud-utils
Ports
The following ports will be used by GRAM components. Verify that these ports are not already in use. If so, change the configuration of the gram component below to use a different port.
- Controller node
- 8000: GRAM Clearinghouse (Unless you are using a different clearinghouse). See this section? to change this port.
- 8001: GRAM Aggregate Manager. See this section? to change this port.
- 9000: VMOC Default Controller
- 7001: VMOC Management. See this section? to change this port.
- 6633: VMOC
Openstack Requirements
Folsom release with Quantum using OpenvSwitch plugin
- currently developing with Folsom version 2012.2.1 installed on Ubuntu 12.04
- Verify environment variables
- The following variables should be set in the environment of any user that will be using the command line tools
- Suggest adding to a "novarc" file and sourcing that file
export OS_TENANT_NAME=admin
export OS_USERNAME=admin
export OS_PASSWORD=<password set in keystone database for admin user>
export OS_AUTH_URL="http://localhost:5000/v2.0/"
export OS_REGION_NAME=RegionOne
export SERVICE_ENDPOINT="http://localhost:35357/v2.0"
export SERVICE_TOKEN=<token set in keystone.conf>
export OS_NO_CACHE=1
- Verify installed version:
sudo dpkg -l | grep nova sudo dpkg -l | grep quantum - Verify running services on Controller and Network nodes:
    sudo service nova-api status
    sudo service nova-scheduler status
    sudo service keystone status
    sudo service quantum-server status
    sudo service quantum-l3-agent status
    sudo service quantum-dhcp-agent status
    sudo service quantum-openvswitch-plugin-agent status
    sudo service rabbitmq-server status
    sudo service mysql status
    sudo service openvswitch-switch status
- Verify OVS configuration on the Controller node:
- There should be a qg port on br-ex for each external network
$ sudo ovs-vsctl show
107352c3-a0bb-4598-a3a3-776c5da0b62b
    Bridge "br-eth1"
        Port "phy-br-eth1"
            Interface "phy-br-eth1"
        Port "eth1"
            Interface "eth1"
        Port "br-eth1"
            Interface "br-eth1"
                type: internal
    Bridge br-ex
        Port br-ex
            Interface br-ex
                type: internal
        Port "eth2"
            Interface "eth2"
        Port "qg-9816149f-9c"
            Interface "qg-9816149f-9c"
                type: internal
    Bridge br-int
        Port "int-br-eth1"
            Interface "int-br-eth1"
        Port br-int
            Interface br-int
                type: internal
    ovs_version: "1.4.0+build0"
- Verify running services on Compute nodes:
     sudo service nova-compute status
     sudo service quantum-plugin-openvswitch-agent status
     sudo service openvswitch-switch status
- Verify OVS configuration on the Comput nodes:
- Assuming no VMs on the compute node
$ sudo ovs-vsctl show
4ec3588c-5c8f-4d7f-8626-49909e0e4e02
    Bridge br-int
        Port br-int
            Interface br-int
                type: internal
        Port "int-br-eth1"
            Interface "int-br-eth1"
    Bridge "br-eth1"
        Port "phy-br-eth1"
            Interface "phy-br-eth1"
        Port "br-eth1"
            Interface "br-eth1"
                type: internal
        Port "eth1"
            Interface "eth1"
    ovs_version: "1.4.0+build0"
- Assuming no VMs on the compute node
- Verify all expected services registered with Nova
- Expect to see nova-cert, nova-consoleauth, and nova-scheduler on the controller node and nova-compute on each compute node. All should have State = :-) (not XXX)
   $ sudo nova-manage service list
   Binary           Host                                 Zone             Status     State Updated_At
   nova-cert        pridevcontrol                        nova             enabled    :-)   2013-02-07 20:47:38
   nova-consoleauth pridevcontrol                        nova             enabled    :-)   2013-02-07 20:47:37
   nova-scheduler   pridevcontrol                        nova             enabled    :-)   2013-02-07 20:47:38
   nova-compute     pridevcompute1                       nova             enabled    :-)   2013-02-07 20:47:33
   nova-compute     pridevcompute2                       nova             enabled    :-)   2013-02-07 20:47:35
- Expect to see nova-cert, nova-consoleauth, and nova-scheduler on the controller node and nova-compute on each compute node. All should have State = :-) (not XXX)
KVM virtualization
- Verify KVM is installed and able to use hardware virtualization:
- NOTE: kvm-ok is part of the cpu-checker package
   $ kvm -version
   QEMU emulator version 1.0 (qemu-kvm-1.0), Copyright (c) 2003-2008 Fabrice Bellard
   $ kvm-ok
   INFO: /dev/kvm exists
   KVM acceleration can be used
   $ sudo service libvirt-bin status
   libvirt-bin start/running, process 2537
- NOTE: kvm-ok is part of the cpu-checker package
Metadata service requirements
- Nova should have set up a NAT rule for metadata services
$ sudo iptables -t nat -L
...
Chain quantum-l3-agent-PREROUTING (1 references)
target     prot opt source               destination
DNAT       tcp  --  anywhere             169.254.169.254      tcp dpt:http to:10.10.8.71:8775
...
Image requirements
- Currently, nova images must meet the following requirements for GRAM:
- Must be based on Ubuntu 12.04/12.10
- Must have 1 interface configured in /etc/network/interfaces. Remaining interfaces will configured based on the rspec configuration.
- Must have the following packages installed:
- cloud-utils
- openssh-server
- bash
- apt
Set up Environment
Make sure that "source /etc/novarc" or the equivalent is run for all users (omniuser and gram specifically). The environment variables set by this script are required to run Openstack commands.
Install Tarballs
Controller node
For this installation you will need to download or otherwise obtain the following software and credentials. Place these tarballs in /tmp on the controller node.
- gcf-<version>.tgz
- download from http://www.gpolab.bbn.com/local-sw or provided by GRAM team
- gram-<version>.tgz
- provided by GRAM team
- gramcerts: certificates
- provided by GRAM team
Install Instance Images on Controller Node
- Make sure you have images installed for the VMs. See image requirements? above. You can add images using the following command:
glance image-create --name=<image-name> --is-public=true --container-format=bare \
      --disk-format=qcow2 < <path to image>
See http://docs.openstack.org/trunk/openstack-compute/admin/content/starting-images.html for information on downloading images.
GCF Installation and Configuration on Controller Node
- Install gcf tarball
$ cd /opt
$ sudo tar -zxvf /tmp/gcf-2.2.tar.gz
$ sudo ln -s gcf-2.2 gcf
GRAM Installation and Configuration on Controller Node
Setup
- Create an entry for the controller node in its /etc/hosts file. For example, if the name of your controller is controller.example.com and its IP address is 198.51.100.10, create an /etc/hosts entry that looks like:
198.51.100.10 controller.example.com controller
- Create gram user on controller node (use your favorite password and take note of this)
$ sudo useradd -m -s /bin/bash gram
$ sudo adduser gram sudo
$ sudo passwd gram
- Add GCF paths to /home/gram/.bashrc. You must use sudo when editing this file.
export PATH=/home/gram/gram/src:/opt/gcf/src:$PATH
export PYTHONPATH=/opt/gcf/src:/home/gram/gram/src
- Install Clearinghouse and Aggregate Manager certificates
$ sudo mkdir -m 777 /etc/gram
$ cd /etc/gram
$ sudo tar -zxvf /tmp/gramcerts.tgz
- Install gram tarball
$ su - gram
$ tar -zxvf /tmp/gram-0.1.tgz
$ ln -s gram-0.1 gram
$ mkdir .gcf
$ cp gram/gcf_config .gcf
$ exit
- Change the default OS image name in
/home/gram/gram/src/gram/am/gram/config.pyto match what is installed on this rack.
- If you need to change the VMOC Management Port, change the vmoc_interface_port variable in
/home/gram/gram/src/gram/am/gram/config.py.# PORT on which to communicate to VMOC interface manager vmoc_interface_port = 7001
Install and configure VMOC and default controller
- Install POX controller software
$ cd /opt
$ sudo git clone http://github.com/noxrepo/pox
$ sudo git checkout -b betta remotes/origin/betta
- Install and start GRAM VMOC services
$ sudo cp /home/gram/gram/src/services/gram-vmoc.conf /etc/init
$ sudo cp /home/gram/gram/src/services/gram-ctrl.conf /etc/init
$ cd /etc/init.d
$ sudo ln -s /lib/init/upstart-job gram-vmoc
$ sudo ln -s /lib/init/upstart-job gram-ctrl
$ sudo service gram-vmoc start
$ sudo service gram-ctrl start
- Verify the VMOC services are running
- If services are not running you can check the logs /var/log/upstart/gram-vmoc.log and /var/log/upstart/gram-ctrl.log
$ sudo service gram-vmoc status
gram-vmoc start/running, process 15200
$ sudo service gram-ctrl status
gram-ctrl start/running, process 15220

$ netstat -an | grep ":9000"
tcp        0      0 0.0.0.0:9000            0.0.0.0:*               LISTEN
$ netstat -an | grep ":7001"
tcp        0      0 0.0.0.0:7001            0.0.0.0:*               LISTEN
$ netstat -an | grep ":6633"
tcp        0      0 0.0.0.0:6633            0.0.0.0:*               LISTEN
Configure and Start Clearinghouse on the Control Node
- Edit /home/gram/.gcf/gcf_config and set the Clearinghouse host to the hostname of the controller (e.g. mycontroller)
[clearinghouse]
# Address at which the Clearinghouse should listen. 0.0.0.0 means all interfaces.
host=mycontroller
port=8000
- Install and start Clearinghouse service
- Clearinghouse will run on port 8000
$ sudo apt-get xmlsec1
$ sudo cp /home/gram/gram/src/services/gram-ch.conf /etc/init
$ cd /etc/init.d
$ sudo ln -s /lib/init/upstart-job gram-ch
$ sudo service gram-ch start
- Verify the Clearinghouse service is running on port 8000
- If service is not running you can check the logs /var/log/upstart/gram-ch.log
$ sudo service gram-ch status
gram-ch start/running, process 15253
$ netstat -an | grep 8000
tcp        0      0 128.33.251.71:8000      0.0.0.0:*               LISTEN
- If service is not running you can check the logs /var/log/upstart/gram-ch.log
Configure and Start Aggregate Manager
- Edit /home/gram/.gcf/gcf_config and set the host to the hostname of the controller (e.g. mycontroller)
[aggregate_manager]
name=gram

# Address that the AM listens on
host=mycontroller
port=8001
- Install and start Aggregate Manager service
- AM will run on port 8001
- AM V2 will run on port 8002
$ sudo cp /home/gram/gram/src/services/gram-am.conf /etc/init
$ sudo cp /home/gram/gram/src/services/gram-amv2.conf /etc/init
$ cd /etc/init.d
$ sudo ln -s /lib/init/upstart-job gram-am
$ sudo ln -s /lib/init/upstart-job gram-amv2
$ sudo service gram-am start
$ sudo service gram-amv2 start
- Verify the AM service is running on port 8001
- If service is not running you can check the logs /var/log/upstart/gram-am.log
$ sudo service gram-am status
gram-am start/running, process 15253
$ netstat -an | grep 8001
tcp        0      0 128.33.251.71:8001      0.0.0.0:*               LISTEN
- If service is not running you can check the logs /var/log/upstart/gram-am.log
- Verify the AM V2 service is running on port 8002
- If service is not running you can check the logs /var/log/upstart/gram-amv2.log
$ sudo service gram-amv2 status
gram-amv2 start/running, process 15253
$ netstat -an | grep 8002
tcp        0      0 128.33.251.71:8002      0.0.0.0:*               LISTEN
- If service is not running you can check the logs /var/log/upstart/gram-amv2.log
Configure GRAM SSH Proxy Tool on Controller Node
- Install gram-ssh-proxy in /usr/local/bin
$ cd /home/gram/gram/src/gram/am/gram
$ sudo make
- Verify the tool has been installed
$ ls -l /usr/local/bin
total 20
-rwsr-xr-x 1 root root 18058 Feb  9 15:56 gram_ssh_proxy
Configure test OMNI environment
- Create test omni user on controller node
$ sudo useradd -m -s /bin/bash omniuser
$ sudo adduser omniuser sudo
$ sudo passwd omniuser
$ sudo mkdir /home/omniuser/.ssh
$ sudo chown omniuser.omniuser /home/omniuser/.ssh
Remember the password picked for omniuser.
- Add GCF paths to /home/omniuser/.bashrc. You must use sudo when editing this file.
export PATH=/opt/gcf/src:$PATH
export PYTHONPATH=/opt/gcf/src
- Create an SSH keypair to be installed on the VMs
$ su - omniuser
$ ssh-keygen
Generating public/private rsa key pair.
Enter file in which to save the key (/home/omniuser/.ssh/id_rsa): /home/omniuser/.ssh/vmkey
Enter passphrase (empty for no passphrase):
Enter same passphrase again:
Your identification has been saved in /home/omniuser/.ssh/vmkey.
Your public key has been saved in /home/omniuser/.ssh/vmkey.pub.
The key fingerprint is:
2f:f2:62:de:3a:3d:c6:42:0d:ad:48:a8:6b:fe:81:8a omniuser@mycontroller
The key's randomart image is:
+--[ RSA 2048]----+
|                 |
|                 |
|   .   .         |
|  . . . .        |
| . . . +S        |
|. . . o ..       |
| o . ..o. .      |
|+.  . =+=.       |
|E... oo*o.       |
+-----------------+
- Configure OMNI
- Start with default omni_config file
   $ mkdir /home/omniuser/.gcf
   $ cp /home/gram/gram/omni_config /home/omniuser/.gcf
- Start with default omni_config file
- Edit /home/omniuser/.gcf/omni_config
- Set the host for the AM and CH to the hostname of the controller (e.g. mycontroller)
[aggregate_nicknames]
gram=,https://mycontroller:8001

# Where the gcf-ch server is listening
ch=https://mycontroller:8000
- Set the host for the AM and CH to the hostname of the controller (e.g. mycontroller)
- Add an entry for omniuser to
/home/omniuser/.gcf/omni_config. Look for the lineusers =and edit it to read:users = omniuser
- Add information about this user to the
Define users heresection of theomni_configfile.[omniuser] urn=urn:publicid:IDN+geni.net:gpo:gcf+user+omniuser keys=~/.ssh/vmkey.pub
- Install clearinghouse and aggregate manager certs in omniuser's ~/.gcf directory
cd /home/omniuser/.gcf
cp /etc/gram/am-cert.pem .
cp /etc/gram/am-key.pem .
cp /etc/gram/ch-cert.pem .
cp /etc/gram/ch-key.pem .
Verify that OMNI can communicate with the AM
$ omni.py -V3 -a gram getversion
INFO:omni:Loading config file /home/omniuser/.gcf/omni_config
INFO:omni:Using control framework my_gcf
INFO:omni:Substituting AM nickname gram with URL https://gramcontrol:8001, URN unspecified_AM_URN
WARNING:omni:You asked to use AM API 2, but the AM(s) you are contacting do not all speak that version.
WARNING:omni:At the URLs you are contacting, all your AMs speak AM API v3.
WARNING:omni:Switching to AM API v3. Next time call Omni with '-V3'.
INFO:omni:Substituting AM nickname gram with URL https://gramcontrol:8001, URN unspecified_AM_URN
INFO:omni:AM URN: unspecified_AM_URN (url: https://gramcontrol:8001) has version:
INFO:omni:{   'geni_ad_rspec_versions': [   {   'extensions': [],
                                      'namespace': 'http://www.geni.net/resources/rspec/3',
                                      'schema': 'http://www.geni.net/resources/rspec/3/ad.xsd',
                                      'type': 'GENI',
                                      'version': '3'}],
    'geni_api': 3,
    'geni_api_versions': {   '3': 'https://gramcontrol:8001/'},
    'geni_credential_types': [{   'geni_type': 'geni_sfa',
                                     'geni_version': '3'}],
    'geni_request_rspec_versions': [   {   'extensions': [],
                                           'namespace': 'http://www.geni.net/resources/rspec/3',
                                           'schema': 'http://www.geni.net/resources/rspec/3/request.xsd',
                                           'type': 'GENI',
                                           'version': '3'}]}
INFO:omni: ------------------------------------------------------------
INFO:omni: Completed getversion:

  Options as run:
                aggregate: ['gram']
                api_version: 3
                framework: my_gcf
                noGetVersionCache: True

  Args: getversion

  Result Summary: Your AMs do not all speak requested API v2. At the URLs you are contacting, all your AMs speak AM API v3. Switching to AM API v3. Next time call Omni with '-V3'.

Got version for https://gramcontrol:8001

INFO:omni: ============================================================
Test Basic AM Functionality
TODO: Basic OMNI commands that should be run and how to verify they were successful
TODO: The canned rspecs (the ones with open-flow controllers listed) that have pridev addresses hard-coded. We should include instructions to edit these. These instructions should go in this section along with the commands to test basic OF functionality
Attachments (2)
- OpenstackThreeNodeArchitectur.jpg (43.5 KB) - added by 10 years ago.
- OpenstackTwoNodeArchitecture.jpg (37.6 KB) - added by 10 years ago.
Download all attachments as: .zip