
| Version 23 (modified by , 7 years ago) (diff) |
|---|
OpenAirInterface ePC GENI Site Deployment
GENI OpenAirInterface Evolved Packet Core (ePC) software deployment is captured in this page. See the GENI LTE EPc Sites page for details about sites where this setup is deployed.
These are reference OAI pages, that provide details about the Kernel and Software deployed at the GENI LTE sites:
The GENI ePC installation will use these major component in the OAI ePC:
- Mobility Management Entity (MME)
- Home Subscriber Server (HSS)
- Serving and PDN Gateway (SPGW=S+P-GW)
Prerequisites
The OpenAirInterface(OAI) software must run on a dedicated bare metal node for ExoGENI or Raw-pc for InstaGENI sites.
The OAI ePC requires a Radio Access Network (RAN) Low-latency kernel installation, which is available for Ubuntu 14.04 for the master branch. The master branch version/Ubuntu 14.04 is used for the GENI installations.
Get GENI Resource
Reserve a dedicate raw pc for use as the ePC hosts. Use the following RSpecs:
- [Attach InstaGENI Gen7/8/9 Ubuntu14 raw pc request Rspec]
- [Attach ExoGENI bare metal node request RSpec]
Request the appropriate device for you site (IG, EG).
Expand Disk Space for IG Raw PC
InstaGENI Raw PCs have 1 TB drives, but by default the disk space allocation is for 16 GBytes, you must test steps to allocate more disk space, as the RAN kernel installation requires ~ 13GB of disk space.
First check to see how available disk resources:
lnevers@ltebase:~$  sudo fdisk -l /dev/sda*

Disk /dev/sda: 1000.2 GB, 1000171331584 bytes
255 heads, 63 sectors/track, 121597 cylinders, total 1953459632 sectors
Units = sectors of 1 * 512 = 512 bytes
Sector size (logical/physical): 512 bytes / 4096 bytes
I/O size (minimum/optimal): 4096 bytes / 4096 bytes
Disk identifier: 0x90909090

   Device Boot      Start         End      Blocks   Id  System
/dev/sda1   *        2048    33556479    16777216   83  Linux
/dev/sda2        33556480    39847935     3145728    0  Empty
/dev/sda3        39847936    46139391     3145728   82  Linux swap / Solaris
/dev/sda4        46139392  1953455039   953657824    0  Empty

Disk /dev/sda1: 17.2 GB, 17179869184 bytes
255 heads, 63 sectors/track, 2088 cylinders, total 33554432 sectors
Units = sectors of 1 * 512 = 512 bytes
Sector size (logical/physical): 512 bytes / 4096 bytes
I/O size (minimum/optimal): 4096 bytes / 4096 bytes
Disk identifier: 0x00000000

     Device Boot      Start         End      Blocks   Id  System

Disk /dev/sda2: 3221 MB, 3221225472 bytes
255 heads, 63 sectors/track, 391 cylinders, total 6291456 sectors
Units = sectors of 1 * 512 = 512 bytes
Sector size (logical/physical): 512 bytes / 4096 bytes
I/O size (minimum/optimal): 4096 bytes / 4096 bytes
Disk identifier: 0x00000000

Disk /dev/sda2 doesn't contain a valid partition table

Disk /dev/sda3: 3221 MB, 3221225472 bytes
255 heads, 63 sectors/track, 391 cylinders, total 6291456 sectors
Units = sectors of 1 * 512 = 512 bytes
Sector size (logical/physical): 512 bytes / 4096 bytes
I/O size (minimum/optimal): 4096 bytes / 4096 bytes
Disk identifier: 0x00000000

Disk /dev/sda3 doesn't contain a valid partition table

Disk /dev/sda4: 976.5 GB, 976545611776 bytes
255 heads, 63 sectors/track, 118724 cylinders, total 1907315648 sectors
Units = sectors of 1 * 512 = 512 bytes
Sector size (logical/physical): 512 bytes / 4096 bytes
I/O size (minimum/optimal): 4096 bytes / 4096 bytes
Disk identifier: 0x00000000

Disk /dev/sda4 doesn't contain a valid partition table
lnevers@ltebase:~$
The above shows that /dev/dsa4 is space available, we will create a partition on /dev/sda4, note that your disk may differ.
lnevers@ltebase:~$ sudo mkfs -t ext3 /dev/sda4
mke2fs 1.42.9 (4-Feb-2014)
Filesystem label=
OS type: Linux
Block size=4096 (log=2)
Fragment size=4096 (log=2)
Stride=0 blocks, Stripe width=0 blocks
59604992 inodes, 238414456 blocks
11920722 blocks (5.00%) reserved for the super user
First data block=0
Maximum filesystem blocks=4294967296
7276 block groups
32768 blocks per group, 32768 fragments per group
8192 inodes per group
Superblock backups stored on blocks:
	32768, 98304, 163840, 229376, 294912, 819200, 884736, 1605632, 2654208,
	4096000, 7962624, 11239424, 20480000, 23887872, 71663616, 78675968,
	102400000, 214990848

Allocating group tables: done
Writing inode tables: done
Creating journal (32768 blocks): done
Writing superblocks and filesystem accounting information: done

lnevers@ltebase:~$
Now we can mount the disk partition to use for the installation:
lnevers@ltebase:~$ sudo mkdir /space
lnevers@ltebase:~$ sudo mount /dev/sda4 /space
lnevers@ltebase:~$ df -kh
Filesystem                                        Size  Used Avail Use% Mounted on
/dev/sda1                                          16G  1.8G   14G  12% /
none                                              4.0K     0  4.0K   0% /sys/fs/cgroup
udev                                               24G  4.0K   24G   1% /dev
tmpfs                                             4.8G  860K  4.8G   1% /run
none                                              5.0M     0  5.0M   0% /run/lock
none                                               24G     0   24G   0% /run/shm
none                                              100M     0  100M   0% /run/user
ops.instageni.gpolab.bbn.com:/q/proj/ch-geni-net  119G  102G  8.0G  93% /proj/ch-geni-net
/dev/sda4                                         896G   72M  850G   1% /space
lnevers@ltebase:~$
Note the kernel installation steps below will download files in the "/space" directory.
BIOS Requirements
The Radio Access Network Kernel has requirements to disable all power management features in the BIOS (sleep states, in particular C-states) and CPU frequency scaling (Intel SpeedStep). You also need to disable hyper-threading, CPU frequency control, C-States, P-States and any other power management feature from BIOS.
InstaGENI Raw PC Required BIOS Settings
Following is a list of setting modified on IG Raw PCs:
- TO ADD ITEMS from Pics -
InstaGENI Site Installation
Installing 4.8 Kernel on IG EPC Resource
After an Ubuntu 16 Raw PC was reserved in the GPO IG rack, the following procedure was followed to create the ePC setup:
# Note the Ubuntu 16.04.1l image delivers a GNU/Linux 4.4.0-34-generic
sudo apt-get update
sudo apt-get -y upgrade

# Note the next step requests a conflicting grub change. The procedure kept existing grub
sudo apt-get -y dist-upgrade
sudo reboot

# Note system comes up with Kernel 4.4.0-78-generic
sudo apt-get install --install-recommends xserver-xorg-hwe-16.04
sudo reboot

# Note system comes up with Kernel 4.8.0-53-generic
Next step is optional, disk was resized to make sure there is all possible disk space available:
sudo apt-get install gparted -y
# Note resize /dev/sda1 from 16G to 19G and create partition /dev/sda2 from from "unallocated" 900G type=ext4 and named extra

# Next add new partition to files system files
sudo mkdir /extra
sudo vi /etc/fstab

# Make file system part of persistent definition by inserting the following to /etc/fstab
/dev/sda2 /extra ext4 defaults 0 0

# Mount newly added file system and change ownership
sudo mount /extra
sudo chown -R lnevers:ch--OpenFlowTuto /extra/
# Enable GTP (GPRS Tunneling Protocol) sudo modprobe gtp }}}
Installing OAI Software
Assuming you have completed the 4.8 Kernel installation, we proceed to install the OpenAirInterface software as specified in the OAI Repository. Follow the instructions on the OAI Repository page.
The wiki OAI Repository has a wiki page that captures How to Connect OAI ePC with COTS User Equipment. Following are installation steps followed:
# Note some prerequisites installation and configured
sudo apt-get install i7z  cpufrequtils -y
sudo vi /etc/default/cpufrequtils

# insert the following in the file
GOVERNOR="performance"
sudo update-rc.d ondemand disable
sudo reboot
Next the installation of the OAI packages:
sudo apt-get update
sudo apt-get install subversion git
git config --global user.name "Luisa Nevers"
git config --global user.email "luisa.nevers@raytheon.com"

echo -n | openssl s_client -showcerts -connect gitlab.eurecom.fr:443 2>/dev/null | sed -ne '/-BEGIN CERTIFICATE-/,/-END CERTIFICATE-/p' | sudo tee -a /etc/ssl/certs/ca-certificates.crt
git config --global http.sslverify false
Put in place links for additional disk space:
cd /extra
git clone https://gitlab.eurecom.fr/oai/openairinterface5g.git
git clone https://gitlab.eurecom.fr/oai/openair-cn.git
git clone https://gitlab.eurecom.fr/oai/xtables-addons-oai.git

ln -s /extra/open* ~/.
ln -s /extra/xtable* ~/.
Build eNB/ePC packages:
# Building eNB.
cd ~/openairinterface5g
source oaienv
cd cmake_targets
./build_oai -I

# Building ePC:
cd ~/openair-cn/SCRIPTS
./build_mme -i
# sudo apt-get install mysql-server --reinstall -y
./build_hss -i
./build_spgw -i
Configurations changes
TBD
Installing the RAN Kernel on InstaGENI Gen8 Hosts
This was the originally suggested approach, which was not used due to issues on older racks (Gen7).
If you installation is on an InstaGENI with HP Gen8 hosts, login to the raw-pc that you reserved and and execute these commands for the package version of the Kernel Master branch:
git clone https://gitlab.eurecom.fr/oai/linux-4.7.x.git
cd linux-4.7.x
sudo dpkg -i linux-headers-4.7.7-oaiepc_4.7.7-oaiepc-10.00.Custom_amd64.deb linux-image-4.7.7-oaiepc_4.7.7-oaiepc-10.00.Custom_amd64.deb
The above command is an excerpt from the Radio Access Network Kernel wiki page.
Installing the RAN Kernel on InstaGENI Gen7 Hosts
If you installation is on an InstaGENI with HP Gen7 hosts, login to the raw-pc that you reserved and and execute the steps details at the Radio Access Network Kernel wiki page. You must follow the instruction for Ubuntu 14 and the Ran Master branch. As a reference the GPO IG Gen7 raw pc installation history was captured in the attached file named install-log-gpo-pc1-gen7.txt.
Hostnames and domain-name configuration
Append the following lines to /etc/hosts:
 127.0.1.1 nano.orbit-lab.org nano
 127.0.1.1 hss.orbit-lab.org hss
Remove /etc/hostname file
sudo rm /etc/hostname
Change the hostname:
sudo hostnamectl set-hostname nano
Logout and login again to verify hostname change and verify name resolution:
lnevers@nano:~$ sudo getent hosts nano
127.0.1.1       nano.orbit-lab.org nano
Attachments (18)
- install-log-gpo-pc1-gen7.txt (1.8 KB) - added by 7 years ago.
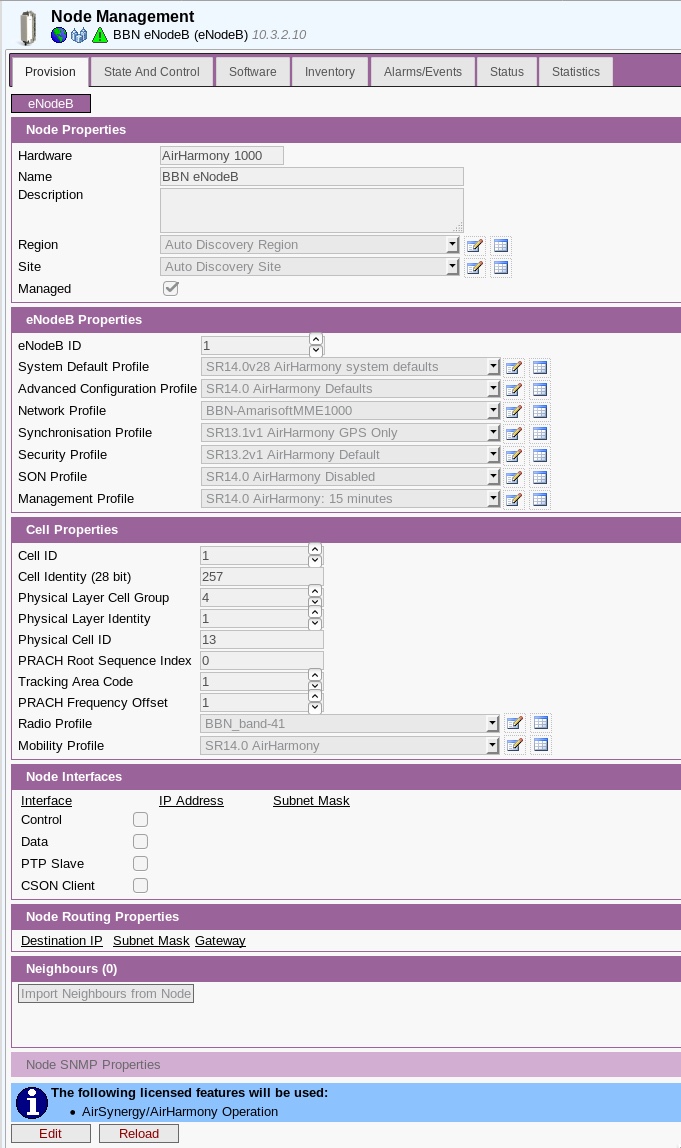
- BBN-eNodeB.jpeg (198.8 KB) - added by 7 years ago.
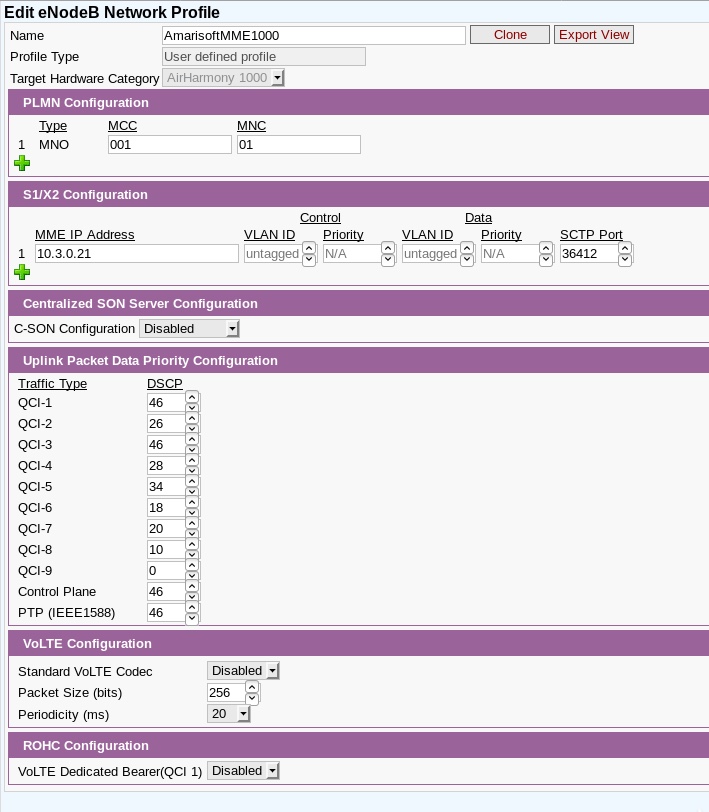
- AmeriSoftNetworkProfile.jpeg (132.2 KB) - added by 7 years ago.
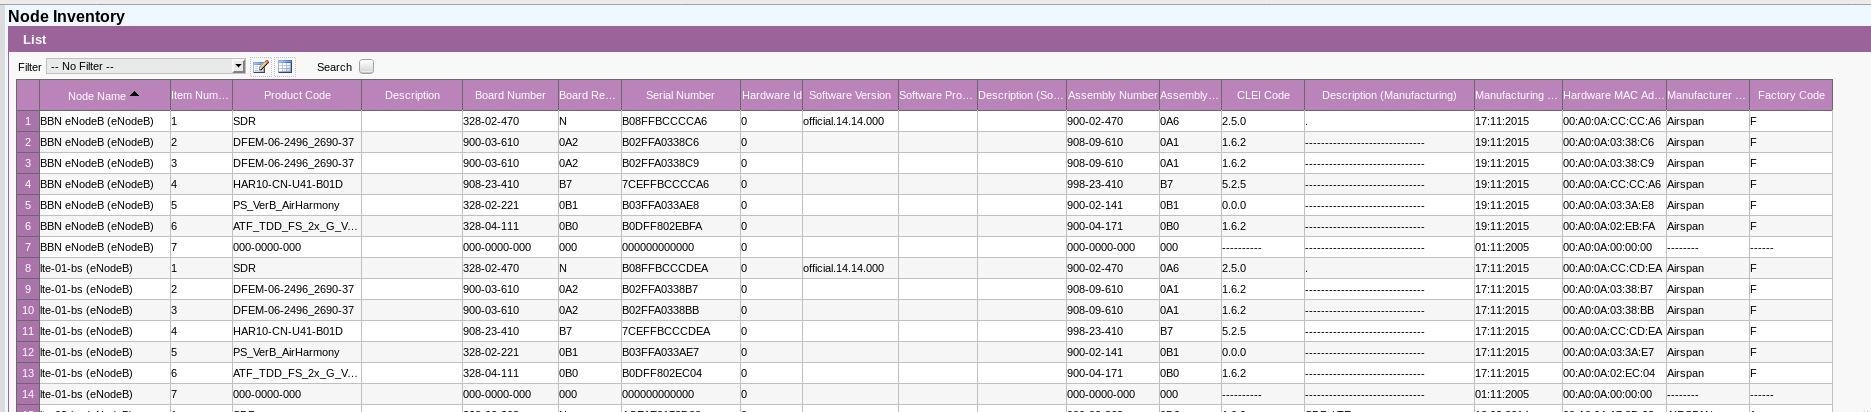
- Inventory-eNodeB.jpeg (277.9 KB) - added by 7 years ago.
- EARFCN.jpeg (71.9 KB) - added by 7 years ago.
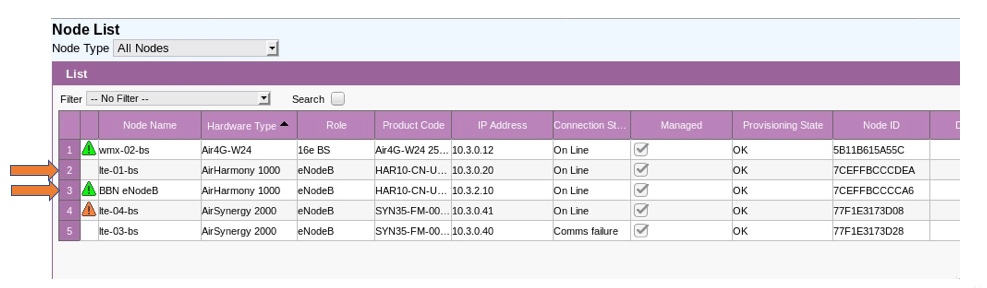
- NodesList.jpeg (74.9 KB) - added by 7 years ago.
- NodesToChoose.jpeg (14.4 KB) - added by 7 years ago.
- BBBNetworkProfile.jpeg (91.8 KB) - added by 7 years ago.
- RadioCellProfile.jpeg (74.3 KB) - added by 7 years ago.
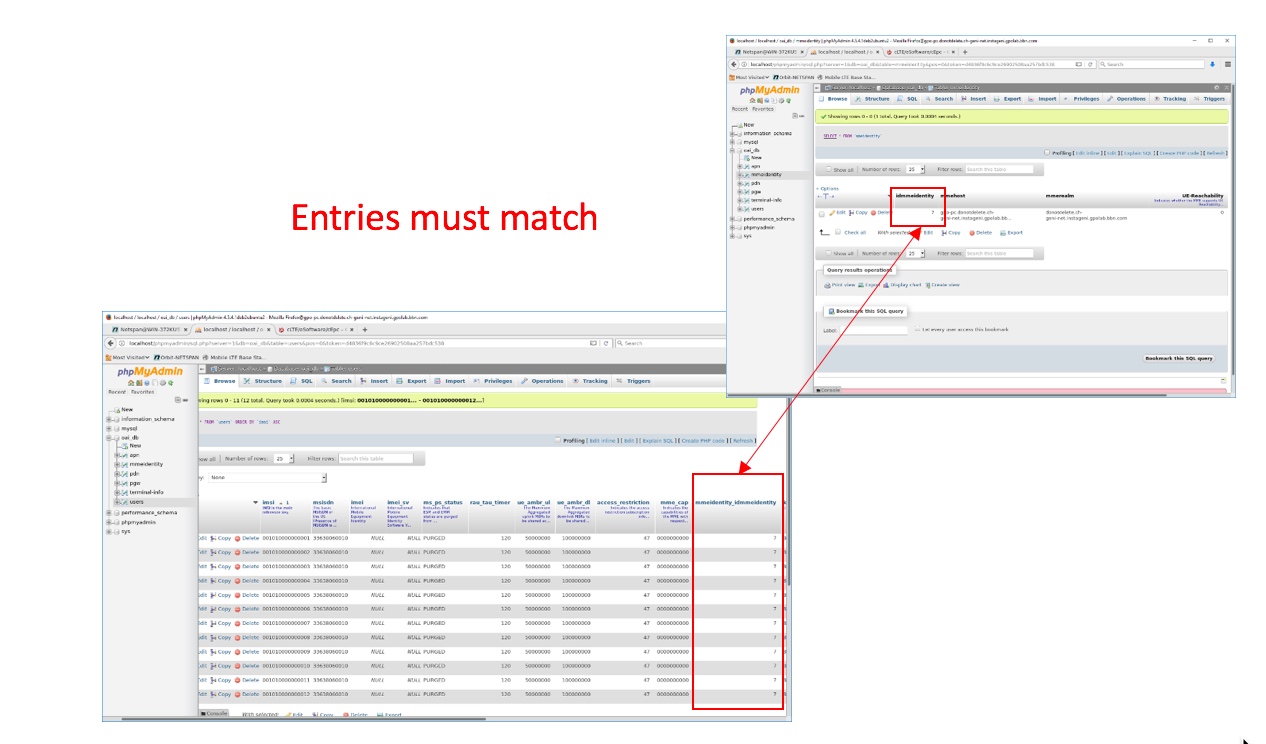
- db-rule1.jpeg (259.0 KB) - added by 7 years ago.
- db-rule2.jpeg (176.2 KB) - added by 7 years ago.
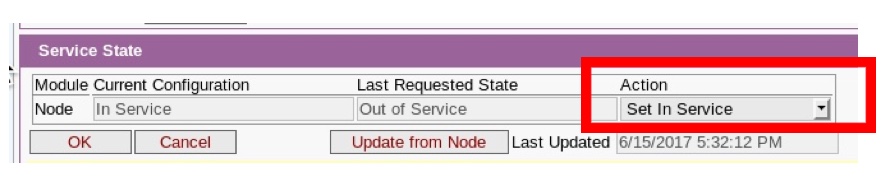
- SetInService.jpeg (48.3 KB) - added by 7 years ago.
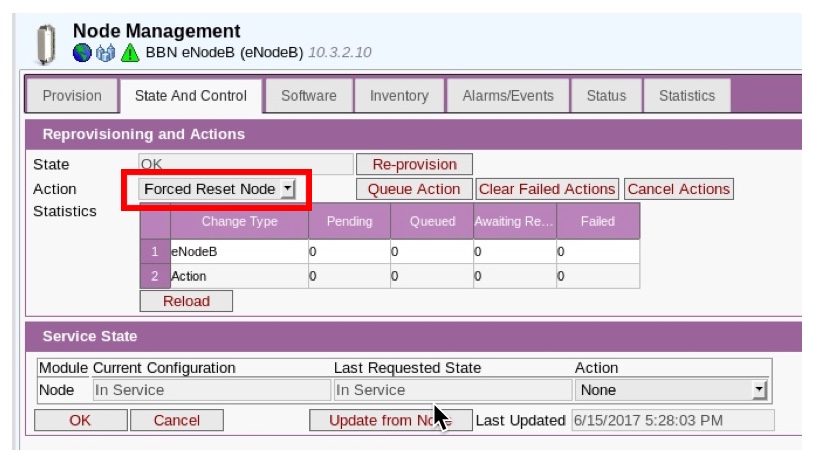
- ForceReset.jpeg (105.8 KB) - added by 7 years ago.
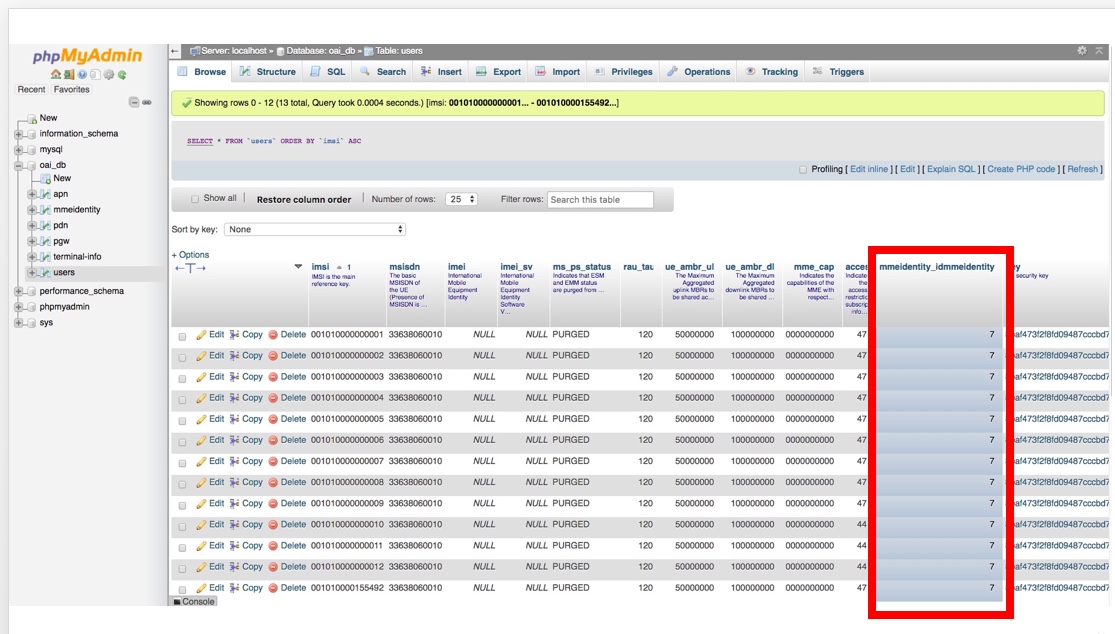
- UserTable.jpeg (220.8 KB) - added by 7 years ago.
- MMEIdentity.jpeg (102.6 KB) - added by 7 years ago.
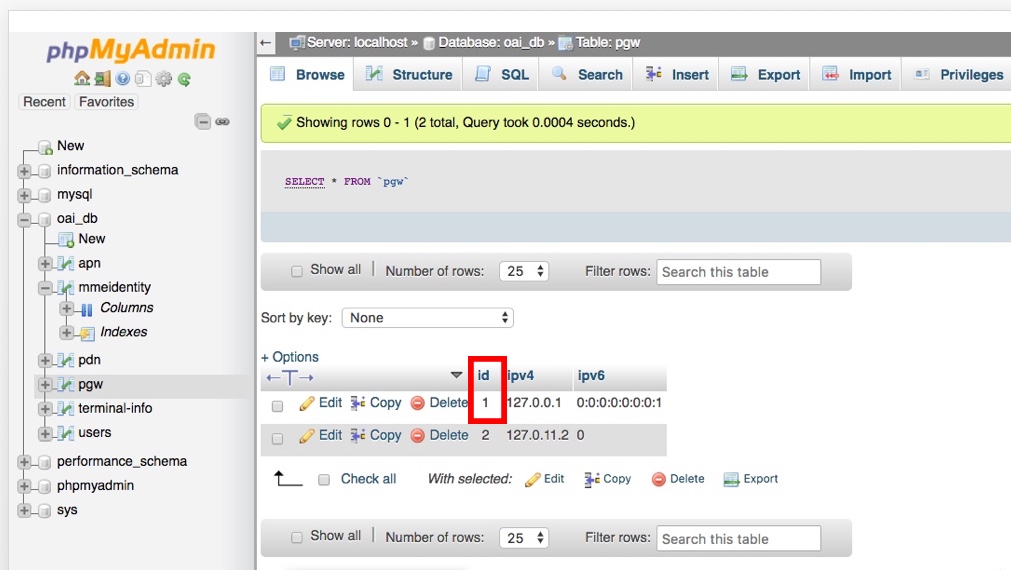
- PGWTable.jpeg (126.9 KB) - added by 7 years ago.
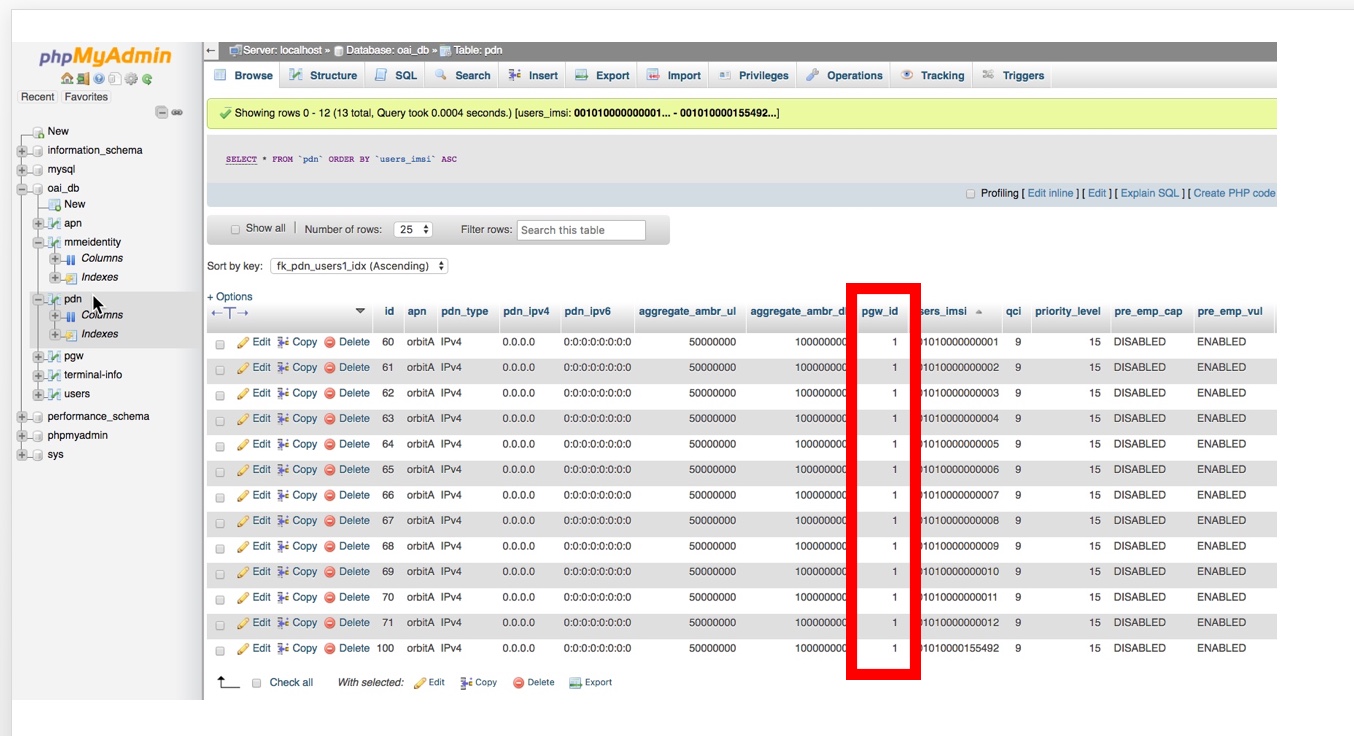
- PDNTable.jpeg (265.3 KB) - added by 7 years ago.
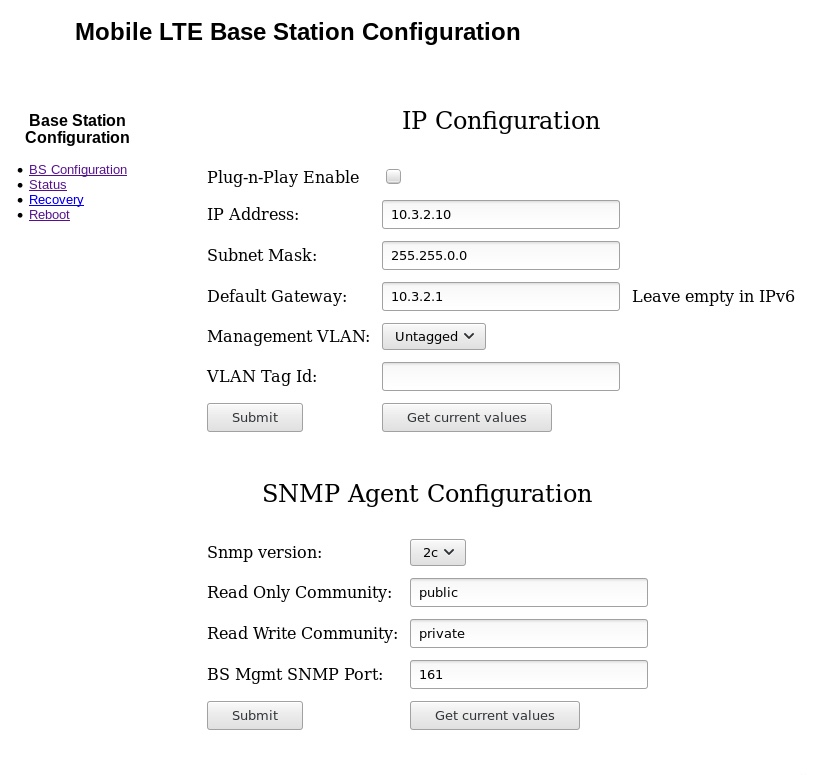
- BBNBaseStationIP.jpeg (88.0 KB) - added by 7 years ago.