
| Version 17 (modified by , 11 years ago) (diff) |
|---|
Execute

3. Initial Setup
3.1 Starting the OML Server (if needed)
For this tutorial we have an OML server running on emmy9.casa.umass.edu, which collects the measurement data in an sqlite3 database and at the end of the experiment it pushes the data to IRODS.
- Here is how you would have to start an OML server if you wanted to run this on a different machine (OML2.8 is required.) DO NOT perform this task in the tutorial.
This is explained the [OML installation file].
$ /usr/bin/oml2-server -l 3003 --logfile=/var/log/oml2-server-2.9.log --user=oml2 --group=oml2 -H /usr/share/oml2-server/oml2-server-hook.sh
The latest version of OML offers the capability of executing a script after the measurement has finished. In OML terminology this is called a "hook". The hook script we use is attached at the bottom of this wiki page (oml2-server-hook.sh).
#!/bin/bash
#
# Example event hook for the OML server, copying an Sqlite database elsewhere
# when the last client has exited.
# Copyright 2012-2013 National ICT Australia (NICTA), Australia
#
# Permission is hereby granted, free of charge, to any person obtaining a copy
# of this software and associated documentation files (the "Software"), to deal
# in the Software without restriction, including without limitation the rights
# to use, copy, modify, merge, publish, distribute, sublicense, and/or sell
# copies of the Software, and to permit persons to whom the Software is
# furnished to do so, subject to the following conditions:
#
# The above copyright notice and this permission notice shall be included in
# all copies or substantial portions of the Software.
#
# THE SOFTWARE IS PROVIDED "AS IS", WITHOUT WARRANTY OF ANY KIND, EXPRESS OR
# IMPLIED, INCLUDING BUT NOT LIMITED TO THE WARRANTIES OF MERCHANTABILITY,
# FITNESS FOR A PARTICULAR PURPOSE AND NONINFRINGEMENT.  IN NO EVENT SHALL THE
# AUTHORS OR COPYRIGHT HOLDERS BE LIABLE FOR ANY CLAIM, DAMAGES OR OTHER
# LIABILITY, WHETHER IN AN ACTION OF CONTRACT, TORT OR OTHERWISE, ARISING FROM,
# OUT OF OR IN CONNECTION WITH THE SOFTWARE OR THE USE OR OTHER DEALINGS IN
# THE SOFTWARE.
#
irodsUserName=rods
irodsHost=emmy9.casa.umass.edu
irodsPort=1247
irodsZone=geniRenci
HOME=/home/oml2
export irodsUserName irodsHost irodsPort irodsZone HOME

LOGFILE=/tmp/oml2-server-hook.log
function log ()
{
	echo "$@" >&2
	echo "$@" >> ${LOGFILE}
}

# XXX: You might need to initialise the iRODS password for the UNIX user
# running tho oml2-server by running 'iinit' to create ~/.irods/.irodsA on its
# behalf for iput to work
IPUT=/usr/bin/iput
SQLITE3=sqlite3
PGDUMP=pg_dump

echo "OML HOOK READY"
log "OML HOOK READY"

while read COMMAND ARGUMENTS; do
	# One report line must be printed in each control path;
	# this first one puts out a timestamp and a dump of the received command, but no newline
	log -n "`date`: ${COMMAND} ${ARGUMENTS}: "
	case "${COMMAND}" in
		"DBCLOSED")
			case "${ARGUMENTS}" in
				file:*)
					DBFILE=${ARGUMENTS/file:/}
					log "${IPUT} ${OPTION} ${DBFILE}"
					NAME=${DBFILE:14:6};
					FILE=${DBFILE:14};
					LENGTH=${#FILE}
					SLICE=${FILE:0:$LENGTH-4}
					DATE=`date`
					log "b db ${DBFILE} closed, pushing to iRODS..."
					${IPUT} -f ${DBFILE} /geniRenci/home/$NAME/ #$FILE
					log "an iRODS operation finished"
					;;
				postgresql://*)
					# Separate the components of the URI by gradually eating them off the TMP variable

					DOMAIN=${ARGUMENTS//*\//}	# cut everything before the final '/'
					USERNAME=${DOMAIN/-*/}		# get the first part before the '-'
					REST=${DOMAIN/$USERNAME-/}	# remove the username from the rest
					EXPNAME=${REST/-*/}		# same as for the username
					TIMESTAMP=${REST//*-/}		# get the last part after the '-'


					TMP="${ARGUMENTS/postgresql:\/\//}"
					USER=${TMP/@*/}
					TMP=${TMP/${USER}@/}
					HOST=${TMP/:*/}
					TMP=${TMP/${HOST}:/}
					PORT=${TMP/\/*/}
					TMP=${TMP/${PORT}\//}
					DBNAME=${TMP}
					DBFILE=${DBNAME}.`date +%Y-%m-%d_%H:%M:%S%z`.pg.sql
					log "PostgreSQL DB ${DBNAME} closed, dumping as ${DBFILE} and pushing to iRODS"
					log "User ${USER} Host ${HOST} Port ${PORT} DBNAME ${DBNAME} Home ${HOME}"
					${PGDUMP} -U ${USER} -h ${HOST} -p ${PORT} ${DBNAME} > /tmp/${DBFILE}
					log "Before IPUT"
					log "${IPUT} -f /tmp/${DBFILE} /geniRenci/home/rods/"
					log `${IPUT} -V -f /tmp/${DBFILE} /geniRenci/home/rods/ 2>&1`
					# ${IPUT} -f /tmp/${DBFILE} /geniRenci/home/rods/
					${IPUT} -f /tmp/${DBFILE} /geniRenci/home/${USERNAME}/experiments/${EXPNAME}-${TIMESTAMP}/measurements.sql
					log "After IPUT"
					;;
				*)
					log "DB ${ARGUMENTS} closed, but don't know how to handle it"
					;;
			esac
			;;
		"EXIT")
			log "Exiting"
			exit 0
			;;
		*)
			log "Unknown command"
			;;
	esac
done
At the following page we give the interested experimenter additional information on how they can run their own OML server independent of the one offered by GIMI.
3.2 Running the init script
The GIMI init script in Exper Mgmt Envir (EME) aims to interactively initialize the experiment environment for each user-running experiment.
3.2.1 Tasks for Init Script
- Get experiment name from user, and derive experiment-id
- Retrieve project_id from omni or CH
- Get list of slice_ids from omni or CH, select slice_id for this experiment
- Get sliver_manifests_rspecs from AMs
- Parse sliver_manifest_rspec to get slice_node_names (fully qualified)
- Select default GIMI Portal, or override
- Setup GSAS (iRODS) structure
- derive defaults for user_irods_home_directory and
- target(exper)-directory, or override
- derive and load proj_exper_step_descriptors
- load template OMF scripts
- get user_irods_target(exper)_iticket, assigned to selcted GIMI Portal agent
- Push sliver_manifest_rspecs and exp_descriptors to iRODS
- Holding user_credentials, config GIMI Portal exper info:
- user_identity
- experiment_id,
- project_id, and slice_id
- slice_node_names
- sliver_manifest_rspecs
- user_irods_home_directory
- user_irods_target(exper)_directory
- user_irods_target(exper)_iticket
3.2.2 GIMI Init installation
This section describes the installation procedure
3.2.3 How to run
Open a terminal window and run:
python gimi_init.py
The output should look like this:
Welcome to the GIMI initialization script, please make sure to install omni and set up your credential before running this script
Are you creating a new experiment?
Since you are creating a new experiment enter “yes”. Your output should be the following:
Enter your preferred experiment path (please use absolute path, e.g., /home/geni/your/dir):
You will now need to input the path to the directory on your VM that you would like to store your experiment information in.
For example you might want to store it your experiment files here:
/home/geni/GIMIexperiment
If the path doesn't already exist your output will look like this:
Path doesn't exist, do you want me to create directory for you? (Yes or No)
Enter “yes” if you would like to create that directory. The init script will now ask you a few question about yourself to be put in the descriptor files that will accompany your experiment files.
Tell us about yourself: enter your name:
It will now ask for the organization you are a part of. This could be a company or university.
Your organization:
Next iRODS will be initialized. You should already have created the file “~/.irods/.irodsEnv”. If you have not done this you will need to answer the iRODS questions with information from your iRODS account which you created in the GENI Portal. You can get additional information at HowToUseiRODS.
Your next output will list your slices and ask you to choose which slice you are using for this experiment.
Your user name is ...

Your active slice names:
...
...

Please enter your preferred slice name for this experiment:
After you enter which slice you would like to use, the output will tell you which slice you chose and which project that slice is a member of. Then it will ask you to name your experiment.
Your slice name is: ...
Your project ID is:
…
Enter your experiment name:
You will then be told the experiment ID. Then the output will look like this:
Retrieving the manifest rspec...
Checking resources from aggregates... (this might take some time)
Depending on which aggregates your slice has resources, you should get additional output about where your resources were found. Here is an example:
Found resource in aggregate: https://boss.instageni.gpolab.bbn.com:12369/protogeni/xmlrpc/am/2.0
Next the OMF template scripts will be pushed to iRODS if they are not already there & iRODS will be set up for the experiment. You will also be given a ticket for the experiment directory that can be used to give other users access.
iRODS initial collection setup was successful

Ticket for new directory: ...
Ticket expiration date is set to: ...
Do you want to push manifest to iRODS? (Yes or No)
You should push manifest to iRODS if you have already reserved your resources so enter “yes”. You should get the following output:
Manifest has been pushed to iRODS

Pushing experiment information to GIMI Experiment Registry...
Saving JSON to file:
…
This will be followed by the JSON files that are pushed to the registery. At the end of all this output you should see:
Pushed data to registry successfully
You have successfully run the GIMI initialization script.
3.3 Experiment descriptor and iRODS
Initial Experiment Collection
This script sets up an experiment collection within the user's iRODS account. The user and GIMI will store objects associated with this experiment in this collection. In the example below the experiment collection is called “keleigh-myFirstExperiment-2013-06-21T08:35:53” .
Descriptor Files
Descriptor files are generated which collect metadata about the experiment and objects being pushed into iRODS. These descriptor files are used to help organize and search for data. "project.xml" and “experiment.xml” are descriptor files created in each experiment collection.
Manifest Rspecs
The user is asked if he would like the manifest rspecs from his slice to be added to this experiment collection in iRODS. If the user says yes, a new collection is created within the experiment collection. The manifest rspecs are then pushed to this new collection and descriptor files are created. In this example "manifest-keleigh-myFirstExperiment-2013-06-21T08:35:53.rspec" is a manifest rspec and "artifact.xml" and “step.xml” are descriptor files.
Experiment Templates
Template OMF scripts are added to the user's iRODS account in their own folder titled “experimentTemplates” the first time a user runs this script. These OMF scripts are also available in Labwiki
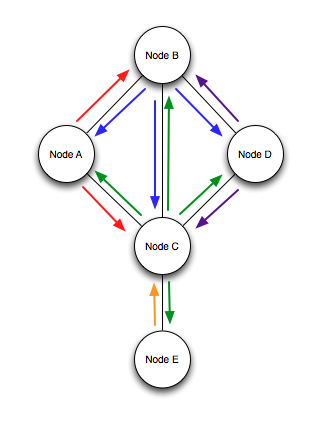
3.4 Verification of Topology
After establishing the slice on which the experiment will be executed, the experimenter will be most likely
be interested in verifying if the slice has been initiated correctly. In this tutorial, we use an http://emmy9.casa.umass.edu/GEC15-GIMI-Tutorial/step1-ping_all.rb OMF experiment script that executes pings between neighboring nodes.
The following figure shows that a total of 12 (between each pair of nodes and in each direction) ping are performed.

defProperty('source1', "nodeA", "ID of a resource")
defProperty('source2', "nodeB", "ID of a resource")
defProperty('source3', "nodeC", "ID of a resource")
defProperty('source4', "nodeD", "ID of a resource")
defProperty('source5', "nodeE", "ID of a resource")

#defProperty('sink1', "nodeA", "ID of a sink")
#defProperty('sink2', "nodeB", "ID of a sink")
#defProperty('sink3', "nodeC", "ID of a sink")
#defProperty('sink4', "nodeD", "ID of a sink")
#defProperty('sink5', "nodeE", "ID of a sink")

defProperty('sinkaddr11', '192.168.4.10', "Ping destination address")
defProperty('sinkaddr12', '192.168.5.12', "Ping destination address")

defProperty('sinkaddr21', '192.168.4.11', "Ping destination address")
defProperty('sinkaddr22', '192.168.2.12', "Ping destination address")
defProperty('sinkaddr23', '192.168.1.13', "Ping destination address")

defProperty('sinkaddr31', '192.168.5.11', "Ping destination address")
defProperty('sinkaddr32', '192.168.2.10', "Ping destination address")
defProperty('sinkaddr33', '192.168.3.13', "Ping destination address")
defProperty('sinkaddr34', '192.168.6.14', "Ping destination address")

defProperty('sinkaddr41', '192.168.1.10', "Ping destination address")
defProperty('sinkaddr42', '192.168.3.12', "Ping destination address")

defProperty('sinkaddr51', '192.168.6.12', "Ping destination address")

defApplication('ping_app', 'pingmonitor') do |a|
    a.path = "/root/pingWrap.rb"
    a.version(1, 2, 0)
    a.shortDescription = "Wrapper around ping"
    a.description = "ping application"
    a.defProperty('dest_addr', 'Address to ping', '-a', {:type => :string, :dynamic => false})
    a.defProperty('count', 'Number of times to ping', '-c', {:type => :integer, :dynamic => false})
    a.defProperty('interval', 'Interval between pings in s', '-i', {:type => :integer, :dynamic => false})

    a.defMeasurement('myping') do |m|
     m.defMetric('dest_addr',:string)
     m.defMetric('ttl',:int)
     m.defMetric('rtt',:float)
     m.defMetric('rtt_unit',:string)
   end
end

defGroup('Source1', property.source1) do |node|
  node.addApplication("ping_app") do |app|
    app.setProperty('dest_addr', property.sinkaddr11)
    app.setProperty('count', 30)
    app.setProperty('interval', 1)
    app.measure('myping', :samples => 1)
  end

  node.addApplication("ping_app") do |app|
    app.setProperty('dest_addr', property.sinkaddr12)
    app.setProperty('count', 30)
    app.setProperty('interval', 1)
    app.measure('myping', :samples => 1)
  end
end

defGroup('Source2', property.source2) do |node|
  node.addApplication("ping_app") do |app|
    app.setProperty('dest_addr', property.sinkaddr21)
    app.setProperty('count', 30)
    app.setProperty('interval', 1)
    app.measure('myping', :samples => 1)
  end

  node.addApplication("ping_app") do |app|
    app.setProperty('dest_addr', property.sinkaddr22)
    app.setProperty('count', 30)
    app.setProperty('interval', 1)
    app.measure('myping', :samples => 1)
  end

  node.addApplication("ping_app") do |app|
    app.setProperty('dest_addr', property.sinkaddr23)
    app.setProperty('count', 30)
    app.setProperty('interval', 1)
    app.measure('myping', :samples => 1)
  end
end

defGroup('Source3', property.source3) do |node|
  node.addApplication("ping_app") do |app|
    app.setProperty('dest_addr', property.sinkaddr31)
    app.setProperty('count', 30)
    app.setProperty('interval', 1)
    app.measure('myping', :samples => 1)
  end

  node.addApplication("ping_app") do |app|
    app.setProperty('dest_addr', property.sinkaddr32)
    app.setProperty('count', 30)
    app.setProperty('interval', 1)
    app.measure('myping', :samples => 1)
  end

  node.addApplication("ping_app") do |app|
    app.setProperty('dest_addr', property.sinkaddr33)
    app.setProperty('count', 30)
    app.setProperty('interval', 1)
    app.measure('myping', :samples => 1)
  end

  node.addApplication("ping_app") do |app|
    app.setProperty('dest_addr', property.sinkaddr34)
    app.setProperty('count', 30)
    app.setProperty('interval', 1)
    app.measure('myping', :samples => 1)
  end
end

defGroup('Source4', property.source4) do |node|

  node.addApplication("ping_app") do |app|
    app.setProperty('dest_addr', property.sinkaddr41)
    app.setProperty('count', 30)
    app.setProperty('interval', 1)
    app.measure('myping', :samples => 1)
  end

  node.addApplication("ping_app") do |app|
    app.setProperty('dest_addr', property.sinkaddr42)
    app.setProperty('count', 30)
    app.setProperty('interval', 1)
    app.measure('myping', :samples => 1)
  end
end

defGroup('Source5', property.source5) do |node|
  node.addApplication("ping_app") do |app|
    app.setProperty('dest_addr', property.sinkaddr51)
    app.setProperty('count', 30)
    app.setProperty('interval', 1)
    app.measure('myping', :samples => 1)
  end
end

onEvent(:ALL_UP_AND_INSTALLED) do |event|
  info "Starting the ping"
  allGroups.startApplications
  wait 5
  info "Stopping the ping"
  allGroups.stopApplications
  Experiment.done
end
3.5 Setup Routing in Experiment Topology
In more complex topologies routing has to be set up. In our case, this is achieved with the aid of an http://emmy9.casa.umass.edu/GEC15-GIMI-Tutorial/step2-routing.rb OMF experiment script. The one we use for this tutorial is shown below.
defGroup('Node1', "nodeA")
defGroup('Node2', "nodeB")
defGroup('Node3', "nodeC")
defGroup('Node4', "nodeD")
defGroup('Node5', "nodeE")


onEvent(:ALL_UP) do |event|
  wait 1
  info 'Changing routing setup'

  group('Node1').exec("route add -net 192.168.1.0/24 gw 192.168.4.10")
  group('Node1').exec("route add -net 192.168.2.0/24 gw 192.168.4.10")
  group('Node1').exec("route add -net 192.168.3.0/24 gw 192.168.5.12")
  group('Node1').exec("route add -net 192.168.6.0/24 gw 192.168.5.12")
  group('Node1').exec("echo 1 >  /proc/sys/net/ipv4/ip_forward")

  group('Node2').exec("route add -net 192.168.3.0/24 gw 192.168.1.13")
  group('Node2').exec("route add -net 192.168.5.0/24 gw 192.168.4.11")
  group('Node2').exec("route add -net 192.168.6.0/24 gw 192.168.2.12")
  group('Node2').exec("echo 1 >  /proc/sys/net/ipv4/ip_forward")

  group('Node3').exec("route add -net 192.168.1.0/24 gw 192.168.3.13")
  group('Node3').exec("route add -net 192.168.4.0/24 gw 192.168.5.11")
  group('Node3').exec("echo 1 >  /proc/sys/net/ipv4/ip_forward")

  group('Node4').exec("route add -net 192.168.2.0/24 gw 192.168.3.12")
  group('Node4').exec("route add -net 192.168.4.0/24 gw 192.168.1.10")
  group('Node4').exec("route add -net 192.168.5.0/24 gw 192.168.3.12")
  group('Node4').exec("route add -net 192.168.6.0/24 gw 192.168.3.12")
  group('Node4').exec("echo 1 >  /proc/sys/net/ipv4/ip_forward")

  group('Node5').exec("route add -net 192.168.2.0/24 gw 192.168.6.12")
  group('Node5').exec("route add -net 192.168.1.0/24 gw 192.168.6.12")
  group('Node5').exec("route add -net 192.168.3.0/24 gw 192.168.6.12")
  group('Node5').exec("route add -net 192.168.4.0/24 gw 192.168.6.12")
  group('Node5').exec("route add -net 192.168.5.0/24 gw 192.168.6.12")

  info 'Routing setup finished'
  wait 5
  info 'Stopping applications'
  allGroups.stopApplications
  wait 1
  Experiment.done
end
This script can be easily adapted if the experimenter wishes to set up the routing between the nodes differently.
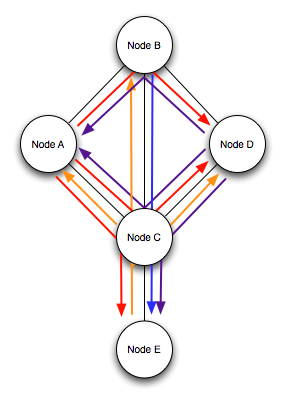
3.6 Verification of Routing
After establishing the routing, we use an http://emmy9.casa.umass.edu/GEC15-GIMI-Tutorial/step3-ping_e2e.rb OMF experiment script that executes pings between each pair of nodes that contains one hop, to verify the correctness of routing setup.

defProperty('source1', "nodeA", "ID of a resource")
defProperty('source2', "nodeB", "ID of a resource")
defProperty('source3', "nodeC", "ID of a resource")
defProperty('source4', "nodeD", "ID of a resource")
defProperty('source5', "nodeE", "ID of a resource")

defProperty('sinkaddr11', '192.168.1.13', "Ping destination address")
defProperty('sinkaddr12', '192.168.3.13', "Ping destination address")
defProperty('sinkaddr13', '192.168.6.14', "Ping destination address")

defProperty('sinkaddr21', '192.168.6.14', "Ping destination address")

defProperty('sinkaddr41', '192.168.4.11', "Ping destination address")
defProperty('sinkaddr42', '192.168.5.11', "Ping destination address")
defProperty('sinkaddr43', '192.168.6.14', "Ping destination address")

defProperty('sinkaddr51', '192.168.5.11', "Ping destination address")
defProperty('sinkaddr52', '192.168.2.10', "Ping destination address")
defProperty('sinkaddr53', '192.168.3.13', "Ping destination address")

defApplication('ping_app', 'pingmonitor') do |a|
        a.path = "/root/pingWrap.rb"
        a.version(1, 2, 0)
        a.shortDescription = "Wrapper around ping"
        a.description = "ping application"
        a.defProperty('dest_addr', 'Address to ping', '-a', {:type => :string, :dynamic => false})
        a.defProperty('count', 'Number of times to ping', '-c', {:type => :integer, :dynamic => false})
        a.defProperty('interval', 'Interval between pings in s', '-i', {:type => :integer, :dynamic => false})

        a.defMeasurement('myping') do |m|
            m.defMetric('dest_addr',:string)
            m.defMetric('ttl',:int)
            m.defMetric('rtt',:float)
            m.defMetric('rtt_unit',:string)
        end
end

defGroup('Source1', property.source1) do |node|
      node.addApplication("ping_app") do |app|
          app.setProperty('dest_addr', property.sinkaddr11)
          app.setProperty('count', 30)
          app.setProperty('interval', 1)
          app.measure('myping', :samples => 1)
      end

      node.addApplication("ping_app") do |app|
          app.setProperty('dest_addr', property.sinkaddr12)
          app.setProperty('count', 30)
          app.setProperty('interval', 1)
          app.measure('myping', :samples => 1)
      end

      node.addApplication("ping_app") do |app|
          app.setProperty('dest_addr', property.sinkaddr13)
          app.setProperty('count', 30)
          app.setProperty('interval', 1)
          app.measure('myping', :samples => 1)
      end
end

defGroup('Source2', property.source1) do |node|
    node.addApplication("ping_app") do |app|
        app.setProperty('dest_addr', property.sinkaddr21)
        app.setProperty('count', 30)
        app.setProperty('interval', 1)
        app.measure('myping', :samples => 1)
    end
end

defGroup('Source4', property.source3) do |node|
      node.addApplication("ping_app") do |app|
          app.setProperty('dest_addr', property.sinkaddr41)
          app.setProperty('count', 30)
          app.setProperty('interval', 1)
          app.measure('myping', :samples => 1)
      end

      node.addApplication("ping_app") do |app|
          app.setProperty('dest_addr', property.sinkaddr42)
          app.setProperty('count', 30)
          app.setProperty('interval', 1)
          app.measure('myping', :samples => 1)
      end

      node.addApplication("ping_app") do |app|
          app.setProperty('dest_addr', property.sinkaddr43)
          app.setProperty('count', 30)
          app.setProperty('interval', 1)
          app.measure('myping', :samples => 1)
      end
end

defGroup('Source5', property.source3) do |node|
          node.addApplication("ping_app") do |app|
              app.setProperty('dest_addr', property.sinkaddr51)
              app.setProperty('count', 30)
              app.setProperty('interval', 1)
              app.measure('myping', :samples => 1)
          end

          node.addApplication("ping_app") do |app|
              app.setProperty('dest_addr', property.sinkaddr52)
              app.setProperty('count', 30)
              app.setProperty('interval', 1)
              app.measure('myping', :samples => 1)
          end

          node.addApplication("ping_app") do |app|
              app.setProperty('dest_addr', property.sinkaddr53)
              app.setProperty('count', 30)
              app.setProperty('interval', 1)
              app.measure('myping', :samples => 1)
          end
end

onEvent(:ALL_UP_AND_INSTALLED) do |event|
      info "Starting the ping"
      allGroups.startApplications
      wait 5
      info "Stopping the ping"
      allGroups.stopApplications
      Experiment.done
end
4. Running Actual Experiment
We will use an http://emmy9.casa.umass.edu/GEC15-GIMI-Tutorial/step4-otg_nmetrics.rb OMF experiment script to execute oml enabled traffic generator and receiver (otg and otr) to simulate network traffic, and use oml enabled nmetrics to measure the system usage (e.g., CUP, memory) and network interface usage on each of the participated ExoGENI nodes.

The one we use for this tutorial is shown below.
defProperty('theSender','nodeB','ID of sender node')
defProperty('theReceiver1', 'nodeE', "ID of receiver node")
defProperty('theReceiver2', 'nodeA', "ID of receiver node")
defProperty('theReceiver3', 'nodeD', "ID of receiver node")
defProperty('packetsize', 128, "Packet size (byte) from the sender node")
defProperty('bitrate', 2048, "Bitrate (bit/s) from the sender node")
defProperty('runtime', 40, "Time in second for the experiment is to run")

defGroup('Sender',property.theSender) do |node|
    options = { 'sample-interval' => 2 }
    node.addPrototype("system_monitor", options)
    node.addApplication("test:app:otg2") do |app|
        app.setProperty('udp:local_host', '192.168.2.10')
        app.setProperty('udp:dst_host', '192.168.6.14')
        app.setProperty('udp:dst_port', 3000)
        app.setProperty('cbr:size', property.packetsize)
        app.setProperty('cbr:rate', property.bitrate * 2)
        app.measure('udp_out', :samples => 1)
    end

    node.addApplication("test:app:otg2") do |app|
        app.setProperty('udp:local_host', '192.168.4.10')
        app.setProperty('udp:dst_host', '192.168.4.11')
        app.setProperty('udp:dst_port', 3000)
        app.setProperty('cbr:size', property.packetsize)
        app.setProperty('cbr:rate', property.bitrate * 2)
        app.measure('udp_out', :samples => 1)
    end

    node.addApplication("test:app:otg2") do |app|
        app.setProperty('udp:local_host', '192.168.1.10')
        app.setProperty('udp:dst_host', '192.168.1.13')
        app.setProperty('udp:dst_port', 3000)
        app.setProperty('cbr:size', property.packetsize)
        app.setProperty('cbr:rate', property.bitrate * 2)
        app.measure('udp_out', :samples => 1)
    end
end

defGroup('Receiver1',property.theReceiver1) do |node|
    options = { 'sample-interval' => 2 }
    node.addPrototype("system_monitor", options)

    node.addApplication("test:app:otr2") do |app|
        app.setProperty('udp:local_host', '192.168.6.14')
        app.setProperty('udp:local_port', 3000)
        app.measure('udp_in', :samples => 1)
    end
end

defGroup('Receiver2',property.theReceiver2) do |node|
    options = { 'sample-interval' => 2 }
    node.addPrototype("system_monitor", options)
    node.addApplication("test:app:otr2") do |app|
        app.setProperty('udp:local_host', '192.168.4.11')
        app.setProperty('udp:local_port', 3000)
        app.measure('udp_in', :samples => 1)
    end
end

defGroup('Receiver3',property.theReceiver3) do |node|
    options = { 'sample-interval' => 2 }
    node.addPrototype("system_monitor", options)
    node.addApplication("test:app:otr2") do |app|
        app.setProperty('udp:local_host', '192.168.1.13')
        app.setProperty('udp:local_port', 3000)
        app.measure('udp_in', :samples => 1)
    end
end

onEvent(:ALL_UP_AND_INSTALLED) do |event|
    info "starting"
    wait 5
    allGroups.exec("ln -s /usr/local/bin/otr2 /usr/bin/otr2")
    allGroups.exec("ln -s /usr/local/bin/otg2 /usr/bin/otg2")
    allGroups.exec("ln -s /usr/local/bin/oml2-nmetrics /usr/bin/oml2-nmetrics")
    allGroups.startApplications
    info "All applications started..."
    wait property.runtime / 4
    property.packetsize = 256
    wait property.runtime / 4
    property.packetsize = 512
    wait property.runtime / 4
    property.packetsize = 1024
    wait property.runtime / 4
    allGroups.stopApplications
    info "All applications stopped."
    Experiment.done
end
5. LabWiki
Labwiki is a tool which provides a user-friendly interface to visualize your experiment. To know more about LabWiki please visit LabWiki
Labwiki can be used to Plan, Prepare and Run your Experiment.
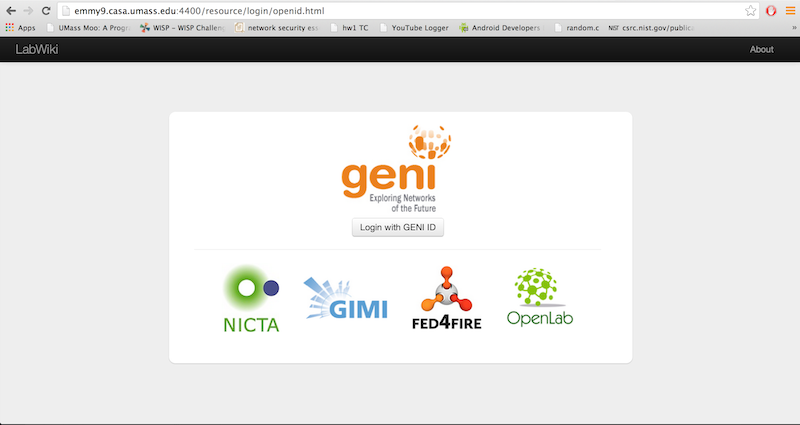
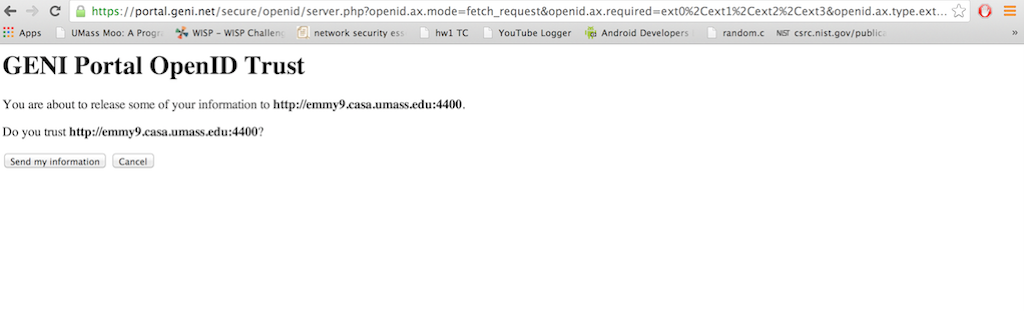
5.1 Login using OpenID
5.2 Plan
Labwiki accounts have already been created for you for this tutorial. To use Labwiki, go to GIMI portal and login with the username and password you have been given.

Figure (1)
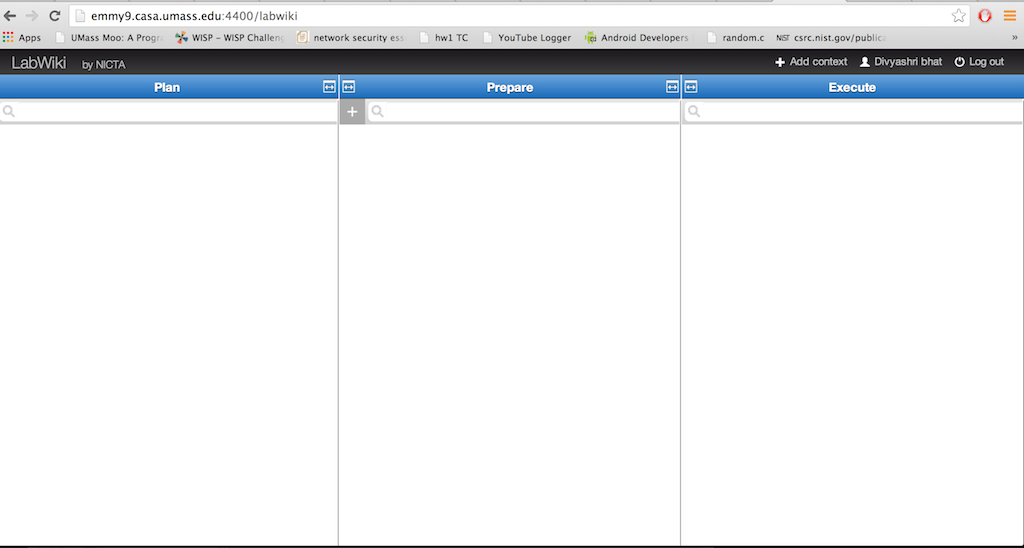
After you have successfully been signed in you will be able to see a screen like the one below.

Figure (2)
The left column could contain the steps to run the experiment or general information about the experiment.

Figure (3)
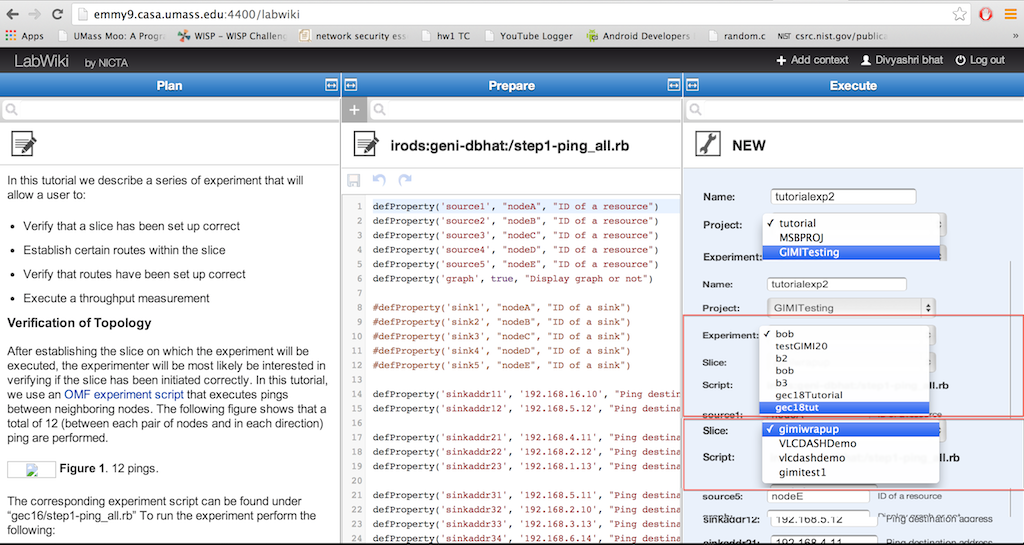
5.2 Prepare
In the Prepare column, you can select the experiment that you want to execute. In this column you will also be able to edit your experiment script.
Figure (4)
After editing, click on the save icon at the top of the column to save your script.
Next, click and drag the icon at the top left corner over to the right column Execute.
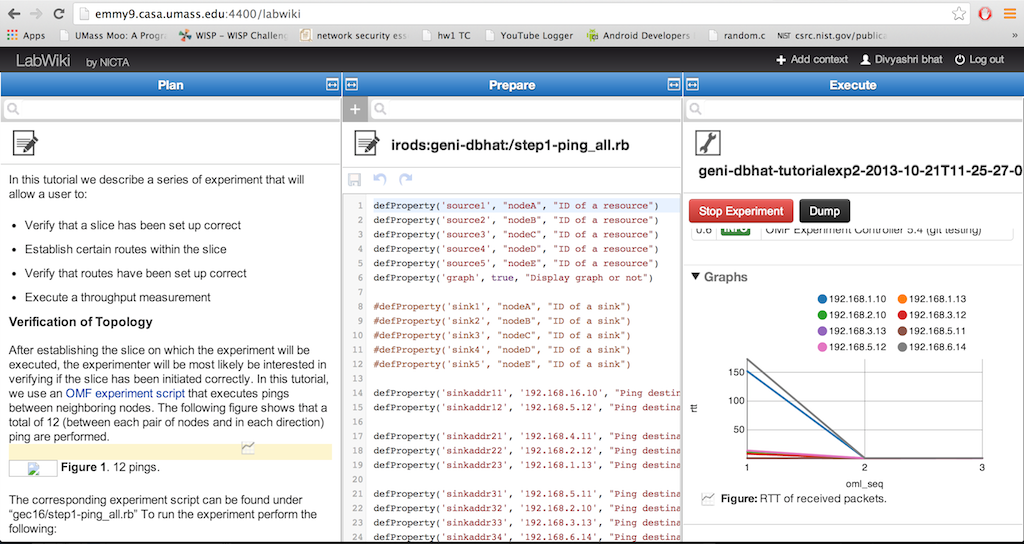
5.3 Execute
Here, you can start your experiment and Visualise it. In the name tab, type in the name you wish to give the experiment. There are no particular rules for this.
Under slice name, type in the name of your slice as you have entered in the Flukes tool while setting up your slice.
Then. scroll towards the bottom of this column and under the tab named Graph, type 'true'.This enables the graph view on your execute column.
Once the experiment starts running you will be able to scroll down and view the graph.

Figure(5)
Click on 'Start Experiment' at the bottom of the screen.
Figure(6)
After a couple of seconds, you can see the graph at the bottom of the screen.
Figure (7)
You can click and drag it to the Plan screen just above Figure 12. This will display the graph along with the experiment description. This graph is also dynamic.
Figure (8)
You can click and drag the experiment description to the Prepare column. This allows you to add any comments or details about the experiment results.
Similarly, Experiments 2 and 3 can be run using the same procedure. Experiment 2 does not have a graph.
Figure(9)
Once you have your slice up and running you can visualize any experiment using LabWiki.
Attachments (15)
- ping.png (35.0 KB) - added by 11 years ago.
- ping.2.png (35.0 KB) - added by 11 years ago.
- GIMIPing_e2e.png (42.9 KB) - added by 11 years ago.
- otg_nmetrics.png (33.1 KB) - added by 11 years ago.
- checkinfoirods.png (312.7 KB) - added by 11 years ago.
- Labwiki_1.png (101.0 KB) - added by 11 years ago.
- Labwiki_2.png (119.5 KB) - added by 11 years ago.
- Labwiki_4.png (343.5 KB) - added by 11 years ago.
- Labwiki_15.png (129.6 KB) - added by 11 years ago.
- Labwiki_11.png (389.3 KB) - added by 11 years ago.
- Labwiki_16.png (433.7 KB) - added by 11 years ago.
- Labwiki_OpenID.png (99.9 KB) - added by 11 years ago.
- Labwiki_sendinfo.png (110.1 KB) - added by 11 years ago.
- Labwiki_19.png (457.3 KB) - added by 11 years ago.
- Labwiki_12.png (368.0 KB) - added by 11 years ago.